1. ArmSom-SDK Release
ArmSom-SDK is a customized version based on Rockchip's general Linux SDK project, providing complete embedded Linux BSP support for RK3588/RK3576 main control development boards.
2. SDK Development Environment Setup
Development environment description is as follows: ArmSom-SDK is developed and tested based on the Ubuntu system. During the development process, Ubuntu 22.04 is mainly used. It is recommended that users use Ubuntu 20.04 or Ubuntu 22.04. The PC system defaults to Windows 11, and when using RockChip's flashing tools, the Windows system is required. Recommended hardware configuration: 64-bit system, hard disk space larger than 80GB. If you perform multiple builds, larger hard disk space will be required.
2.1 Install SDK Dependent Software Packages
Install the software packages required for SDK build. Copy the following content entirely into the terminal for installation:
sudo apt-get update && sudo apt-get install git ssh make gcc libssl-dev \
liblz4-tool expect expect-dev g++ patchelf chrpath gawk texinfo chrpath \
diffstat binfmt-support qemu-user-static live-build bison flex fakeroot \
cmake gcc-multilib g++-multilib unzip device-tree-compiler ncurses-dev \
libgucharmap-2-90-dev bzip2 expat gpgv2 cpp-aarch64-linux-gnu libgmp-dev \
libmpc-dev bc python-is-python3 python3-pip python2 u-boot-tools curl \
python3-pyelftools dpkg-dev
2.2 Install repo
ArmSom-SDK uses repo to download and manage project software repositories.
mkdir ~/bin
curl https://storage.googleapis.com/git-repo-downloads/repo > ~/bin/repo
chmod a+x ~/bin/repo
echo PATH=~/bin:$PATH >> ~/.bashrc
source ~/.bashrc
After executing the above commands, verify that repo -v is installed successfully and runs normally.
2.3 Git Configuration
Set your own git information to ensure normal code pulling in subsequent steps. If you don't need to submit code, you can set any username and email address.
git config --global user.name "your name"
git config --global user.email "your mail"
2.4 Switch to Python 3
If the returned version number is Python3, no further Python version switching is needed. If it is Python2 version or no python is found, you can switch using the following method:
#Check which Python versions are installed in the current system
ls /usr/bin/python*

#Link python to python3
sudo ln -sf /usr/bin/python3 /usr/bin/python

#Re-check default Python version
python -V
3. SDK Source Code Acquisition
ArmSom-SDK code is divided into several git repositories for version management separately. The repo tool can be used for unified downloading, committing, branch switching, and other operations on these git repositories.
Run the following commands to create a directory named armsom-sdk in the current user's home directory, which will be used to store SDK source code.
mkdir ~/armsom-sdk
cd armsom-sdk
repo init -u https://github.com/ArmSoM/manifests.git -b linux -m armsom_linux_generic.xml
.repo/repo/repo sync -c -j4

The ubuntu24.04 repository has enabled git-lfs for managing large files. You can only pull the complete code by executing git lfs pull
4. SDK Updates
We continuously update ArmSom-SDK and synchronize modified content to GitHub in real-time. We welcome all development enthusiasts to jointly manage and maintain the open-source code. If you need to synchronize updated content locally, you can use repo or git to achieve this.
4.1 Update Entire SDK Using repo
First, update .repo/manifests, which contains repo configuration files and records repository version information.
# Enter .repo/manifests directory
cd .repo/manifests

# Switch branch to Linux
git checkout linux

# Pull latest manifests
git pull

#Enter SDK top-level folder
cd ~/armsom-sdk

# Synchronize remote repositories
.repo/repo/repo sync -c
4.2 Update Individual Source Code Repositories Using Git
Sometimes you only want to update a specific repository rather than the entire SDK. Or if you have already modified some SDK repositories, using repo synchronization will fail. In such cases, you need to update individual repositories. Here taking the debian12 repository as an example:
# Enter debian12 directory
cd debain12

# Checkout to corresponding repository's default branch
git checkout lbc-develop-5.10

# Pull git repository
git pull
5. Automatic Firmware Build
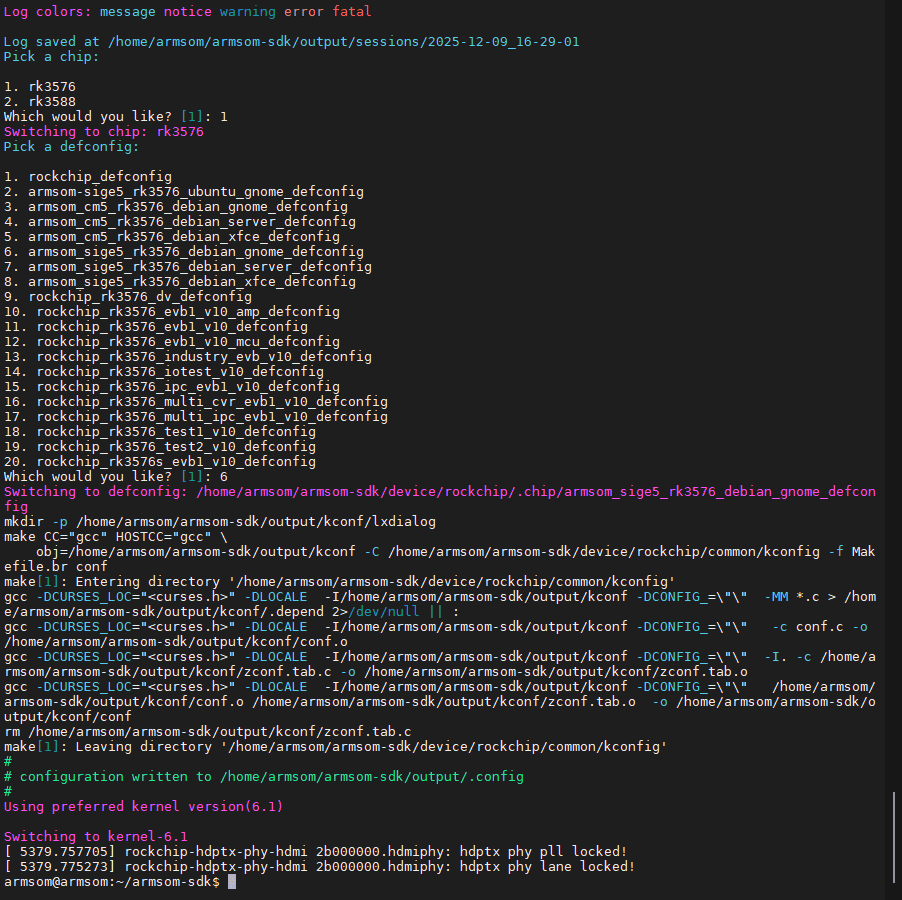
In the SDK top-level folder, execute the following commands to select the target board's main chip model and SDK configuration file.
Execute the following command to select configuration chip and configuration file:
./build.sh chip
After selecting the configuration file, pink prompt text will indicate the kernel version used by the current configuration file.
One-click compilation of U-Boot, kernel, Rootfs and packaging into update.img image:
./build.sh
The built images are saved in the rockdev/ directory.
6. Step-by-Step Firmware Build
When compiling firmware for the first time, it's necessary to run the one-click firmware build. However, during firmware development, it's recommended to use partitioned building, utilizing the SDK's single module build functionality.
6.1 Select SDK Configuration File
First, you still need to select the SDK configuration file. If you have already performed automatic compilation, this step can be skipped. Here taking the sige7 board's Debian system XFCE desktop image as an example:
Select SDK configuration file:
./build.sh armsom-sige7_rk3588_debian_xfce_linux6.1_defconfig
6.2 U-Boot Build
./build.sh uboot
The generated U-Boot image is u-boot/uboot.img.
6.3 Kernel Build
Boot partition kernel image: first generate the kernel deb package, then compile the kernel and pack the generated deb package into the boot partition.
Execute the following commands in order to automatically complete kernel building and packaging:
./build.sh kernel
The generated kernel image is kernel/extboot.img.
6.4 rootfs Build
The SDK mainly supports Ubuntu, Debian, of course other systems are also supported but not explained here.
Ubuntu, Debian support different desktop versions, which have been specified when selecting the SDK configuration file earlier.
Build Debian:
./build.sh debian
Build Ubuntu:
./build.sh ubuntu
The system image name is renamed to linaro-(SOC model)-(desktop version)-rootfs.img, such as linaro-rk3576-gnome-rootfs.img.
6.5 Image Packaging
When u-boot, kernel, and Rootfs are all built, you need to execute ./build.sh firmware for firmware packaging. This mainly checks whether the partition table file exists, whether each partition corresponds to the partition table configuration, and copies or links all files to rockdev/ according to the configuration file.
Firmware packaging:
./build.sh firmware
Generate update.img:
./build.sh updateimg
7. Customizing the Kernel
The kernel we provide already supports most features, but for those who need customized functionalities, it may not be directly usable, hence the need to configure the kernel ourselves. We take the rtc chip hym8563 on the sige7 board as an example to explain how to add drivers and configure the device tree.
7.1 Modifying Kernel Configuration
The Linux kernel configuration system consists of three parts:
Makefile: Distributed in the top-level directory and various subdirectories of the Linux kernel source code, it defines the compilation rules for the Linux kernel.
Configuration files: Provide users with configuration options. For example, the Kconfig files define configuration items. During compilation, the arch/arm64/configs/armsom_linux_rk3588_defconfig file is used to assign values to these configuration items.
Configuration tools: Include the configuration command interpreter and the configuration user interface (Linux provides user configuration interfaces based on character interface, Ncurses graphical interface, and Xwindows graphical interface, corresponding to make config, make menuconfig, and make xconfig respectively).
To customize the configuration file, you can modify the definition of RK_KERNEL_DEFCONFIG in the corresponding file at device/rockchip/rk3588/ on the board.
#Execute the command
make menuconfig KCONFIG_CONFIG=arch/arm64/configs/armsom_linux_rk3588_defconfig ARCH=arm64
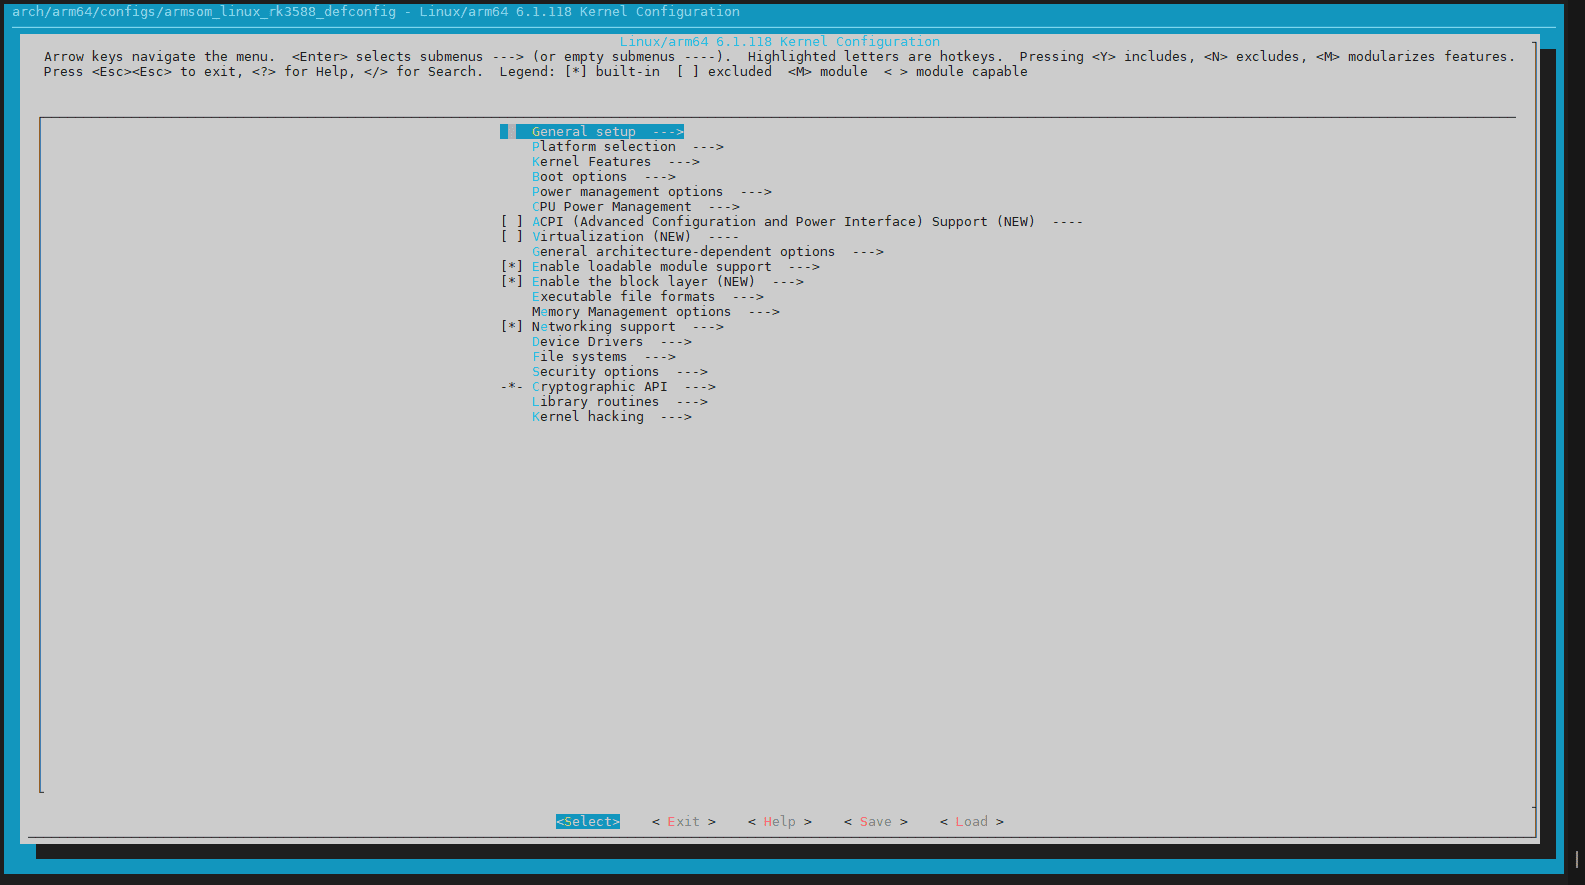 We choose to configure the hym8563 driver for the board. Pressing "/" while in English input mode allows for searching. Enter "8563" to locate the configuration option:
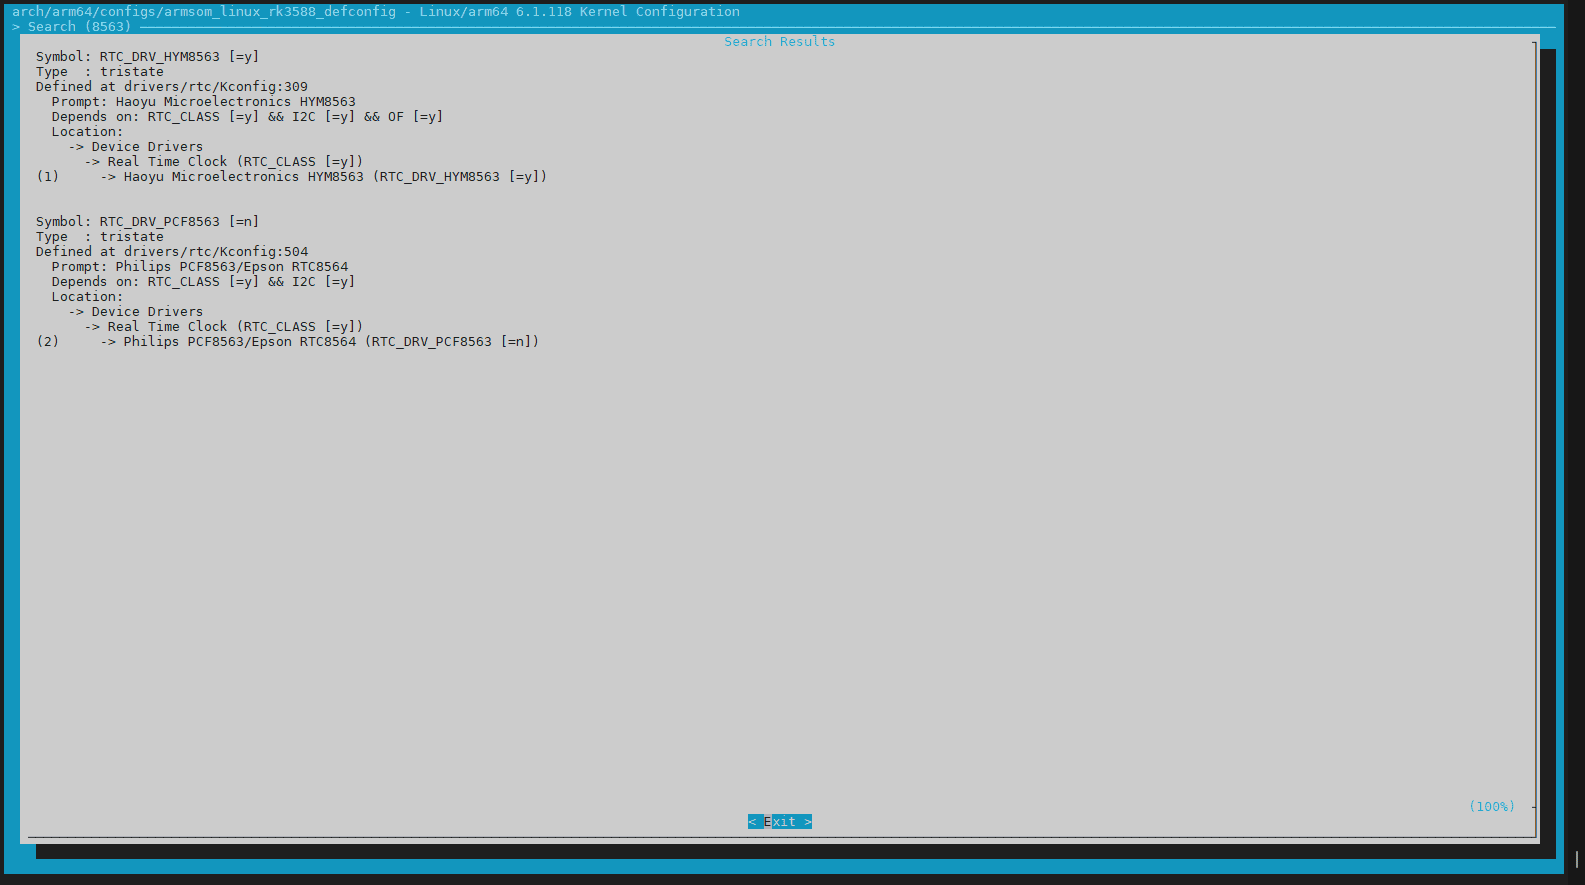 Press "1" to directly jump to the corresponding option, then press the spacebar to select the content.
After modification, select "Save" in the bottom right corner. Note: Do not save to the original path. Instead, save to .config. Then use the following commands to save the defconfig file and overwrite the original configuration file.

#Save the defconfig file
make savedefconfig ARCH=arm64

#Overwrite the original configuration file
cp defconfig arch/arm64/configs/armsom_linux_rk3588_defconfig
If you know the driver name, you can also directly add or modify it in the armsom_linux_rk3588_defconfig file.
7.2 Device Tree Files
In the sige series boards, each board has its own main device tree, located in /boot/dtb
root@armsom:~# ls /boot/dtb/ -al
total 1708
drwxrwxr-x 3 root root   4096 Dec 23  2025 .
drwxr-xr-x 7 root root   4096 Aug 26 23:23 ..
drwxrwxr-x 2 root root   4096 Dec 23  2025 overlay
-rw-rw-r-- 1 root root 277578 Dec 23  2025 rk3576-armsom-cm5-io.dtb
-rw-rw-r-- 1 root root 280081 Dec 23  2025 rk3576-armsom-sige5.dtb
-rw-rw-r-- 1 root root 295991 Dec 23  2025 rk3576-evb1-v10-linux.dtb
-rw-rw-r-- 1 root root 278216 Dec 23  2025 rk3588-armsom-aim7-io.dtb
-rw-rw-r-- 1 root root 285123 Dec 23  2025 rk3588-armsom-sige7.dtb
-rw-rw-r-- 1 root root 286305 Dec 23  2025 rk3588-armsom-w3.dtb
The main device tree used by the board is specified by /boot/rk-kernel.dtb. rk-kernel.dtb is a symbolic link pointing to dtb/rk3588-armsom-sige7.dtb. Therefore, the system uses this device tree to boot. If you want to switch the device tree:
#Navigate to the /boot directory
cd /boot

#Switch to boot with the rk3588-***.dtb device tree
ln -sf dtb/rk3588-***.dtb rk-kernel.dtb
7.3 Configuration Files
The configuration files under /boot/uEnv can configure the enabling/disabling of device tree overlays, kernel boot parameters, and the kernel to boot.
root@armsom:/boot# ls /boot/uEnv/ -la
total 24
drwxrwxr-x 2 root root 4096 Aug 26  2025 .
drwxr-xr-x 7 root root 4096 Aug 26 23:23 ..
lrwxrwxrwx 1 root root   20 Aug 26  2025 uEnv.txt -> uEnvarmsom-sige7.txt
-rw-rw-r-- 1 root root  228 Dec 23  2025 uEnvArmsom.txt
-rw-rw-r-- 1 root root 1794 Dec 23  2025 uEnvarmsom-aim7-io.txt
-rw-rw-r-- 1 root root 2058 Dec 23  2025 uEnvarmsom-sige7.txt
-rw-rw-r-- 1 root root 1794 Dec 23  2025 uEnvarmsom-w3.txt
The configuration files contain information such as the kernel version, device tree overlays, and boot parameters.
7.4 Device Tree Overlays
Device tree overlays are located in /boot/dtb/overlay
root@armsom:/boot# ls /boot/dtb/overlay
rk3588-armsom-can1-m0.dtbo
rk3588-armsom-can1-m1.dtbo
......
Currently, they only include configurations for the board's 40-pin header, camera, and screen. You can refer to other device trees in arch/arm64/boot/dts/rockchip/overlay in the SDK to add required functionalities.
The method to configure device tree overlays is to modify the device tree overlay configuration file /boot/uEnv/uEnv.txt.
#Modify the configuration file for your board
sudo vi /boot/uEnv/uEnv.txt

#Below is the content of the sige7 configuration file
uname_r=6.1.118-rk3588
initrd=initrd-6.1
size=0x1000000
cmdline="earlyprintk console=ttyFIQ0 console=tty1 consoleblank=0 loglevel=7 rootwait rw rootfstype=ext4"

enable_uboot_overlays=1
#overlay_start

#40pin
#dtoverlay=/dtb/overlay/rk3588-armsom-can1-m0.dtbo
......
#dtoverlay=/dtb/overlay/rk3588-armsom-uart7-m2.dtbo


# Display
#dtoverlay=/dtb/overlay/rk3588-armsom-sige7-display-1200x1900-10.1hd-overlay.dtbo

# CAM0
#dtoverlay=/dtb/overlay/rk3588-armsom-sige7-camera-ov13850-csi0-overlay.dtbo
# CAM1
#dtoverlay=/dtb/overlay/rk3588-armsom-sige7-camera-ov13850-csi1-overlay.dtbo

#overlay_end
To enable a device tree overlay, remove the comment symbol from the corresponding line, i.e., delete '#'. To disable a device tree overlay, add a comment symbol to the beginning of the corresponding line, i.e., add '#'. As seen above, the 40-pin, camera, and screen functionalities for sige7 are disabled by default and need to be manually enabled.
7.5 Updating the Kernel
After modifying the kernel drivers or device tree, you can install the deb packages compiled from the SDK.
After executing ./build.sh kernel, four installation packages will be generated in the current directory.
lhd@armsom:~/customized_project/armsom-sdk$ ls *.deb
linux-headers-6.1.118-rk3588_6.1.118-rk3588-203_arm64.deb  linux-image-6.1.118-rk3588-dbg_6.1.118-rk3588-203_arm64.deb
linux-image-6.1.118-rk3588_6.1.118-rk3588-203_arm64.deb    linux-libc-dev_6.1.118-rk3588-203_arm64.deb
- linux-headers-6.1.118-rk3588_6.1.118-rk3588-203_arm64.deb This package contains the kernel source code. After installation, the kernel source code will be copied to /usr/src/linux-headers-6.1.118-rk3588.
- linux-image-6.1.118-rk3588-dbg_6.1.118-rk3588-203_arm64.deb This package contains the kernel and drivers needed for debugging, mainly used for debugging when the system encounters errors or crashes (optional installation).
- linux-image-6.1.118-rk3588_6.1.118-rk3588-203_arm64.deb This package includes the kernel, drivers, device tree-related files, and update scripts.
- linux-libc-dev_6.1.118-rk3588-203_arm64.deb This package contains some header files for libc (optional installation).
There are four packages in total for the upgrade, but only two need to be installed:
1.linux-headers-6.1.118-rk3588_6.1.118-rk3588-203_arm64.deb
2.linux-image-6.1.118-rk3588_6.1.118-rk3588-203_arm64.deb
After installation, reboot.