1. Google Drive resource introduction
ArmSoM organizes supporting resources by product on Google Drive, including hardware resources, software resources, system images and development tools, as well as read-before-use notes and quality inspection reports. Open your product's folder and read its instructions before downloading.
1.1 Resource overview
These resources help you understand the hardware design, develop software, install an OS and debug the board. Start with the product's read-before-use notes, which cover power, connections and first-use precautions. Look in the corresponding folder for supporting files such as quality inspection reports.
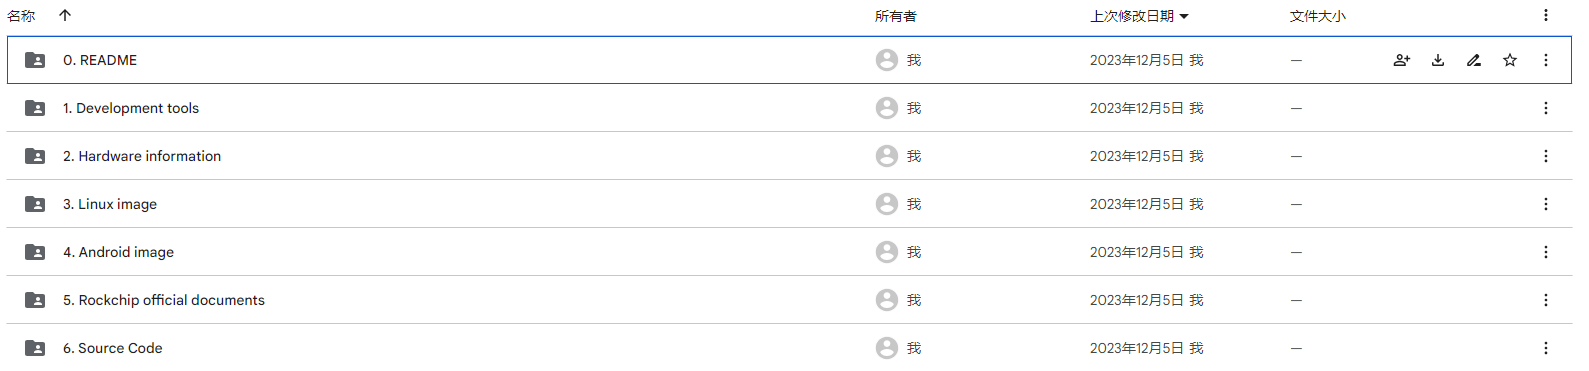
Available resources, OS versions, desktop environments and tools vary by product. Refer to the files and notes in the corresponding product folder. The sections below describe resource categories; not every board provides every combination.
1.2 Hardware resources
Hardware resources describe board interfaces, circuit connections and dimensions to help with peripheral connections, carrier board development and mechanical design.
| Resource | Purpose |
|---|---|
| Schematics | Check power circuits, interfaces and connections between components |
| Dimension drawings and DXF files | Check board dimensions, mounting holes and connector positions |
| Hardware design files | Reference product or development-kit designs; available formats depend on the folder contents |
| Datasheets for major components | Look up chip functions, electrical specifications and interfaces |
To view Allegro design files in Altium Designer, see Import Allegro PCB files.
1.3 Software resources
Software resources primarily include development documentation and prebuilt system images for reference, OS installation and application deployment.
| Resource | Purpose |
|---|---|
| Development documentation | Consult chip vendor references, peripheral configuration instructions and software development guides for the product's platform |
| System images | Flash to the board to run the system; see the next section for OS versions, desktop variants and filenames |
1.4 System images
System images contain a system built for a specific board. Confirm the product model before choosing an OS version and desktop variant.
1.4.1 OS versions
| System | Common versions or identifiers | Description |
|---|---|---|
| Debian | Debian 11 / bullseye; Debian 12 / bookworm | Choose from the versions available for your board according to application requirements; package versions differ |
| Ubuntu | Ubuntu 22.04 LTS / jammy | For desktop or service applications using the Ubuntu software ecosystem |
| Armbian | Armbian and distribution details in the filename or notes | Based on Debian or Ubuntu; see the product folder for versions and supported boards |
| Android | Android and a version number | For Android application and UI development; use a version provided for your board |
For example, the Sige6 product documentation lists Debian 11, while CM5 and AIM7 list Debian 12 and Ubuntu 22.04. Download from your own product's folder.
1.4.2 Desktop and command-line variants
The OS version and desktop environment are separate choices. For example, Debian 12 identifies the distribution, while XFCE identifies the desktop environment.
| Type | Common filename identifiers | Use case |
|---|---|---|
| GNOME desktop | gnome | Use graphical applications with a monitor, keyboard and mouse |
| XFCE desktop | xfce / xfce4 | Use a lighter graphical desktop with lower resource requirements |
| Server / CLI | server / cli | No graphical desktop preinstalled; manage the board over serial or SSH and deploy services |
For an HDMI desktop, graphical applications or video previews, choose a desktop image provided for your board. For services managed primarily over SSH, consider Server / CLI. Tutorials that use a desktop require a graphical environment, which a command-line image does not provide by default.
1.4.3 Identify image files
Image filenames commonly include the product, OS version or codename, desktop environment, architecture and date. Naming varies by product; this historical filename illustrates the fields:
armsom-w3-debian-bullseye-xfce4-arm64-20231115
| Field | Meaning |
|---|---|
armsom-w3 | Target product: ArmSoM W3 |
debian-bullseye | Debian 11 (Bullseye) |
xfce4 | XFCE graphical desktop |
arm64 | 64-bit ARM architecture |
20231115 | Date in YYYYMMDD format: November 15, 2023 |
Extract archives as instructed in their accompanying notes. update.img is typically a firmware upgrade package, while rootfs.img is typically a root filesystem partition image. The .img extension alone does not identify the flashing method.
Check the product model, hardware revision and flashing instructions. Boards with the same SoC do not necessarily use interchangeable images. Do not flash a standalone rootfs.img as complete system firmware.
1.4.4 After downloading
- Read the product folder's notes and confirm the board, OS version, desktop variant and target storage. If checksums are provided, verify the downloaded files.
- Use the appropriate flashing tools: see Flash a system image for Rockchip products, or the Sige6 product guide for Allwinner Sige6.
- Follow the product guide to connect, power on and log in to the board. See Check board system information to confirm the installed version.
- Before installing packages on Debian, Ubuntu or Armbian, see Update APT sources to check the network, system time and package sources.
1.5 Development tools
Choose tools for your board's chip platform. These tools generally run on the computer connected to the board. Download only the tools needed for the operation you are performing.
1.5.1 Rockchip development tools
| Tool | Purpose | Use case |
|---|---|---|
| RKDevTool | Upgrade partition images or complete firmware | Flash over USB from a Windows computer |
| RK Driver Assistant (DriverAssistant) | Install Rockchip USB drivers | Set up a Windows computer for USB flashing |
| Linux_Upgrade_Tool | Upgrade firmware | Flash over USB from a Linux computer |
| SD_Disk_Tool | Write compatible Rockchip firmware to SD cards | Create boot or upgrade cards as described in the board's guide |
| FactoryTool | Flash multiple USB devices for production | Write firmware to boards in batches |
| Rockchip device identifier tool | Write identifiers such as serial numbers and MAC addresses | Configure device identities during production |
1.5.2 Allwinner development tools
The following list follows the Sige6 product documentation. Look for the tools in the Sige6 development-tools folder. The Phoenix flashing tools listed here run on Windows.
| Tool | Purpose | Use case |
|---|---|---|
| PhoenixSuit | Upgrade individual partitions or complete firmware | Flash Sige6 images to eMMC over USB |
| PhoenixCard | Create SD card firmware | Create a Sige6 boot card, selecting the mode described in the product guide |
| PhoenixUSBpro | Flash multiple USB devices for production | Write firmware to boards in batches |
USB driver (InstallUSBDrv.bat) | Allow Windows to recognize Allwinner USB flashing devices | Install before using PhoenixSuit |
| Device identifier tool | Write device identification data | Production configuration; follow the accompanying tool instructions |
1.5.3 Common tools
| Tool | Purpose | Use case |
|---|---|---|
| ADB tools | Run debugging commands or transfer files on systems with ADB enabled | Android or other images with an active ADB service |
| CH340 serial driver | Recognize USB-to-serial adapters using a CH340 chip | Serial debugging on Windows; other chips require their corresponding drivers |
| Serial terminal (such as MobaXterm) | Read boot logs and access the command line | Serial debugging; MobaXterm also supports SSH connections |
| SDCardFormatter | Format SD cards | Prepare or reuse storage cards; it does not flash images |
| IP scanner | Find device addresses on the local network | Help locate a board whose IP address is unknown |
USB flashing drivers and USB-to-serial drivers serve different purposes and are not interchangeable. A serial driver lets the computer recognize the adapter; a terminal application opens the serial port. Follow the board's documentation for wiring and baud rate.