Start the system
There are two steps required when running the product at the beginning: burning the system and starting the system
I have already explained how to burn the system before. Now I will explain to you how to start the system.
Starting the system requires correctly connecting the storage device and performing operations such as power-on and startup. For details, please refer to this article.
System login can use serial port login or SSH login. If we have access to the screen, we can directly enter the desktop system through the manager displayed on the display screen.
1. How to start the product
ArmSoM series products support multiple boot methods. Our current products mainly use eMMC and SD cards to boot, and some product hardware supports NVME boot.
For products without onboard eMMC, only one boot method is supported: SD card. When the system image is burned into the SD card, it is booted from the SD card.
For products with onboard eMMC and a TF card slot, both eMMC and SD card boot methods are supported.
SD card startup -> eMMC startup -> SD card and eMMC have no images, startup fails
2. Startup Precautions
The image of the Linux system is burned into the emmc or SD card, and the product will run automatically when powered on.
The following are the product startup notes:
Correctly connect on-board peripherals according to the product interface diagram, especially devices that do not support hot swap (MIPI-CSI display, MIPI-DSI camera, PCIE-WIFI network card, PCIE-4G network card, SSD hard drive, etc.), Unplugging and plugging in while powered on may damage the device and prevent it from working properly.
When using the display, please note that the MIPI interface does not support hot swapping. There are two types of HDMI interfaces, one is the standard HDMI interface and the other is micro-HDMI. The two interfaces cannot be directly connected. , you need to use a switching interface for conversion connection. If it is a monitor with a VGA or DP interface, it can also be displayed by using an adapter.
The product supports mouse and keyboard, which can be connected through USB interface if necessary.
Use the power source to power the product. Note: The power supply specifications marked in the product documentation are the specifications for normal use of the product. If there are many peripherals connected, please use a power supply with the same voltage and higher power.
When the image is started for the first time after burning, it will enter Recovery mode to configure the product. It will automatically restart after a minute or two of power-on. After restarting, the system will run normally.
3. Login method
3.1. Serial terminal access
Our product defines the 6th (GND), 8th (TX), and 10th (RX) pins on the 40PIN GPIO pin as a UART serial communication interface or has a separate Debug interface , to facilitate troubleshooting problems in the early startup phase of the system.
Connect the USB to TTL serial cable as follows:
| ArmSoM Products | Connectivity | Serial Port Modules |
|---|---|---|
| GND (pin 6) | ---> | GND |
| TX (pin 8) | ---> | RX |
| RX (pin 10) | ---> | TX |
3.1.2. Instructions for use
Serial port parameter configuration
The default serial port configuration of ArmSoM products based on Rockchip chips is as follows:
baudrate: 1500000
data bit: 8
stop bit: 1
parity: none
flow control: none
3.1.3. Using serial port debugging on Windows
Generally use putty or SecureCRT on Windows. Among them we recommend using the free version of MobaXterm. This is a powerful terminal software. Let me introduce it here. The usage of MobaXterm is similar to it.
Go here to download MobaXterm:
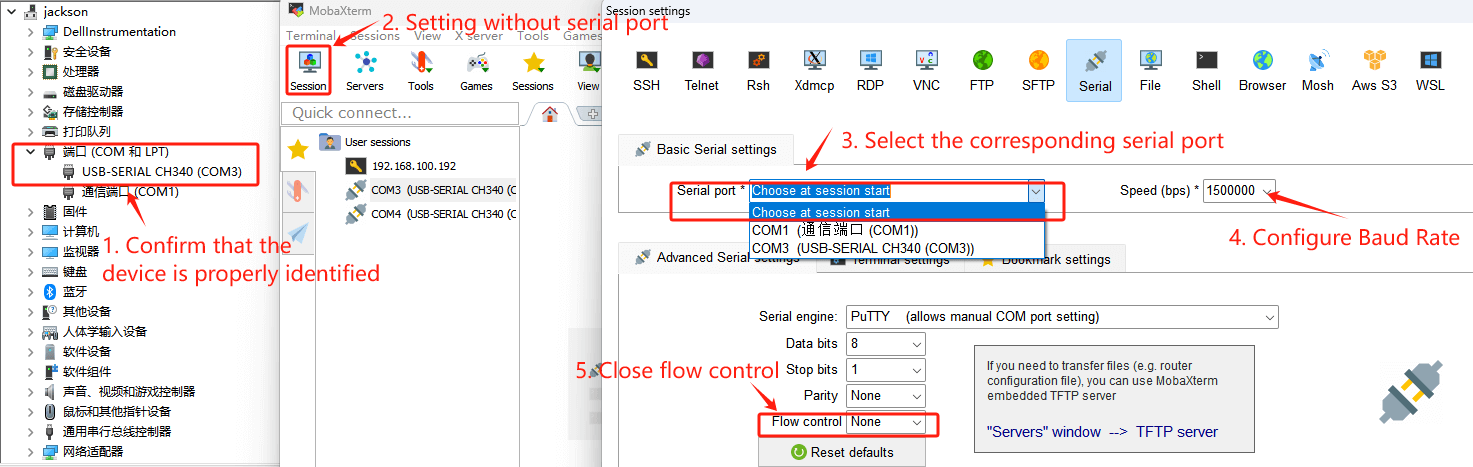
Connect the serial port module to the computer, then open the device manager of the computer and check the name of the port.
1. Select session as Serial.
2. Change the Serial port to the COM port found in Device Manager.
3. Set Speed (bsp) to 1500000.
4. Click the OK button.
3.1.4. Using serial port debugging on Linux
There are several options available on Linux:
minicom picocom
- kermit
The following will introduce the use of minicom. For other software, please refer to the online software usage.
3.1.4.1 Install minicom
sudo apt-get install minicom
After connecting the serial port cable, take a look at what the serial port device file is. The following example is /dev/ttyUSB0
# ls /dev/ttyUSB*
/dev/ttyUSB0
There is a situation where the serial port has no permission to read. Temporary solution: via chmod command
sudo chmod 777 /dev/ttyUSB0
Permanent processing: By adding the current user to the dialout group
sudo usermod -aG dialout current username
3.1.4.2 Set up minicom
- Edit ~/.bashrc, add the following parameters, and it will take effect after reopening a new terminal.
alias minicom='minicom -w -t xterm -l -R UTF-8'
- Create and edit the file ~/.minirc.rockchip and add the following content. The purpose of this place is to set the configuration of rockchip.
pu port /dev/ttyUSB0
pu baudrate 1500000
pu bits 8
pu parity N
pu stop bits 1
pu rtscts No
- Start minicom Execute the following command to connect ArmSoM products based on Rockchip chips. The parameter rockchip is to use the above configuration.
minicom rockchip
Q1: If device manager does not see the device
A1: You need to install the driver corresponding to the serial port yourself
Q2: When using the debugging console, there is system startup information on the screen, but the keyboard cannot be used to enter text.
A2: Hardware Flow Control may be enabled by default. Turning off Hardware Flow Control should return to normal.
3.2. HDMI monitor and mouse and keyboard
As long as it is a product with a desktop system, plug in the HDMI interface data cable to connect to the screen, plug in the mouse and keyboard, and enter the desktop to operate the serial port, file system, etc.
3.3. SSH access
SSH is pre-integrated in the official ArmSoM Linux image to facilitate remote access to the terminal. This guide uses ArmSoM-W3 as an example. The operations for other motherboards are similar.
3.3.1. Necessary preparations
- ArmSoM Internet-enabled products
- RJ45 network cable
- Host PC
- Router/Switch
Connect ArmSoM-W3 to a router/switch on the same network segment as the host through a network cable.
3.3.2. Check SSH service status
After ArmSoM-W3 starts, you can view the SSH service status through the following command:
sudo service ssh status
If the SSH service is abnormal or uninstalled, you can restart or reinstall it with the following command: Restart the service:
service sshd restart
re-install:
sudo apt-get update
sudo apt-get install ssh
3.3.3. Query IP address
To view through the command line, you can use the serial port/adb/ to directly connect to hdmi. Enter the following command in the terminal to view the IP address.
ip a
The IP address in the same network segment as the host is the IP address required for SSH connection. For example, in the following output, 192.168.10.59 is the IP address we need:
armsom@armsom-w3:~$ ip a
1: lo: <LOOPBACK,UP,LOWER_UP> mtu 65536 qdisc noqueue state UNKNOWN group default qlen 1000
     link/loopback 00:00:00:00:00:00 brd 00:00:00:00:00:00
     inet 127.0.0.1/8 scope host lo
        valid_lft forever preferred_lft forever
2: enP4p65s0: <BROADCAST,MULTICAST,UP,LOWER_UP> mtu 1500 qdisc mq state UP group default qlen 1000
     link/ether 8a:e5:4e:f3:ea:5a brd ff:ff:ff:ff:ff:ff permaddr 2a:ab:ea:32:56:cc
     inet 192.168.10.59/24 brd 192.168.10.255 scope global dynamic noprefixroute enP4p65s0
        valid_lft 85861sec preferred_lft 85861sec
Use Angryip to find the IP address of the product
When you cannot directly operate the motherboard to obtain the IP address without a screen or remotely, you can use this method to query the IP address.
First, the host PC needs to download Angryip, and then ensure that the host PC and the ArmSoM product are in the same LAN.
Open Angryip and select the IP range, which ranges from 192.168.10.0 - 192.168.10.255 (select the network segment where the host and motherboard are located). Click Start as shown in the picture.

Ctrl + F Search for the armsom keyword and find the IP address.
3.3.4. Connection
Open the host terminal and check whether they are on the same network segment through the ping command:
Ping the IP address of the ArmSoM product
When connected, the ping results should be normal.
*SSH login to ArmSoM-W3
IP address of ssh name@armsom-w3
For example: ssh armsom@192.168.0.1
- If local domain is supported, you can use the following command instead of scanning the IP address of ArmSoM-W3.
ping armsom-w3.local
ssh armsom@armsom-w3.local
Once properly connected, the terminal switches to the remote terminal of ArmSoM-W3 as shown below:
Linux armsom-w3 5.10.160 #1 SMP Wed Nov 8 15:45:13 CST 2023 aarch64

The programs included with the Debian GNU/Linux system are free software;
the exact distribution terms for each program are described in the
individual files in /usr/share/doc/*/copyright.

Debian GNU/Linux comes with ABSOLUTELY NO WARRANTY, to the extent
permitted by applicable law.
armsom@armsom-w3:~$ ip a
1: lo: <LOOPBACK,UP,LOWER_UP> mtu 65536 qdisc noqueue state UNKNOWN group default qlen 1000
     link/loopback 00:00:00:00:00:00 brd 00:00:00:00:00:00
     inet 127.0.0.1/8 scope host lo
        valid_lft forever preferred_lft forever
2: enP4p65s0: <BROADCAST,MULTICAST,UP,LOWER_UP> mtu 1500 qdisc mq state UP group default qlen 1000
     link/ether 8a:e5:4e:f3:ea:5a brd ff:ff:ff:ff:ff:ff permaddr 2a:ab:ea:32:56:cc
     inet 192.168.10.59/24 brd 192.168.10.255 scope global dynamic noprefixroute enP4p65s0
        valid_lft 85861sec preferred_lft 85861sec
You can now operate the terminal.
3.3.4. Login username and password
| User | Username | Password |
|---|---|---|
| superuser | root | root |
| Ordinary user | armsom | armsom |
First enter the username (case sensitive) and then enter the password (there will be no text prompt when entering the password, so you need to pay attention to the Chinese input method and capitalization)
If the username and password are correct, you will enter the terminal.
To change the username, use the usermod command, and to change the password, use the passwd command.