Product Introduction:Sige1
Let's get to know Sige1 in 5 minutes.
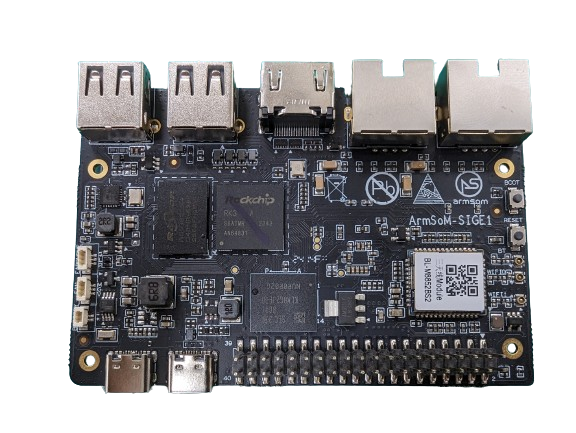
Overview
The ArmSoM-Sige1 utilizes the Rockchip RK3528, a new-generation intelligent set-top box and multimedia application chip. It is applicable to IPTV/OTT boxes, cloud terminals, and integrated products. It is a high-performance, low-power 4K player with decoding capability supporting up to 8K. Additionally, it also supports the AVS2 and HDR VIVID standards.
Key Parameter
- SoC: Rockchip RK3528
- CPU: RK3528 Quad-core Cortex-A53
- GPU: ARM Mali-450 GPU
- VPU/Decoding:
- Hardware Decoding: Supports 60fps playback of 4K ultra-high-definition video with up to 10-bit pixels. Supports video standards including H.265, H.264, AVS2, etc.
- Hardware Encoding: Supports 60fps capture of 1080p high-definition video. Supports H.265 and H.264 encoding.
- RAM: 4GB 32-bit LPDDR4x, default 4GB (RK3528 supports maximum 4GB)
- Flash: 32GB eMMC, default eMMC 32GB
- Operating Voltage: Wide range input voltage, from 4.5V to 18V (voltage error ±5%)
- Operating Temperature: 0°C to 80°C
- Operating System:
- Officially Supported by Rockchip: Android 9.0_box, Debian11, Buildroot
- Third-party Support: Armbian
- PCB: 6-layer PCB board design
- Weight: 38.9g
- Dimensions: 92mm × 62mm
Hardware
Hardware Interface
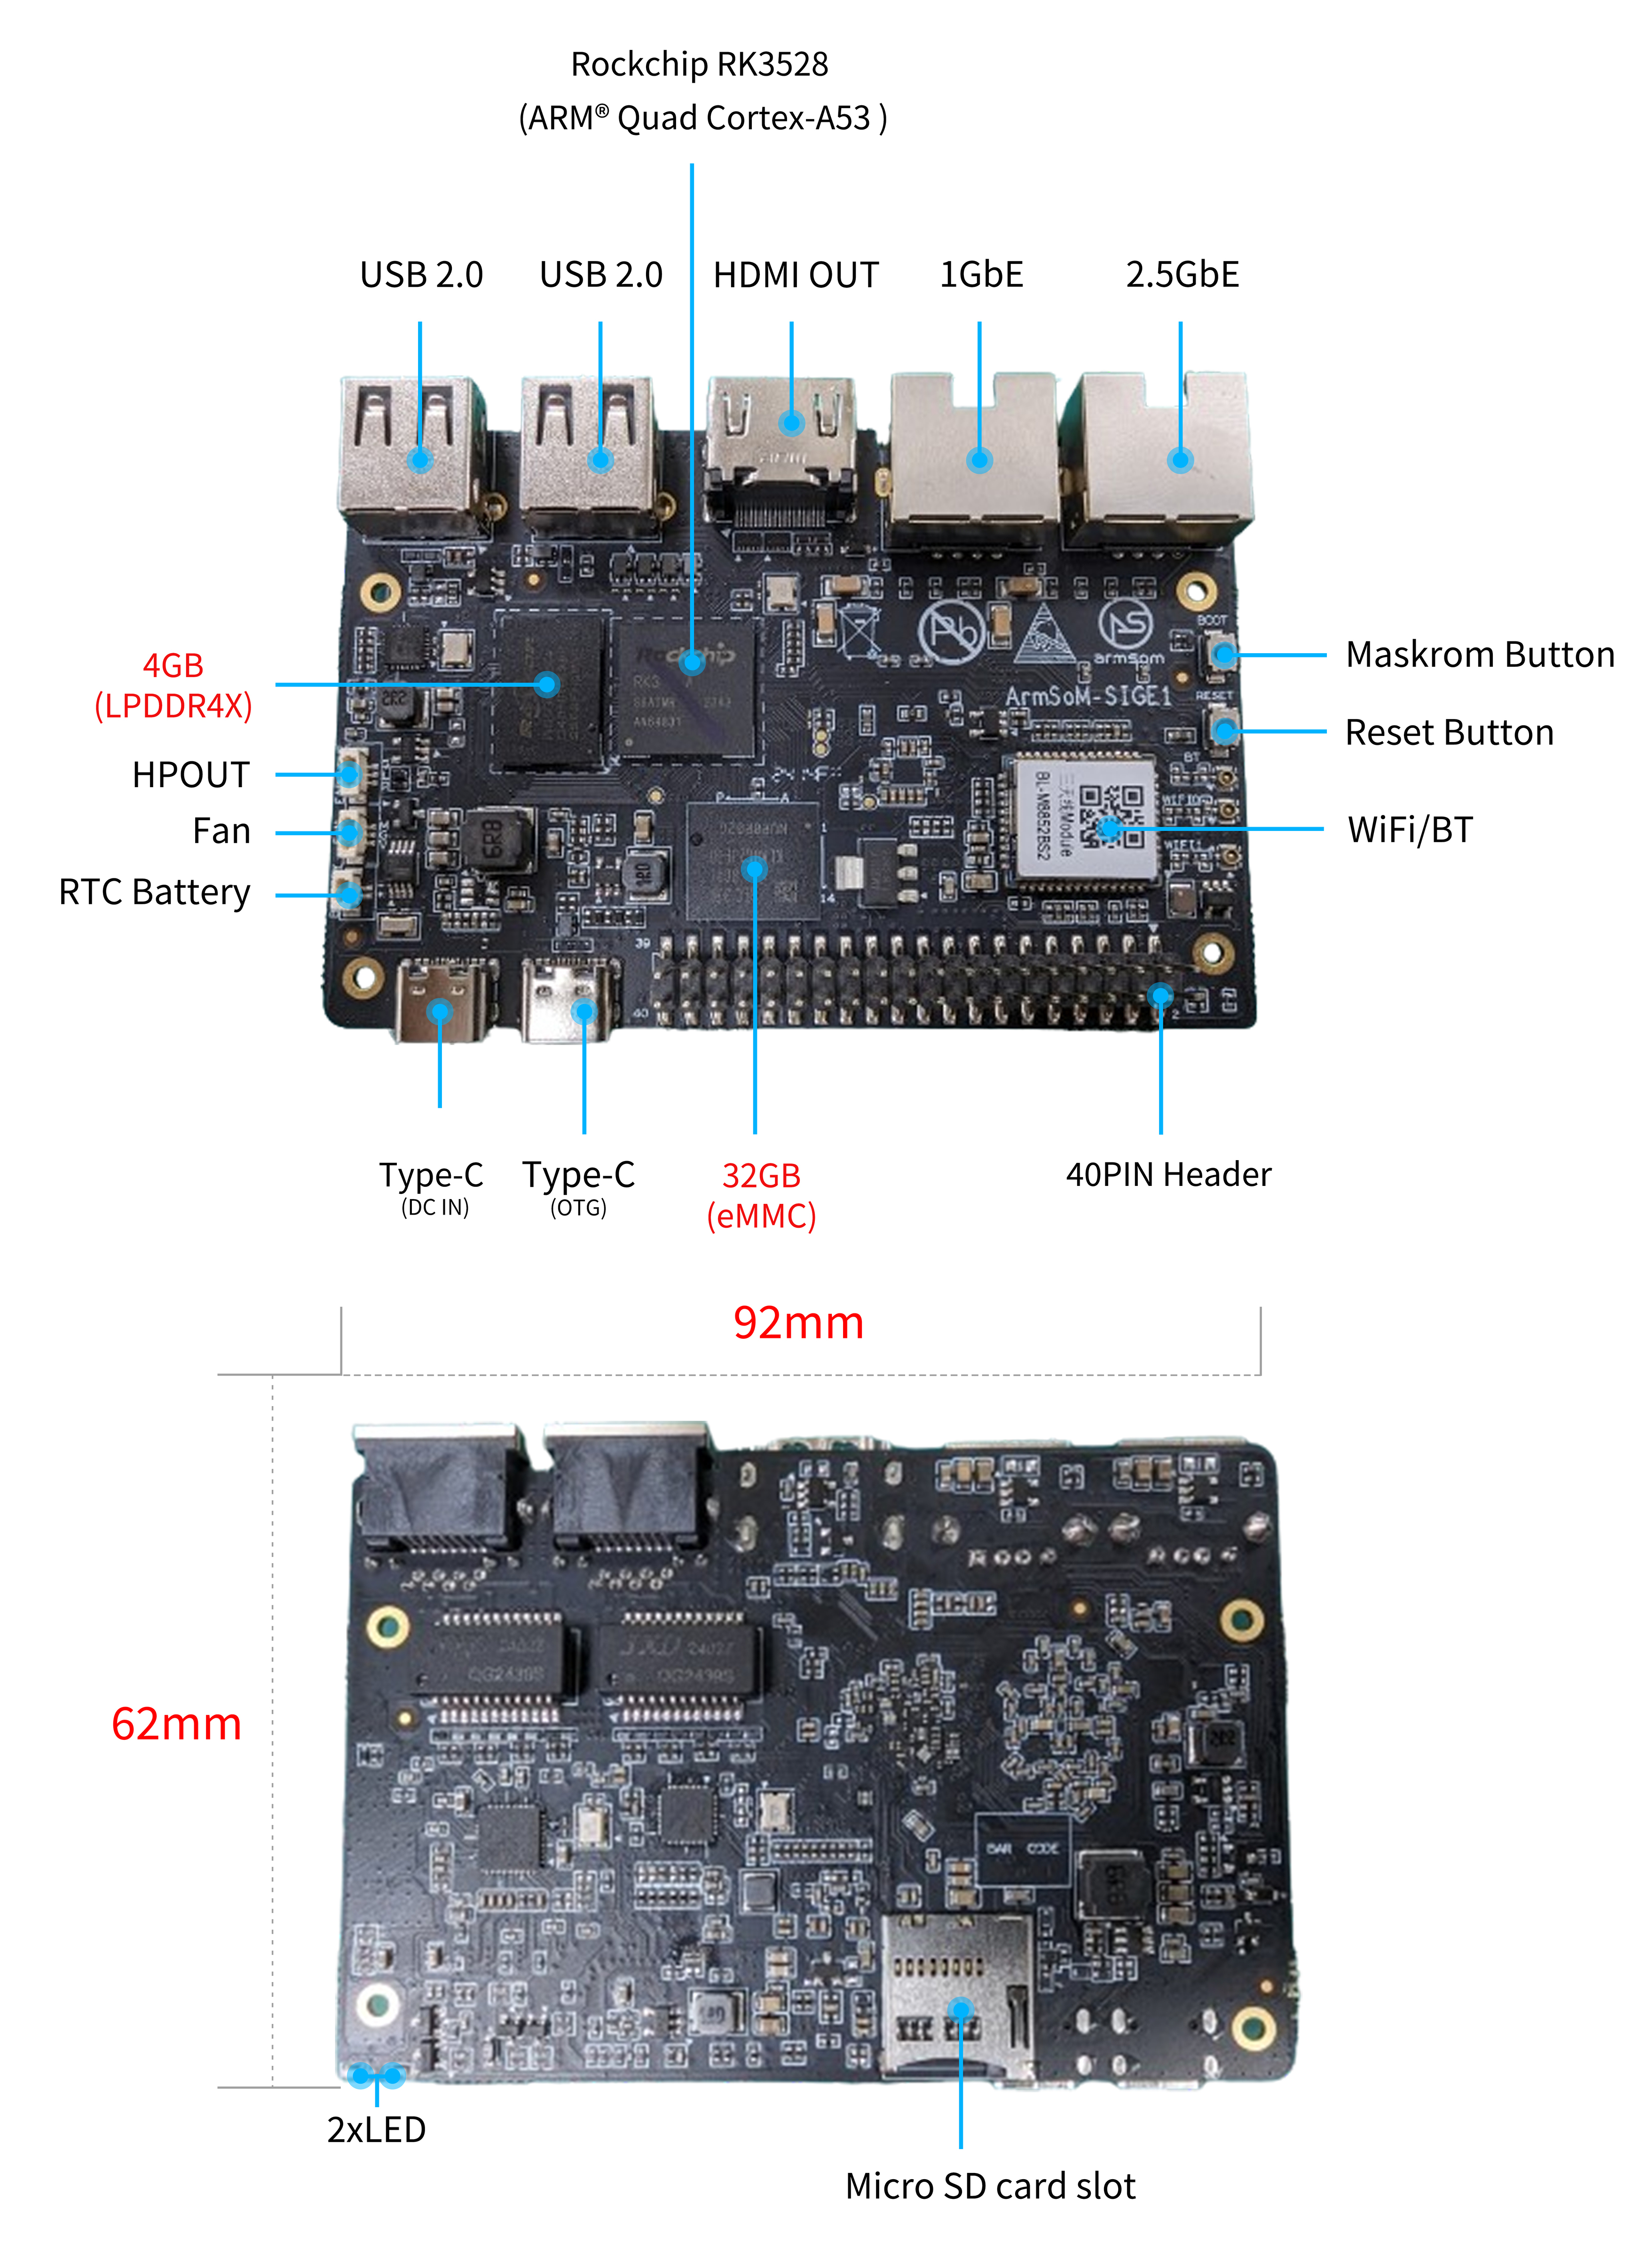
On the Sige1, there are two Type-C interfaces that look identical, but only one of them (Type-C DC IN) serves as the power input interface.
Hardware Spec
| Category | Functional Parameters |
|---|---|
| SOC | |
| CPU | |
| GPU | |
| VPU/Codec | |
| RAM | |
| Flash | |
| Network | |
| Video Output | |
| Audio | |
| USB Ports | |
| 40-pin | |
| Others | |
| Power | |
| Buttons | |
| System | |
| Dimensions | |
| Operating Temperature |
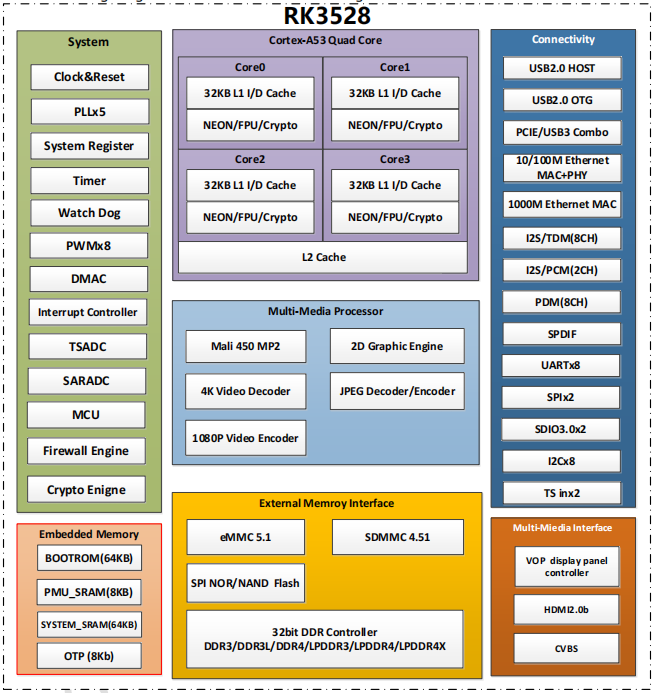
RK3528 Block Diagram
Hardware Pin Definitions
40-pin header
| GPIO number | Function | Pin | Pin | Function | GPIO number |
|---|---|---|---|---|---|
| +3.3V | 1 | 2 | +5.0V | ||
| 130 | I2C1_SDA_M0 / UART3_RTSN / I2S1_SDI3 / GPIO4_A2_d / | 3 | 4 | +5.0V | |
| 131 | I2C1_SCL_M0 / UART3_CTSN / I2S1_SDI2 / GPIO4_A3_d | 5 | 6 | GND | |
| 1 | REF_CLK_OUT_M0 /GPIO0_A1 | 7 | 8 | UART0_TX_M0 / JTAG_MCU_TCK_M1 / JTAG_CPU_TCK_M1 / GPIO4_D0_d | 152 |
| GND | 9 | 10 | GPIO0_B6 / UART0_RX_M0 / JTAG_MCU_TMS_M1 / JTAG_CPU_TMS_M1 / GPIO4_C7_u | 151 | |
| 0 | GPIO0_A0 | 11 | 12 | I2S1_SCLK / UART1_RTSN / GPIO4_A5_d | 133 |
13 | 14 | GND | |||
15 | 16 | ||||
| +3.3V | 17 | 18 | |||
| 138 | SPI0_MOSI / PDM_SDI0 / I2S1_SDO3 / GPIO4_B2_d | 19 | 20 | GND | |
| 41 | SPI0_MISO / PDM_SDI2 / I2S1_SDI1 / GPIO4_B3_d | 21 | 22 | ||
| 43 | SPI0_CLK / I2S1_SDI0 / GPIO4_B4_d | 23 | 24 | SPI0_CSN0 / PWR_CTRL1 /SPI0_CS0_M2 | 44 |
| GND | 25 | 26 | PWM6_M0 / SPI0_CSN1 / PDM_SDI3 / GPIO4_C1_d | 145 | |
| 150 | I2C0_SDA_M0 / PWM0_M0 / GPU_AVS / GPIO4_C3_d | 27 | 28 | ARM_AVS / PWM1_M0 / I2C0_SCL_M0 / GPIO4_C4_d | 148 |
29 | 30 | GND | |||
31 | 32 | GPIO4_C0/PWM5_M0 / FEPHY_LED_LINK_M0 / UART3_TX_M1 | 144 | ||
| 103 | GPIO4_B7 / PWM4_M0 / FEPHY_LED_SPD_M0 / UART3_RX_M1 | 33 | 34 | GND | |
| 134 | UART1_TX_M0 / I2S1_LRCK / GPIO4_A6_d | 35 | 36 | ||
37 | 38 | GPIO3_B2 / SPI0_CLK / I2S1_SDI0 | 106 | ||
| GND | 39 | 40 | GPIO4_A7_d / UART1_RX_M0 / I2S1_SDO0 | 107 |
Fan
0.8mm connector(CON3102)
| Pin | Assignment | Description |
|---|---|---|
| 1 | VCC_5V0 | 5V Power ouput |
| 2 | GND | GND |
| 3 | PWM | PWM control |
EARPHONE
0.8mm connector(CON3101)
| Pin | Assignment | Description |
|---|---|---|
| 1 | AOR | right channel |
| 2 | AOL | left channel |
| 3 | GND | GND |
Resources
Source Code
ArmSoM github source code : https://github.com/ArmSoM/armsom-build
ArmSoM-Sige1 kernel:
ArmSoM-Sige1 uboot:
openwrt(istoreos): https://github.com/istoreos/istoreos
Official Image
ArmSoM team uses Debian bullseye as the official operating system.
Download
The following systems have been tested and verified by ArmSoM official:
Network disk address: Google Drive link
debain bullseye
Firmware location: 3. Linux image/debian/ArmSoM-Sige1 -
Third Party System
Ubuntu
Image location: 3. Linux Images/ubuntu/ArmSoM-Sige1 -
istoreos
Firmware location: 3. Linux image/openwrt/ArmSoM-Sige1 -
armbian

Firmware location: 3. Linux image/armbian/ArmSoM-Sige1 -
Hardware Resources
User Manual
The Sige1 user manual helps users understand the basic usage of Sige1 and the necessary preparations. When you receive the product, you need to know its model and hardware version, which can be found on the board's silk screen. We will introduce the product information to you in as much detail as possible.
Getting Started
Before starting to use the ArmSoM-Sige1, please prepare the following items:
Tools
- Sige1 motherboard
- Power supply: USB Type-C
- Supports 9V/2A, 12V/2A, 15V/2A
- System installation (choose one):
- MicroSD card/TF card boot
- MicroSD card/TF card, Class 10 or above, at least 8GB SDHC, and card reader
- The following are high-speed TF cards verified by the ArmSoM team:
- SanDisk 32GB TF (MicroSD) (recommended by developers)
- SanDisk 32GB TF (MicroSD) for dash cams & security monitoring dedicated storage card (recommended for long-term operation)
- SanDisk TF 8G Class10 microSD
- SanDisk TF 128G Class10 microSD XC TF 128G 48MB/S
- Onboard eMMC boot
- USB Type-C data cable, write the image from the Type-C port on Sige1, you need a Type-C data cable to connect Sige1 and PC.
- MicroSD card/TF card boot
Optional Items
- USB keyboard and mouse
- HDMI monitor and HDMI cable
- Sige1 is equipped with a full-size HDMI port, supporting up to 8K@60 display.
- HDMI EDID is used to determine the best display resolution. On displays and TVs that support 1080p (or 4K/8K), this resolution will be selected. If 1080p is not supported, the next available resolution will be found by EDID.
- Ethernet cable (network cable)
- Sige1 supports Ethernet networking, with a maximum support of 2.5Gb.
- The network cable is used to connect Sige1 to the local network and the Internet.
- Audio cable
- 0.8mm vertical socket can be used.
- USB-A to USB-C data cable
Selecting Burn Mode
Interface Settings
If you are using ArmSoM-Sige1 for the first time, please familiarize yourself with the peripheral interfaces first for better understanding of the content below.
Debug Serial Port
Connect the USB to TTL serial cable as shown below:
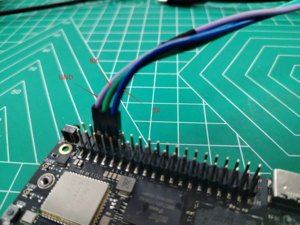
| Sige1 | Connection | Serial Module |
|---|---|---|
| GND (pin 6) | <---> | GND |
| TX (pin 8) | <---> | RX |
| RX (pin 10) | <---> | TX |
Gigabit/2.5G Ethernet Port
If you are using wired Ethernet for networking, align the network cable with the RJ45 port on ArmSoM-Sige1 and insert it, and the system desktop will pop up the wired connection.
- Use the command ifconfig to check whether Ethernet is normal, it will display the network card enP2p33s0 or enP4p65s0 and the Ethernet IP address. In addition, use the ping tool to determine whether the network is connected.
ifconfig
ping mi.com
- If ping fails, try
$ sudo dhclient enP2p33s0
or
$ sudo dhclient enP4p65s0
WIFI
# 1. Open the WIFI
armsom@armsom-sige1:/# nmcli r wifi on
# 2. Scan WIFI
armsom@armsom-sige1:/# nmcli dev wifi
# 3. Connect to WIFI network
armsom@armsom-sige1:/# nmcli dev wifi connect "wifi_name" password "wifi_password"
BT
# 1. Activate Bluetooth
armsom@armsom-sige1:/# service bluetooth start
# 2. Enter bluetoothctl
armsom@armsom-sige1:/# bluetoothctl
# 3. Enter the following commands to connect
armsom@armsom-sige1:/# power on
armsom@armsom-sige1:/# agent on
armsom@armsom-sige1:/# default-agent
armsom@armsom-sige1:/# scan on
armsom@armsom-sige1:/# pair yourDeviceMAC
HDMI ArmSoM-Sige1 has an HDMI output port, supporting CEC and HDMI 2.1, with a maximum resolution support of 8Kp60.
USB Ports ArmSoM-Sige1 provides two USB 2.0 ports.
Audio View the sound card in the system.
armsom@armsom-sige1:/# aplay -l
**** List of PLAYBACK Hardware Devices ****
card 0: rockchiphdmi [rockchip,hdmi], device 0: rockchip,hdmi i2s-hifi-0 [rockchip,hdmi i2s-hifi-0]
  Subdevices: 1/1
  Subdevice #0: subdevice #0
card 1: rk3528acodec [rk3528-acodec], device 0: ffb90000.sai-rk3528-hifi ffe10000.acodec-0 [ffb90000.sai-rk3528-hifi ffe10000.acodec-0]
  Subdevices: 1/1
  Subdevice #0: subdevice #0

// Play music

armsom@armsom-sige1:/# aplay -D plughw:1,0 ./usr/share/sounds/alsa/Front_Right.wav
Fan
Sige1 is equipped with a 5V fan, using a 0.8mm connector.
// View current speed
armsom@armsom-Sige1:/# cat /sys/class/hwmon/hwmon1/pwm1
Type-C
Sige1 is equipped with a USB Type‑C™ 2.0 port, supporting OTG.
40Pin
Sige1 provides a 40-pin GPIO socket, compatible with most sensors on the market.
RGB LED
Sige1 has two user LEDs, green and red.
User Green LED By default, it is always on, indicating normal system operation. User Red LED By default, it is off and can be controlled by the user. Users can control it through commands
armsom@armsom-sige1:/# sudo su
armsom@armsom-sige1:/# echo timer > /sys/class/leds/red\:status/trigger
armsom@armsom-sige1:/# echo activity > /sys/class/leds/red\:status/trigger
RTC
- Sige1 is equipped with an RTC IC hym8563.
- First, use a 2-pin header interface to insert the RTC battery for RTC IC power supply.
- Please note that we should keep the RTC battery in the RTC connector and confirm that the rtc hym8563 device has been created.
armsom@armsom-Sige1:/#  dmesg | grep rtc
[    6.407133] rtc-hym8563 6-0051: rtc information is valid
[    6.412731] rtc-hym8563 6-0051: registered as rtc0
[    6.413779] rtc-hym8563 6-0051: setting system clock to 2022-06-22T01:22:26 UTC (1655860946)
- Find rtc0, then use the following command to set the system time and synchronize it to rtc0.
armsom@armsom-sige1:/# hwclock -r
2023-11-03 10:32:40.461910+00:00
armsom@armsom-sige1:/# date
2023年 11月 03日 Fridays 10:33:12 UTC
armsom@armsom-sige1:/# hwclock -w
armsom@armsom-sige1:/# hwclock -r
armsom@armsom-sige1:/# poweroff
- Turn off the RTC battery, and after 10 minutes or more, insert the RTC battery and start Sige7 to check whether the RTC is synchronized with the system clock
armsom@armsom-sige1:/# hwclock -r
2023-11-03 10:35:40.461910+00:00
armsom@armsom-sige1:/# date
2023年 11月 03日 Fridays 10:36:01 UTC
Product Certificates
CE / FCC / RoHS
Purchase Samples
ArmSoM Official Website: [Link]
ArmSoM Official AliExpress Store: [Link]
ArmSoM Official Taobao Store: [Link]
For OEM & ODM, please contact: sales@armsom.org