Network settings
ArmSoM series products are equipped with Ethernet ports or WIFI modules, PCIE to Ethernet modules, USB to Ethernet modules, etc. In this way, our network needs are not just as simple as surfing the Internet, but can also lead to a variety of different ways of playing.
1. Network connection
Connecting to the Internet or forming a LAN requires meeting a prerequisite - the device needs to obtain an IP. IP can be understood as the name of the device. Devices in the LAN can communicate through IP in the LAN. As follows 192.168.10.100
armsom@armsom-w3:~$ ip a
1: lo: <LOOPBACK,UP,LOWER_UP> mtu 65536 qdisc noqueue state UNKNOWN group default qlen 1000
     link/loopback 00:00:00:00:00:00 brd 00:00:00:00:00:00
     inet 127.0.0.1/8 scope host lo
        valid_lft forever preferred_lft forever
2: enP4p65s0: <BROADCAST,MULTICAST,UP,LOWER_UP> mtu 1500 qdisc mq state UP group default qlen 1000
     link/ether 92:be:6d:d5:e7:b4 brd ff:ff:ff:ff:ff:ff permaddr 72:d3:55:ba:fe:0a
     inet 192.168.10.100/24 brd 192.168.10.255 scope global dynamic noprefixroute enP4p65s0
        valid_lft 34665sec preferred_lft 34665sec
1.1. ping command
ping (Packet Internet Groper), an Internet packet explorer, is a program used to test the amount of network connections. It is a command used to check whether the network is smooth or the network connection speed
The principle of ping: Send a data packet of a certain length to the specified network address. According to the agreement, if the specified network address exists, a data packet of the same size will be returned. Of course, if there is no return within a specific time, it will be a "timeout" and it will The specified network address is considered to not exist
1.2. Local area communication
A gateway is a must in a LAN. We can ping the gateway to see if our IP can be used successfully. If we cannot ping the gateway, it means that the LAN is not connected.
#ping command
sudo ping + ip address
- After successfully connecting to the Internet, you can see a series of data, as follows
armsom@armsom-w3:~$ sudo ping 192.168.10.1
ping: socket: Address family not supported by protocol
PING 192.168.10.1 (192.168.10.1) 56(84) bytes of data.
64 bytes from 192.168.10.1: icmp_seq=1 ttl=64 time=0.649 ms
64 bytes from 192.168.10.1: icmp_seq=2 ttl=64 time=0.583 ms
64 bytes from 192.168.10.1: icmp_seq=3 ttl=64 time=0.571 ms
64 bytes from 192.168.10.1: icmp_seq=4 ttl=64 time=0.614 ms
64 bytes from 192.168.10.1: icmp_seq=5 ttl=64 time=0.583 ms
64 bytes from 192.168.10.1: icmp_seq=6 ttl=64 time=0.703 ms
1.3. Connect to the Internet
We can check whether the product is connected to the Internet by pinging the website
#ping command
sudo ping xxx.com
- Take baidu.com as an example. After successfully connecting to the Internet, you can see a series of data, as shown in the figure below
armsom@armsom-w3:~$ sudo ping www.baidu.com
ping: socket: Address family not supported by protocol
PING www.a.shifen.com (183.2.172.185) 56(84) bytes of data.
64 bytes from 183.2.172.185 (183.2.172.185): icmp_seq=1 ttl=52 time=7.83 ms
64 bytes from 183.2.172.185 (183.2.172.185): icmp_seq=2 ttl=52 time=7.80 ms
64 bytes from 183.2.172.185 (183.2.172.185): icmp_seq=3 ttl=52 time=8.36 ms
64 bytes from 183.2.172.185 (183.2.172.185): icmp_seq=4 ttl=52 time=8.39 ms
2. Command line graphical connection
- Enter graphics configuration
armsom@armsom-w3:~$ sudo nmtui
- Move the keyboard arrow keys to Active a connection and press Enter to enter wifi settings
- Move the arrow keys to the wifi you want to connect to and press Enter
- If you are connecting to an unconnected hotspot with a password, you will enter the password input interface.
- If you want to disconnect from wifi, press the Enter key when connected to disconnect.
3. Command line connection
- List wifi list
armsom@armsom-w3:~$ nmcli dev wifi list
- Connect to wifi
Take hotspot: armsom password: armsom88 and use interface wlan0 as an example
# First connection
armsom@armsom-w3:~$ sudo nmcli dev wifi connect armsom password 'armsom88' ifname wlan0
Device 'wlan0' successfully activated with '7867c3af-dca2-4e9a-9721-a20f7a0e1b46'.

# After the first successful connection, then connect or switch wifi
armsom@armsom-w3:~$ sudo nmcli dev wifi connect armsom
4. Desktop connection
When using wired Internet access, please plug the network cable into the RJ45 interface. There will be a network connection icon in the upper right corner of the desktop. Select the network you want to connect to and enter the password to access the Internet.
5. USB shared network
todo
6. Static network configuration
6.1. nmtui
- Set the ip address before the static address
armsom@armsom-w3:~$ sudo ifconfig
enP4p65s0: flags=4163<UP,BROADCAST,RUNNING,MULTICAST> mtu 1500
         inet 192.168.10.100 netmask 255.255.255.0 broadcast 192.168.10.255
         ether 92:be:6d:d5:e7:b4 txqueuelen 1000 (Ethernet)
         RX packets 23758 bytes 1774543 (1.6 MiB)
         RX errors 0 dropped 80 overruns 0 frame 0
         TX packets 67013 bytes 3879463 (3.6 MiB)
         TX errors 0 dropped 0 overruns 0 carrier 0 collisions 0
         device interrupt 155
If you want to successfully set a static address, you need to pay attention to whether the IP address you want to set is occupied by other devices. You can use ping to set the static address. If there is data returned, it proves that the IP address is occupied by other devices.
It is recommended that newbies who do not understand network configuration can set the static address to the IP address obtained during dynamic connection.
The following are detailed steps
- Enter graphics configuration
armsom@armsom-w3:~$ nmtui
Move the keyboard arrow keys to Edit a connection and press Enter to enter the wifi settings.
Select the network you want to edit, here we take eth0 as an example
- Enter to see the default configuration of the network
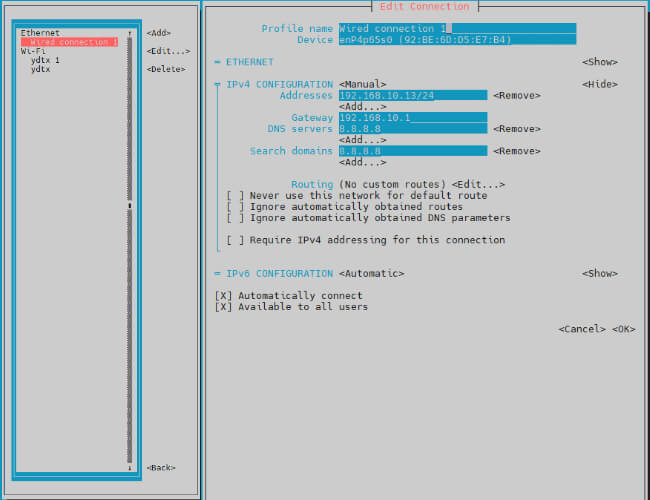
- Need to set IPV4 CONFIGURATION to Manual
- Then move the cursor to show and press enter to enter detailed configuration
Here we take the IP address 192.168.10.13 and the gateway 192.168.10.1 as an example.
The IP address and gateway need to be configured according to your actual network conditions. If you copy the configuration here, there is a high chance that your product will not be able to connect to the Internet. Junior developers recommend changing the static IP to a dynamically obtained IP.
- How to obtain the gateway
#1.Set the network to automatically obtain IP

#2. After successfully obtaining the IP, use the command
route

#result
root@armsom-w3:/home/armsom# route
Kernel IP routing table
Destination Gateway Genmask Flags Metric Ref Use Iface
default 192.168.10.1 0.0.0.0 UG 100 0 0 enP4p65s0
192.168.10.0 0.0.0.0 255.255.255.0 U 100 0 0 enP4p65s0

#3.Gateway is our gateway, use the following command
route-n

#result
root@lubancat:~# route -n
Kernel IP routing table
Destination Gateway Genmask Flags Metric Ref Use Iface
default 192.168.10.1 0.0.0.0 UG 100 0 0 enP4p65s0
192.168.10.0 0.0.0.0 255.255.255.0 U 100 0 0 enP4p65s0

#You can see our gateway address ---- 192.168.10.1
192.168.10.13/24 where /24 represents the mask 255.255.255.0,
DNS servers Nationwide DNS–>114.114.114.114 Global DNS–>8.8.8.8
search domain can inherit DNS servers settings,
Multiple DNS servers and search domains can be set.
After setting up, you can move to the back and click OK to complete the setting.
After completing the settings, you need to activate the settings for the network to take effect. Click Activate a connection to enter the connection, press enter once to cancel the connection, and press enter again to reconnect.