9. File transfer
In this section, we need to choose to put the PC and the armsom board in the same LAN via a network cable or wifi to facilitate file transfer.
If you use a network cable or wifi to connect to the network, please refer to the "V. Network Connection and Settings" section
For armsom boards, we recommend two methods for file transfer:
ssh link
nfs mount
The difference between them is:
Only ordinary files can be transferred through ssh link, not link files
You can transfer any file between Ubuntu and armsom boards through nfs mount
If you choose to use wifi, we can try to control the on and off of wifi with the following commands (only for familiarity with commands, not required):
sudo ip link set dev wlan0 up //Turn on wlan0 device, but will not affect the power status of wifi
sudo ip link set dev wlan0 down //Turn off wlan0 device, but will not affect the power status of wifi

sudo rfkill block wifi //Completely turn off Wi-Fi hardware
sudo rfkill unblock wifi //Completely turn on WIFI hardware

ip a or ip addr show //Used to display and operate the IP layer (network layer) properties of the network interface, mainly used to display information such as the IP address to the user
ip link show //Used to display and operate the link layer properties of the network interface, you can see whether the interface is disabled, display the MAC address, display the interface speed, and do not directly display the IP address configuration

sudo nmtui //Graphical interface configuration wifi
9.1 For transferring files using ssh link:
- In the Windows desktop environment, press the Windows key (field icon key) + r key at the same time, enter cmd in the pop-up option box, then press the Enter key, and enter ipconfig in the cmd terminal
- Enter sudo nmtui in the armsom board serial terminal, select activate a connection in the pop-up graphical interface, select the WiFi name you want to connect to with the arrow keys, and then press Enter. After 1s, a dialog box pops up requiring a password. Enter the password to connect
- Ping the IP address seen in the cmd environment under window in step 1 in the armsom board. If you can ping, it means that the router has assigned the same network segment IP address to the PC and the board
- Connect the board through mobaXterm software, and use ip a in the armsom board to view the board ip. Then open mobaXterm in the PC to connect to the board through ssh
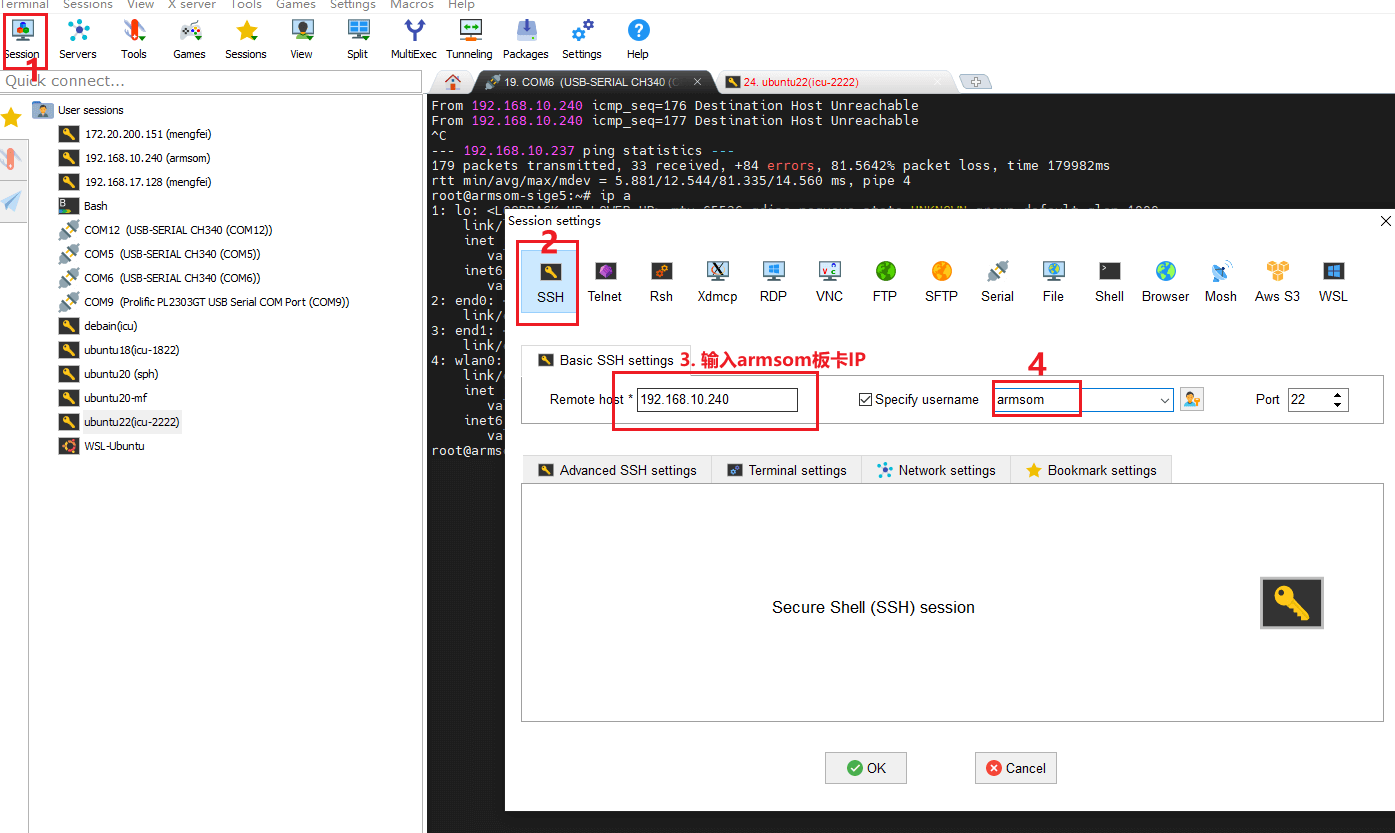
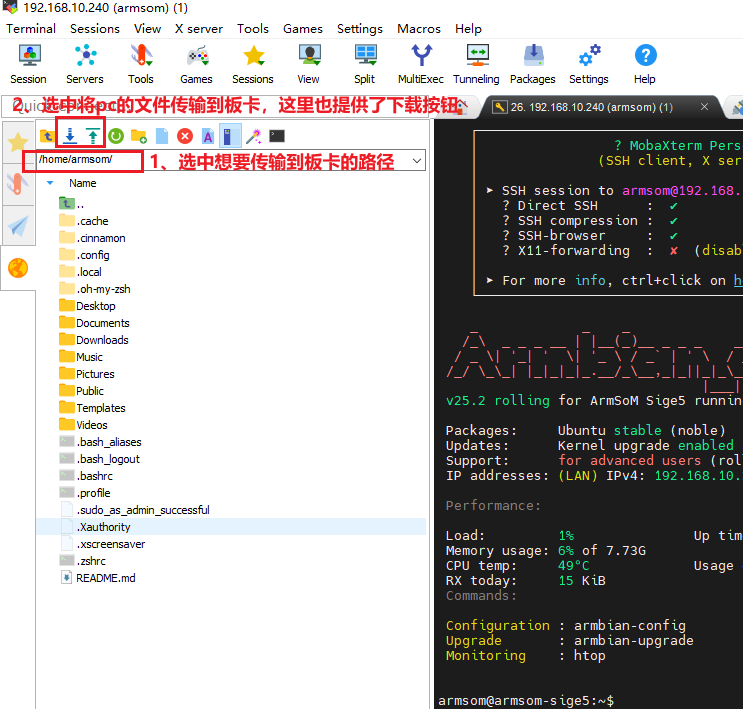
There are two points to note for ssh transmission:
1. ssh can only transfer ordinary files, not link files

2. It can only be transferred to the folder whose group belongs to the user name entered in step 4 of Figure 1. If you want to transfer to other folders, please use the root user ssh to log in to the board
9.2 For using nfs to mount and transfer files
Use NFS to build the above experimental environment. It mainly includes three steps: connecting to the network, starting the NFS service on the host, and mounting the file system on the board.
Our goal is to map the following directories of the development host and the board:
Development host shared directory: /home/username/nfs
Board mount directory: /mnt
9.2.1 Virtual machine ubuntu Armsom board connected to the same wifi
Set the mode to bridge mode in the virtual machine as follows:
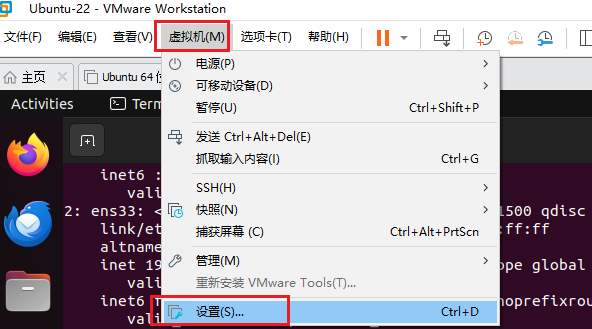
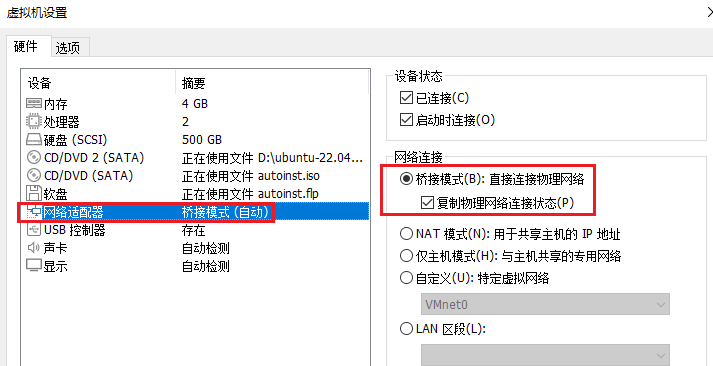
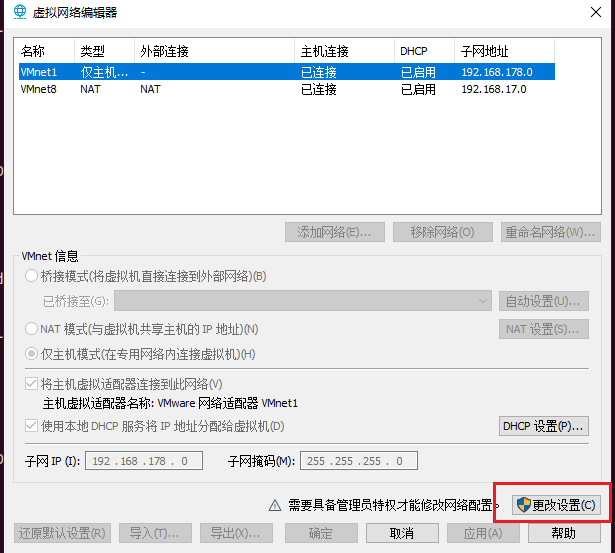
Use administrator privileges in the virtual network editor to change the network card used in bridge mode to a dedicated wifi network card. The modification steps in the vmware software are as follows:
Find the following in the control panel under Windows:

In the virtual network editor, change the network card used in the bridge mode to the wifi device name selected in the above picture
Under Windows, connect to the wifi named Avery-m. Later, Ubuntu will also use the wifi network card to connect to this wifi with the help of the bridge mode.
The visible IP in Ubuntu is 172.20.10.13
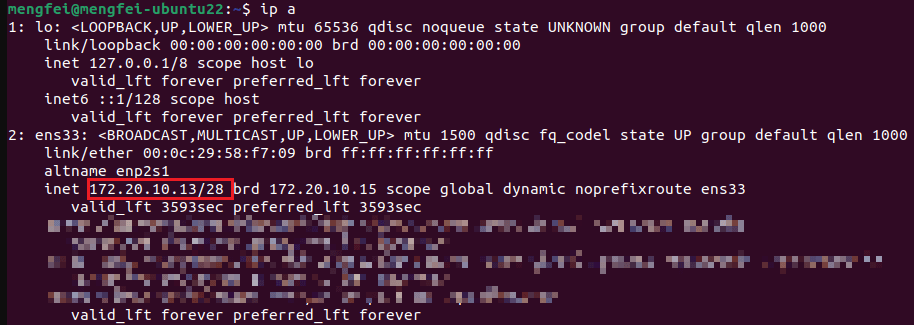
The visible IP in Windows is 172.20.10.2
Enter the graphical interface of wifi settings through the sudo nmtui command in the armsom board
Use the arrow keys on the keyboard to select the wifi you want to connect to, press Enter and wait for the connection. Enter the wifi password in the following interface to successfully connect.
After the connection is successful, the ip is 172.20.10.11

9.2.2 Ubuntu Enables nfs
Execute the following command in ubuntu# Install nfs server
sudo apt-get install nfs-kernel-server
# ubuntu creates /nfs path
sudo mkdir /nfs
# Modify /etc/exports in ubuntu
sudo gedit /etc/exports
# Modify the /etc/exports file in the pop-up interface, add the following content at the end, remember to click save after modification
/nfs *(rw,sync,no_root_squash)
The modified /etc/exports file content is as follows:

# Then use the command to restart the nfs service
sudo /etc/init.d/nfs-kernel-server restart

# The meaning of this command is to use the TCP protocol to mount the /nfs path in the device with IP 172.20.10.13 (linux ubuntu IP, please modify it according to the actual situation) to the /mnt folder of the current armsom board
# Enter the following command in the armsom board:
sudo mount -t nfs -o proto=tcp,nolock 172.20.10.13:/nfs /mnt
At this point we create a new file in Ubuntu, and a new file will appear under the /mnt path in the armsom board, indicating that the nfs file transfer is successful