Product Introduction: ArmSoM-CM5
CM5 Overview
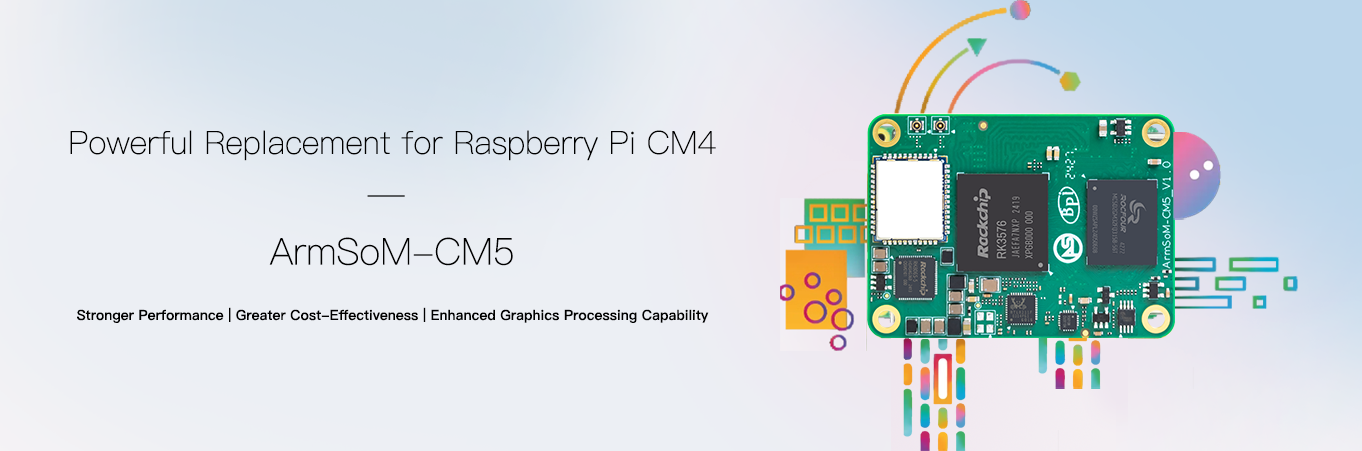
The ArmSoM-CM5 is a compute module powered by the Rockchip RK3576 second-generation 8nm high-performance AIOT platform. It integrates a quad-core Cortex-A72 @ 2.2GHz and a quad-core Cortex-A53 @ 1.8GHz, along with a dedicated NEON co-processor, a 6 TOPS NPU, and supports up to 16GB of large memory. It supports 4K video encoding and decoding, features a rich set of interfaces, and supports various operating systems.
- ArmSoM-Sige5 Single Board Computer;
- ArmSoM-CM5 RK3576 CM5 Compute Module, ArmSoM-CM5-IO CM5 companion IO board;
Leveraging a robust ecosystem and a variety of expansion accessories, ArmSoM helps users easily transition from concept to prototype to mass production, making it an ideal creative platform for makers, dreamers, and hobbyists.
There's a problem with Pin 21 on the ArmSoM-CM5 v1.2 not working properly, but it has been fixed in v1.3. The boards currently on sale and those to be released are all v1.3 or higher, so you can buy and use them with confidence. We will also launch the CM5 v2.0 (LPDDR4X version) later to accommodate different memory price points.
Key Specifications
- SOC: Rockchip RK3576
- CPU: Integrates quad-core Cortex-A72 @ 2.2GHz, quad-core Cortex-A53 @ 1.8GHz, and a dedicated NEON co-processor.
- GPU: ARM Mali G52 MC3 GPU.
- NPU: Up to 6 TOPS (INT8) computing power, supporting INT4/INT8/INT16 mixed precision computation.
- VPU/Video Codec:
- Decoding: Supports H.264, H.265, VP9, AV1, and AVS2 up to 8K@30fps or 4K@120fps, and high-quality JPEG decoding up to 4K@60fps.
- Encoding: Supports H.264 and H.265,JPEG up to 4K@60fps.
- RAM: 2/4/8/16GB 32bit LPDDR5 (V1.3) / LPDDR4X (V2.0), default is 8GB, with RK3576 supporting up to 16GB.
- Flash: 32/64/128GB eMMC, default is 64GB eMMC.
- WIFI/BT: Onboard IEEE 802.11a/b/g/n/ac/ax WIFI6 and BT5.3 syn43752
- Operating Voltage: 4.5V–5.5V
- Operating Temperature: 0℃ ~ 80℃
- Weight: 12g
- Dimensions:
- CM5: 55 x 40 mm x 4.9mm
- CM5-IO: 100 x 80 x 29 mm (3.94 x 3.15 x 1.14 inches)
Getting started
CM5 User Manual
How to start using your CM5 Module
CM5 Hardware
Hardware Interface
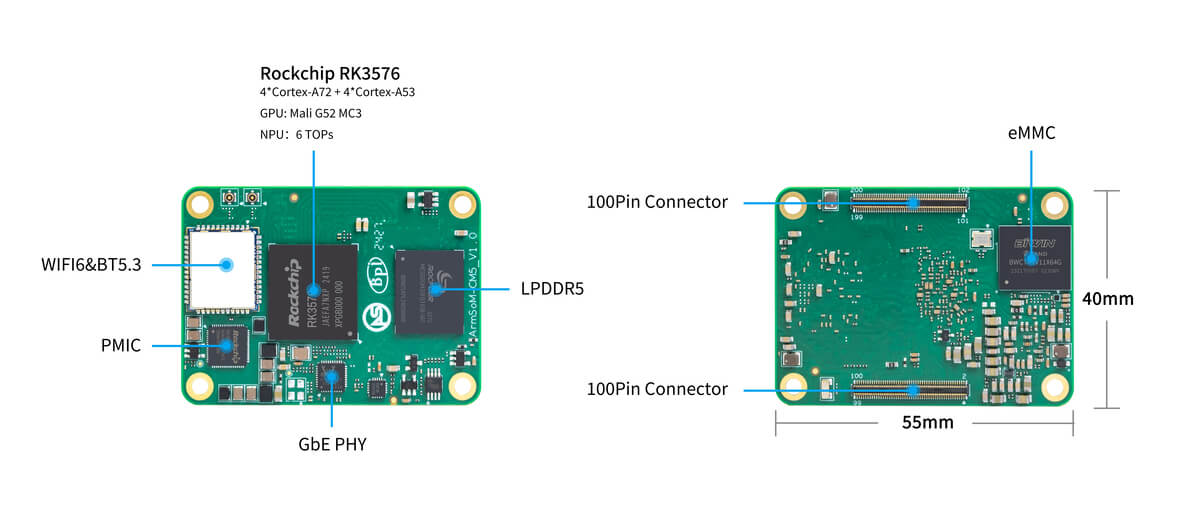
- Designed as a board-to-board connector.
- Due to the RK3576 chip's PIN limitations, it supports only 1 HDMI and 1 DSI, whereas the Raspberry Pi CM4 supports up to 2 HDMI and 2 DSI.
- AmrSoM-CM5 has an additional PCIe and USB3 compared to the Raspberry Pi CM4.
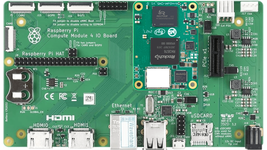
You can use the Raspberry Pi CM4 baseboard.
ArmSoM CM5 vs Raspberry Pi CM4
Below is a comparison table between ArmSoM CM5 and Raspberry Pi CM4:
| Specification | ArmSoM CM5 | Raspberry Pi CM4 |
|---|---|---|
| Processor | RK3576 SoC | Broadcom BCM2711 |
| CPU Architecture | Quad-core ARM Cortex-A72 & Quad-core Cortex-A53 | Quad-core ARM Cortex-A72 |
| GPU | ARM Mali G52 MC3 GPU | VideoCore VI |
| Memory | Up to 16GB LPDDR5 (V1.3) / LPDDR4X (V2.0) | 1GB, 2GB, 4GB, 8GB LPDDR4 |
| Storage | eMMC storage (optional capacities) | No built-in storage, supports microSD cards |
| Display Output | 1x HDMI 2.1, 1x DP | 2x HDMI 2.0 |
| Video Resolution | Supports 4K@120fps | Supports 4K@30fps |
| Network Interface | 1x Gigabit Ethernet port | 1x Gigabit Ethernet port |
| USB Ports | 1x USB3.0,1x USB2.0 | 1x USB 2.0 |
| GPIO | 40-PIN GPIO | 40-PIN GPIO |
| Expandability | 2x PCIe/SATA/USB 3.0 | 1x PCIe 2.0 |
| Camera Interface | 1x 4-lane MIPI CSI, 1x 2-lane MIPI CSI | 1x 4-lane MIPI CSI, 1x 2-lane MIPI CSI |
| Display Interface | 1x 4-lane MIPI DSI | 2x 4-lane MIPI DSI |
| Power Input | 5V | 5V |
| Dimensions | 55mm x 40mm | 55mm x 40mm |
| Operating System Support | Debian, Android, Ubuntu, etc. | Raspberry Pi OS, Ubuntu, others |
| Primary Use Cases | AI development, embedded systems, industrial control, DIY projects, education, IoT | DIY projects, education, IoT, etc. |
CM5 Block Diagram

Hardware Spec
| Category | Function |
|---|---|
| SOC | |
| CPU | |
| GPU | |
| NPU | |
| VPU/Codec | |
| ISP | |
| RAM | |
| Flash | |
| Display | |
| Camera | |
| Network | |
| PCIe | |
| USB | |
| Audio | |
| Others |
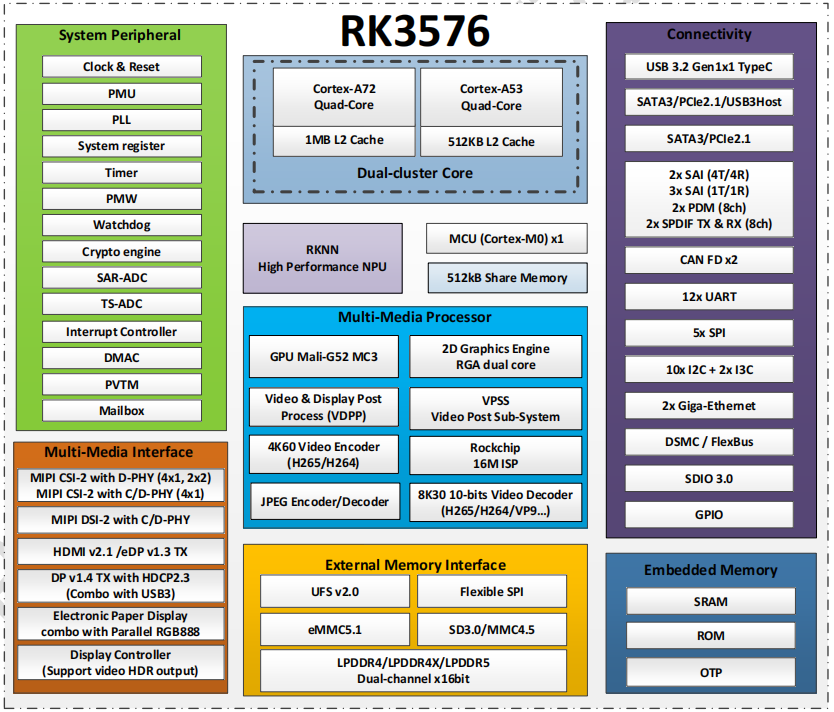
RK3576 Block Diagram
RK3576 Block Diagram
Hardware Pin Definitions

Electrical characteristics
Here’s a table showing the power consumption of ArmSoM-CM5 and ArmSoM-CM5-IO in different states:
| No. | Product | SoC | DC input voltage | Standby (OS interface) | Powered off | Maximum (CPU stress test) |
|---|---|---|---|---|---|---|
| 3 | CM5 | RK3576 | 4.0 V | 350 mA | 0.1 mA | 1040 mA |
| 4 | CM5-IO | RK3576 | 12.0 V | 480 mA | 27 mA | 735 mA |
CM5-IO Product Introduction
The CM5-IO is the IO board for the ArmSoM CM5, with dimensions of 100x80x29 mm. It is a miniature AI computer designed specifically for makers, learners, and developers, enabling the rapid application of AI technology to various smart devices.
CM5-IO Hardware Information
Hardware Specifications
The CM5-IO board is an expansion board specifically designed for the CM5 computing module, aimed at assisting in system and embedded board development.
- 1x HDMI output, 1x Typec(DP) output
- 4x USB 3.0 Type-A
- Gigabit Ethernet RJ45 with PoE support
- Firmware flashing and device mode via USB Type-C
- GPIO: 40-PIN header
- Power connector: DC Barrel jack for 12V power input, outer diameter 5.5mm, inner diameter 2.0mm, center positive, outer negative
- Expansion: M.2 (M-key, supports PCIe), microSD
- MIPI DSI: 1x 4-lane MIPI DSI, supports up to 4K@60fps (x4)
- MIPI CSI0: 1x 4-lane MIPI CSI, each lane up to 2.5Gbps
- MIPI CSI1: 1x 2-lane MIPI CSI, each lane up to 2.5Gbps
- Others: HPOUT, FAN, VRTC
- Voltage range: 5V-23V
- Dimensions: 100 x 80 x 29 mm (3.94 x 3.15 x 1.14 inches)
- Weight: 65.2g
Hardware Interfaces
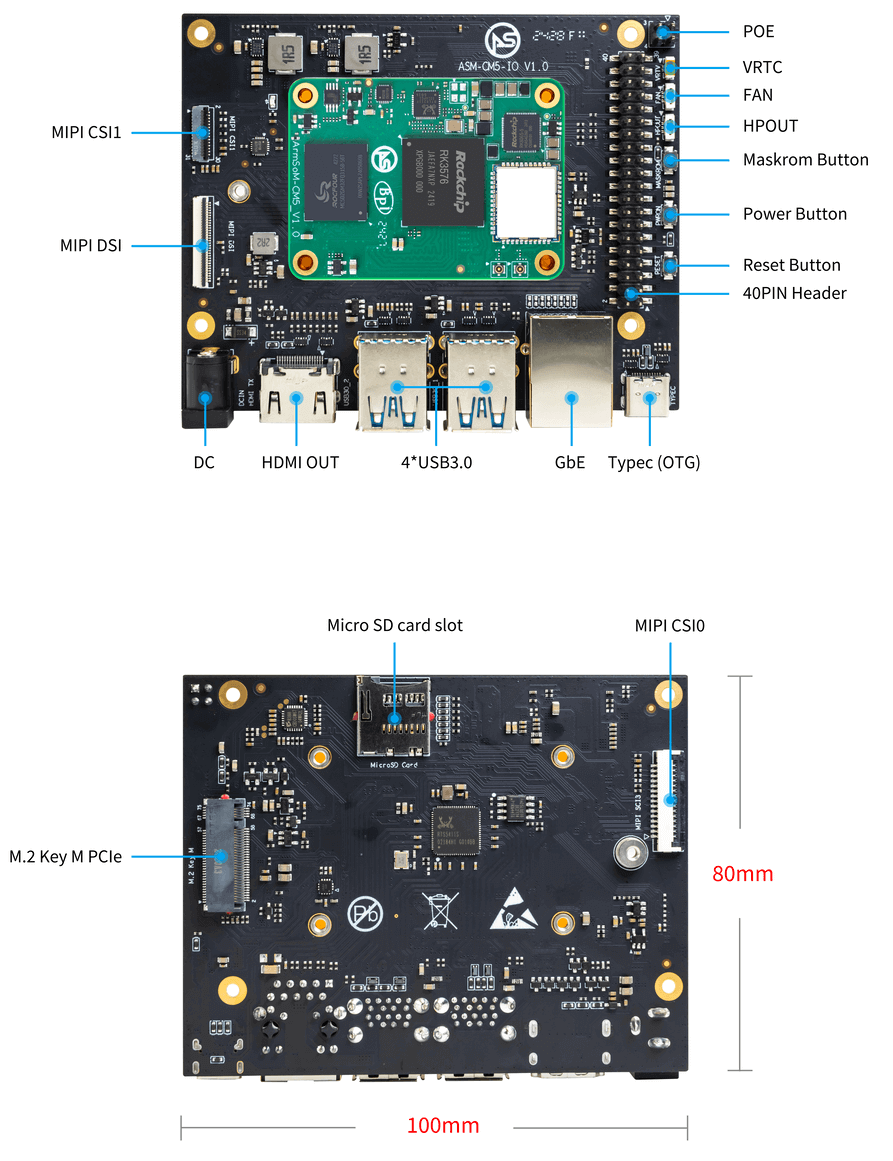
The cm5-io board uses a 12V DC power supply.
Pin Definition
40-PIN header
| GPIO number | Function | Pin | Pin | Function | GPIO number |
|---|---|---|---|---|---|
| +3.3V | 1 | 2 | +5.0V | ||
| 140 | CAN1_RX_M2 / I2C3_SDA_M0 / UART2_RX_M1 / GPIO4_B4_d | 3 | 4 | +5.0V | |
| 141 | CAN1_TX_M2 / I2C3_SCL_M0 / UART2_TX_M1 / GPIO4_B5_d | 5 | 6 | GND | - |
| 20 | PWM0_CH0_M0 / GPIO0_C4_d | 7 | 8 | UART0_TX_M0 / GPIO0_D4_u | 28 |
| - | GND | 9 | 10 | UART0_RX_M0 / GPIO0_D5_u | 29 |
| - | - | 11 | 12 | - | - |
| - | - | 13 | 14 | GND | |
| - | - | 15 | 16 | GPIO2_D1_d / UART4_RX_M0 / I2C6_SDA_M2 / PWM2_CH1_M2 | 89 |
| +3.3V | 17 | 18 | GPIO2_D0_d / UART4_TX_M0 / I2C6_SCL_M2 / PWM2_CH0_M2 | 88 | |
| 97 | I2C7_SDA_M1 / SPI3_MOSI_M0 / UART3_RX_M0 / GPIO3_A1_d | 19 | 20 | GND | - |
| 98 | CAN1_TX_M3 / SPI3_MISO_M0 / SPDIF_RX1_M1 / UART3_CTSN_M0 / GPIO3_A2_d | 21 | 22 | SARADC_VIN4 | - |
| 96 | I2C7_SCL_M1 / SPI3_CLK_M0 / UART3_TX_M0 / GPIO3_A0_d | 23 | 24 | GPIO3_A3_d / CAN1_RX_M3 / SPI3_CSN0_M0 / UART3_RTSN_M0 / SPDIF_TX1_M1 | 99 |
| - | GND | 25 | 26 | - | - |
| 111 | I2C4_SDA_M3 / UART2_RX_M2 / GPIO3_B7_d | 27 | 28 | GPIO2_D6_d / PWM2_CH6_M2 / SAI3_MCLK_M2 | 94 |
| 112 | I2C4_SCL_M3 / UART2_TX_M2 / GPIO3_C0_d | 29 | 30 | GND | - |
| 126 | SPI3_MOSI_M1 / PWM2_CH6_M3 / GPIO3_D6_d | 31 | 32 | - | - |
| - | - | 33 | 34 | GND | - |
| - | - | 35 | 36 | - | - |
| - | - | 37 | 38 | - | - |
| - | GND | 39 | 40 | - | - |
FAN
| Pin | Assignment | Description |
|---|---|---|
| 1 | VCC_5V0 | 5V Power ouput |
| 2 | GND | GND |
| 3 | PWM | PWM control |
HPOUT
| Pin | Assignment | Description |
|---|---|---|
| 1 | AOR | right channel |
| 2 | AOL | left channel |
| 3 | GND | GND |
VRTC
0.8mm connector(J27)
| Pin | Assignment | Description |
|---|---|---|
| 1 | + | Positive pole |
| 2 | - | Negative pole |
PoE In(J5)
| Pin | Assignment | Description |
|---|---|---|
| 1 | VC1 | TX1 |
| 2 | VC2 | RX1 |
| 3 | VC3 | TX2 |
| 4 | VC4 | RX2 |
Resources
ArmSom-bsp
Building a Linux System
Armbian
Armbian Linux build framework
CM5 kernel
Improved Rockchip Linux
CM5 uboot
ArmSoM/u-boot
RKNN-LLM
AI models to Rockchip chips
Official Image
ArmSoM provides the following official system images. Select the matching product folder and image version in the shared drive. How to Flash Image📤
Download
The following systems have been tested and verified by ArmSoM official:
Network disk address:
Google Drive link| logo | Description | Download |
|---|---|---|
 | Debian 12 for CM5: Debian 12 (Bookworm) system images. Open the matching product folder in the shared drive; available versions and desktop variants are listed there. | Google Drive root folder |
 | Android14 for CM5 : Make your device more personal, protected and accessible with the newest OS upgrade. Improved photo quality, new themes and AI generated wallpapers. Privacy updates for your health, safety and data. And expanded accessibility features. | Google Drive root folder |
 | Ubuntu 22.04 LTS for CM5: Ubuntu 22.04 LTS (Jammy Jellyfish) system images. Select the matching image in the product folder in the shared drive. | Google Drive root folder |
Third Party System
| logo | Description | Download |
|---|---|---|
 | Armbian for CM5 : Armbian is a computing build framework that allows users to create ready-to-use images with working kernels in variable user space configurations for various single board computers. It provides various pre-build images for some supported boards. These are usually Debian or Ubuntu flavored. | CM5-IO:armbian image CM5-RPI-CM4-IO:armbian image |
 | ubuntu-rockchip for CM5 : This project aims to provide a default Ubuntu experience for Rockchip RK3588 devices. Get started today with an Ubuntu Server or Desktop image for a familiar environment. | ubuntu-rockchip image |
Hardware Resources
CM5 Hardware ResourcesArmSoM-CM5 pin table - pin table
CM5-IO Resources
ArmSom-bsp
Building a Linux System
Armbian
Armbian Linux build framework
Android14 SDK
Improved Rockchip Android
CM5 kernel
Improved Rockchip Linux
CM5 uboot
ArmSoM/u-boot
RKNN-LLM
AI models to Rockchip chips
Official Images
ArmSoM provides the following official system images. Select the matching product folder and image version in the shared drive. How to Flash Image📤
Download
The following systems have been tested and verified by ArmSoM official:
Network disk address:
Google Drive link| Logo | Description | Download |
|---|---|---|
| Debian 12 for CM5-IO: Debian 12 (Bookworm) system images. Open the matching product folder in the shared drive; available versions and desktop variants are listed there. | Google Drive root folder |
| Ubuntu 22.04 LTS for CM5-IO: Ubuntu 22.04 LTS (Jammy Jellyfish) system images. Select the matching image in the product folder in the shared drive. | Google Drive root folder |
| Android 14 for CM5: The latest OS upgrade makes your device more personalized, secure, and accessible. It offers improved photo quality, new themes, and AI-generated wallpapers. Privacy updates protect your health, safety, and data while expanding accessibility features. | Google Drive root folder |
Third-Party Images
| Logo | Description | Download |
|---|---|---|
| Armbian for CM5: Armbian is a build framework that allows users to create ready-to-use images with a working kernel based on various user-space configurations for single-board computers. It provides a variety of pre-built images for some supported SBCs, typically based on Debian or Ubuntu. | Armbian Image |
| Ubuntu-Rockchip for CM5: This project aims to provide the default Ubuntu experience for Rockchip RK3588 devices. Get started right away by choosing the appropriate Ubuntu server or desktop image, and enjoy a familiar environment. | Ubuntu-Rockchip Image |
Hardware Resources
Get schematics, PCB, DXF, and other hardware documentation for the cm5-io development kit to quickly start your development.
CM5 Hardware ResourcesArmSoM-CM5 pin table - pin table
CM5 User Manual
Getting Started
Preparing for CM5-IO Usage
In the following text, "CM5 Kit" refers to CM5 + CM5-IO.
Tools Preparation
- Power supply
- System Installation (Choose one)
- eMMC Boot
- USB Type-C cable: Use a Type-C cable to write the image to the CM5 Kit through the Type-C port. You will need a Type-C cable to connect the CM5 Kit to your PC.
- MicroSD/TF Card Boot
- MicroSD/TF card: Class 10 or above, at least 8GB SDHC, and a card reader.
- Below are high-speed TF cards tested and verified by the ArmSoM team:
- SanDisk 32GB TF (MicroSD) (Recommended for developers)
- SanDisk 32GB TF (MicroSD) Dashcam & Surveillance-specific storage card (Recommended for long-term operation)
- SanDisk TF 8G Class10 microSD
- SanDisk TF 128G Class10 microSD XC TF 128G 48MB/S
- eMMC Boot
You can set up the CM5 Kit as an interactive desktop computer or as a headless computer that can only be accessed over the network. To set up the CM5 Kit as a headless computer, configure the hostname, user account, network connection, and SSH during the initial OS installation. If you plan to use the CM5 Kit directly, you will need the following additional accessories:
Optional Accessories
- Keyboard & Mouse
- HDMI monitor and HDMI cable
- Ethernet cable
- Camera module
- For a 4-lane camera, it's recommended to use the camera-module1.
- For a 2-lane camera, use the Raspberry Pi camera-module-v2.
- LCD display
- It's recommended to use the Display 10 HD.
- Audio cable, 0.8mm vertical socket.
- RTC battery, 0.8mm vertical socket.
- Fan, 0.8mm vertical socket.
Power Supply
- Supports DC 12V adapter, 2.5mm
Choosing a Flashing Method
Interface Usage
If you are using the CM5 Kit for the first time, please familiarize yourself with the hardware interfaces of each product, which will help you better understand the following content.
Debugging Serial Port
Connect the USB to TTL serial cable as shown below:
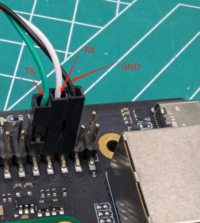
| CM5-IO | Connect | Serial Module |
|---|---|---|
| GND (pin 6) | ---> | GND |
| TX (pin 8) | ---> | RX |
| RX (pin 10) | ---> | TX |
Ethernet Port
- First, insert one end of the Ethernet cable into the CM5 Kit's Ethernet port, and connect the other end to the router, ensuring that the network is functioning properly.
- After the system starts, an IP address will be automatically assigned to the Ethernet card via DHCP, with no additional configuration needed.
- To view the IP address in the Linux system on the CM5 Kit, use the following command:
root@armsom-cm5:/# ip a
1: lo: <LOOPBACK,UP,LOWER_UP> mtu 65536 qdisc noqueue state UNKNOWN group default qlen 1000
    link/loopback 00:00:00:00:00:00 brd 00:00:00:00:00:00
    inet 127.0.0.1/8 scope host lo
       valid_lft forever preferred_lft forever
    inet6 ::1/128 scope host noprefixroute
       valid_lft forever preferred_lft forever
2: end0: <BROADCAST,MULTICAST,UP,LOWER_UP> mtu 1500 qdisc mq state UP group default qlen 1000
    link/ether c6:9c:b0:7e:2b:1f brd ff:ff:ff:ff:ff:ff permaddr aa:a6:84:1b:0d:21
    inet 192.168.10.78/24 brd 192.168.10.255 scope global dynamic noprefixroute enP4p65s0
       valid_lft 86221sec preferred_lft 86221sec
    inet6 fe80::5bb0:d96f:926d:b334/64 scope link noprefixroute
       valid_lft forever preferred_lft forever
3: wlan0: <NO-CARRIER,BROADCAST,MULTICAST,UP> mtu 1500 qdisc mq state DOWN group default qlen 1000
    link/ether cc:64:1a:33:b5:40 brd ff:ff:ff:ff:ff:ff
4: wlan1: <NO-CARRIER,BROADCAST,MULTICAST,UP> mtu 1500 qdisc mq state DOWN group default qlen 1000
    link/ether ce:64:1a:33:b5:40 brd ff:ff:ff:ff:ff:ff
After the CM5 Kit starts up, there are three ways to check the IP address:
- Connect an HDMI monitor, log into the system, and use the terminal to enter the
ip acommand to check the IP address. - Connect a [debug serial port](#Debugging Serial Port) and use the terminal to enter the
ip acommand to check the IP address. - If you do not have a debug serial port or an HDMI monitor, you can also check the IP address of the CM5 Kit's Ethernet port through the router's management interface. However, sometimes the IP address may not be visible on the router. If the IP address is not visible, troubleshoot as follows:
- First, check if the Linux system has started normally. If the green light on the CM5 Kit is steady, it has generally started correctly.
- Check if the Ethernet cable is securely connected, or try a different cable.
- Try using a different router, as issues have been encountered where routers cannot properly assign IP addresses or the assigned IP address does not show up on the router.
- If no other router is available, you will need to connect an HDMI monitor or use a debug serial port to check the IP address.
Note that DHCP automatic IP assignment on the CM5 Kit does not require any configuration.
- Use the
pingtool to check network connectivity.
The command to test network connectivity is shown below. You can interrupt the ping command by pressing Ctrl+C.
root@armsom-cm5:~$ ping www.baidu.com
PING www.a.shifen.com (183.2.172.185): 56 data bytes
64 bytes from 183.2.172.185: icmp_seq=0 ttl=53 time=8.370 ms
64 bytes from 183.2.172.185: icmp_seq=1 ttl=53 time=8.917 ms
64 bytes from 183.2.172.185: icmp_seq=2 ttl=53 time=8.511 ms
64 bytes from 183.2.172.185: icmp_seq=3 ttl=53 time=8.673 ms
^C
--- www.a.shifen.com ping statistics ---
4 packets transmitted, 4 packets received, 0% packet loss
round-trip min/avg/max/stddev = 8.370/8.618/8.917/0.203 ms
WiFi
The CM5 Kit includes an onboard WiFi module, so no external network devices are required. It uses the standard 4th generation antenna.
Connect to WiFi using the server image via command line
First, log in to the Linux system. You can do this in one of three ways:
- If the CM5 Kit is connected to a network cable, you can remotely log in via SSH.
- If the CM5 Kit is connected to a debug serial port, you can use a serial terminal to log in.
- If the CM5 Kit is connected to an HDMI display, you can log in using the terminal displayed on the HDMI screen.
Use the
nmcli dev wificommand to scan for nearby WiFi hotspots.# 1. Enable WiFi
root@armsom-cm5:/# nmcli r wifi on
# 2. Scan for WiFi
root@armsom-cm5:/# nmcli dev wifi
# 3. Connect to a WiFi network
root@armsom-cm5:/# nmcli dev wifi connect "wifi_name" password "wifi_password"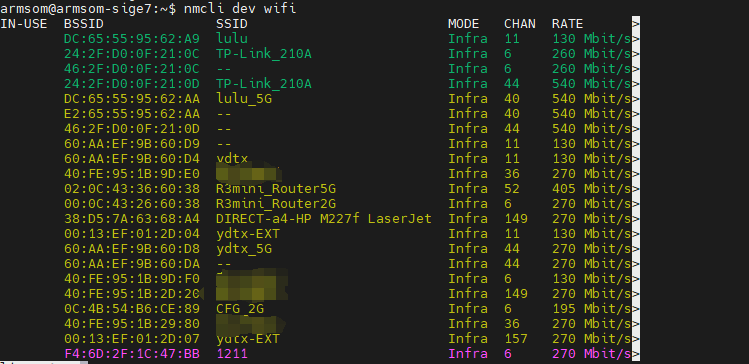
Use the
nmclicommand to connect to the scanned WiFi network:- Replace
wifi_namewith the name of the WiFi hotspot you want to connect to. - Replace
wifi_passwordwith the password for that WiFi hotspot.
root@armsom-cm5:~$ nmcli dev wifi connect "wifi_name" password "wifi_password"
Device 'wlan0' successfully activated with "wlan0b6d10bba-e1d5-4b6d-a17f-7d5ab44bbb6f".- Replace
Use the
ip addr show wlan0command to view the IP address of the WiFi connection.root@armsom-cm5:~$ ip addr show wlan0
4: wlan0: <BROADCAST,MULTICAST,UP,LOWER_UP> mtu 1500 qdisc pfifo_fast state UP group default qlen 1000
link/ether b8:2d:28:5a:52:6a brd ff:ff:ff:ff:ff:ff
inet 192.168.10.9/24 brd 192.168.10.255 scope global dynamic noprefixroute wlan0
valid_lft 86321sec preferred_lft 86321sec
inet6 fe80::850d:3119:e0:afa3/64 scope link noprefixroute
valid_lft forever preferred_lft foreverUse the
pingcommand to test network connectivity over WiFi. You can interrupt the ping command usingCtrl+C.root@armsom-cm5:~$ ping www.baidu.com
PING www.a.shifen.com (183.2.172.185): 56 data bytes
64 bytes from 183.2.172.185: icmp_seq=0 ttl=53 time=8.370 ms
64 bytes from 183.2.172.185: icmp_seq=1 ttl=53 time=8.917 ms
64 bytes from 183.2.172.185: icmp_seq=2 ttl=53 time=8.511 ms
64 bytes from 183.2.172.185: icmp_seq=3 ttl=53 time=8.673 ms
^C
--- www.a.shifen.com ping statistics ---
4 packets transmitted, 4 packets received, 0% packet loss
round-trip min/avg/max/stddev = 8.370/8.618/8.917/0.203 ms
Connect to WiFi using the server image via graphical interface
Log in to the Linux system. You can do this in one of three ways:
- If the CM5 Kit is connected to a network cable, you can remotely log in via SSH.
- If the CM5 Kit is connected to a debug serial port, you can use a serial terminal to log in (use MobaXterm, as Minicom cannot display the graphical interface).
- If the CM5 Kit is connected to an HDMI display, you can log in using the terminal displayed on the HDMI screen.
In the command line, enter the
nmtuicommand to open the WiFi connection interface.
root@armsom-cm5:~$ nmtuiSelect "Activate a connection" and press Enter.
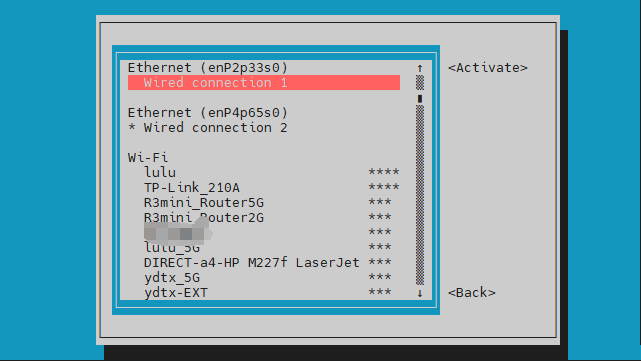
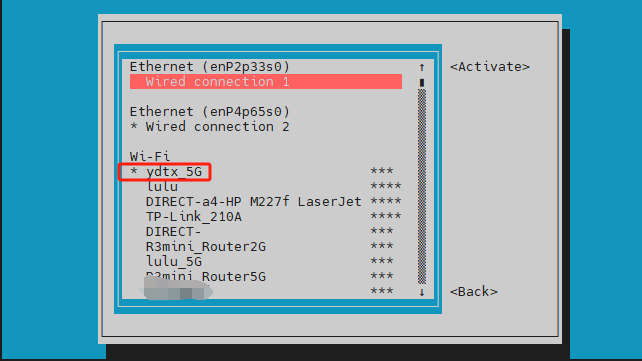
Select the WiFi hotspot you want to connect to and enter the password. Once connected, an asterisk (*) will appear next to the connected WiFi network.
Use the
ip addr show wlan0command to view the WiFi connection's IP address.root@armsom-cm5:~$ ip addr show wlan0
4: wlan0: <BROADCAST,MULTICAST,UP,LOWER_UP> mtu 1500 qdisc pfifo_fast state UP group default qlen 1000
link/ether b8:2d:28:5a:52:6a brd ff:ff:ff:ff:ff:ff
inet 192.168.10.9/24 brd 192.168.10.255 scope global dynamic noprefixroute wlan0
valid_lft 86316sec preferred_lft 86316sec
inet6 fe80::a422:3494:3147:92d/64 scope link noprefixroute
valid_lft forever preferred_lft foreverUse the
pingcommand to test WiFi network connectivity. You can interrupt the ping command usingCtrl+C.root@armsom-cm5:~$ ping www.baidu.com
PING www.a.shifen.com (183.2.172.185): 56 data bytes
64 bytes from 183.2.172.185: icmp_seq=0 ttl=53 time=8.370 ms
64 bytes from 183.2.172.185: icmp_seq=1 ttl=53 time=8.917 ms
64 bytes from 183.2.172.185: icmp_seq=2 ttl=53 time=8.511 ms
64 bytes from 183.2.172.185: icmp_seq=3 ttl=53 time=8.673 ms
^C
--- www.a.shifen.com ping statistics ---
4 packets transmitted, 4 packets received, 0% packet loss
round-trip min/avg/max/stddev = 8.370/8.618/8.917/0.203 ms
Test method for desktop image
Click the network configuration icon on the desktop (make sure the network cable is disconnected when testing WiFi).
After successfully connecting to WiFi, you can open a browser to check if you can access the internet.
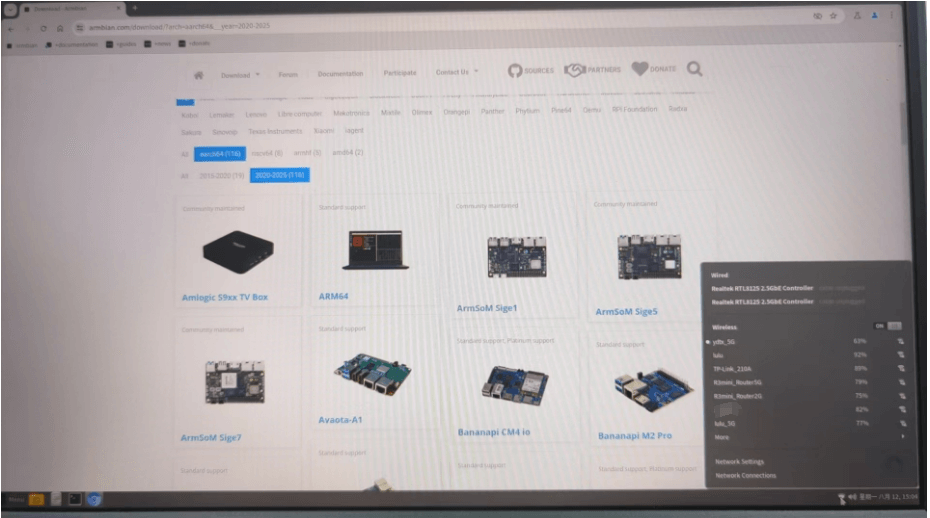
Network Settings Network Settings
Bluetooth
# 1. Activate Bluetooth
root@armsom-cm5:/# service bluetooth start
# 2. Enter bluetoothctl
root@armsom-cm5:/# bluetoothctl
# 3. Enter the following commands to connect
root@armsom-cm5:/# power on
root@armsom-cm5:/# agent on
root@armsom-cm5:/# default-agent
root@armsom-cm5:/# scan on
root@armsom-cm5:/# pair yourDeviceMAC
HDMI
The CM5 Kit supports HDMI up to 4Kp120.
- Use an HDMI cable to connect the CM5 Kit to an HDMI display.
- After booting the Linux system, if the HDMI display has an image output, it indicates that the HDMI interface is working normally.
Note: Many laptops have an HDMI port, but it usually only supports output, not HDMI input. This means it cannot display the HDMI output from other devices on the laptop screen. If you plan to connect the development board's HDMI to a laptop's HDMI port, please first confirm that your laptop supports HDMI input. If HDMI does not display anything, please check if the system you are using has a desktop version, as the server version will only display a terminal.
HDMI to VGA Display Test
You will need the following accessories:
- HDMI to VGA adapter
- A VGA cable and a monitor that supports VGA input
The HDMI to VGA display test is shown below:
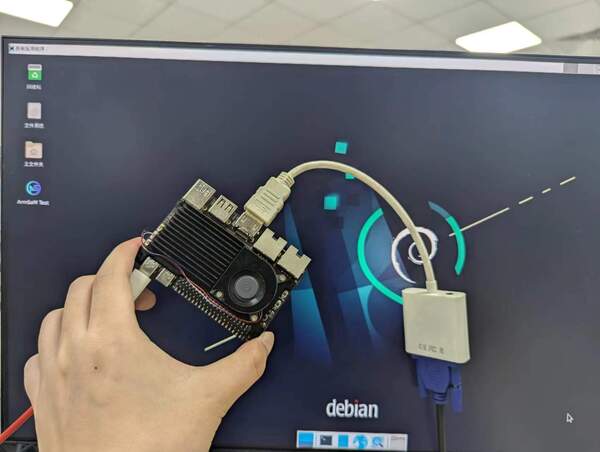
When using HDMI to VGA display, there is no need to configure anything on the CM5 Kit or Linux system. As long as the HDMI interface on the development board displays correctly, it should work. If you encounter issues, please check the HDMI to VGA adapter, VGA cable, and monitor.
USB
USB Mouse or Keyboard Connection Test
- Insert a USB keyboard into the CM5 Kit's USB port.
- Connect the CM5 Kit to an HDMI display.
- If the mouse or keyboard can operate the system normally, it indicates that the USB port is working correctly (the mouse can only be used in a desktop version of the system).
USB Storage Device Connection Test
- Insert a USB flash drive or USB external hard drive into the CM5 Kit's USB port.
- Run the following command. If you see an output for
sdX, it indicates that the USB drive is recognized successfully:
root@armsom-cm5:/# cat /proc/partitions | grep "sd*"
major minor  #blocks  name
   8        0  122880000 sda
- Use the
mountcommand to mount the USB drive to/mnt/, and then you can view the files on the USB drive:
root@armsom-cm5:/# sudo mount /dev/sda1 /test/
- After mounting, use the
df -hcommand to check the USB drive’s capacity and mount point:
root@armsom-cm5:/test# df -h | grep "sd"
/dev/sda        4.7G  4.7G     0  100% /test
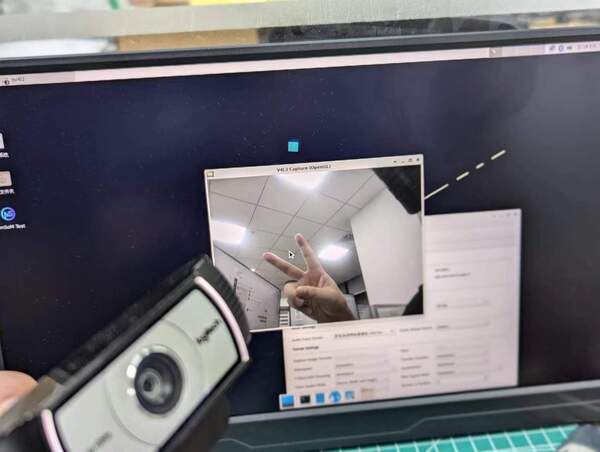
USB Camera
Prepare a USB camera that supports the UVC protocol, then insert the USB camera into the CM5 Kit's USB port.
Use the
v4l2-ctlcommand to see the device node information for the USB camera, which will be/dev/video0:
root@armsom-cm5:/# v4l2-ctl --list-devices
Logitech HD Webcam C93 (usb-xhci-hcd.5.auto-1):
        /dev/video40
        /dev/video41
        /dev/media4
- On a desktop system, you can use Cheese/V4L2 Test Bench to directly open the USB camera:
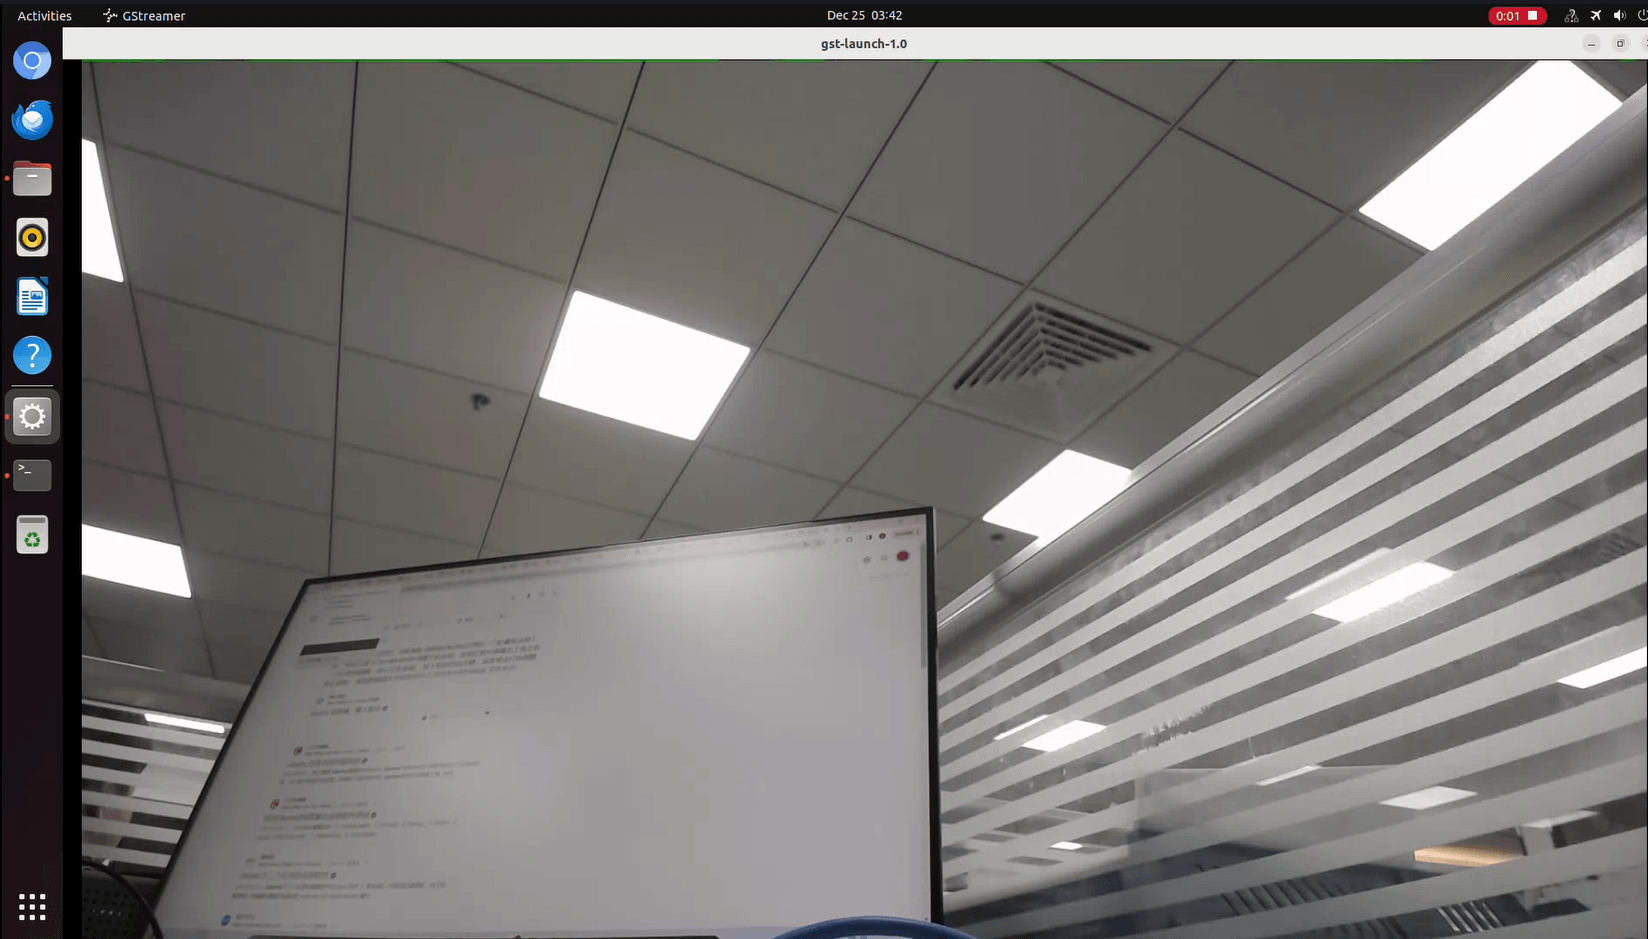
You can also use terminal commands to open the camera preview:
root@armsom-cm5:/# gst-launch-1.0 v4l2src device=/dev/video0 io-mode=4 ! videoconvert ! video/x-raw,format=NV12,width=1920,height=1080 ! xvimagesink;
Command to take a photo:
root@armsom-cm5:/# gst-launch-1.0 v4l2src device=/dev/video0 io-mode=4 ! videoconvert ! video/x-raw,format=NV12,width=1920,height=1080 ! jpegenc ! multifilesink location=/home/armsom/test.jpg;
Command to record a video:
gst-launch-1.0 v4l2src num-buffers=512 device=/dev/video0 io-mode=4 ! videoconvert ! video/x-raw, format=NV12, width=1920, height=1080, framerate=30/1 ! tee name=t ! queue ! mpph264enc ! queue ! h264parse ! mpegtsmux ! filesink location=/home/armsom/test.mp4
M.2 Key M
The CM5 Kit features an M.2 Key M connector:
- On the back of the product, there is an M.2 Key M connector. The board includes a standard M.2 2280 mounting hole for deploying an M.2 2280 NVMe SSD.
Note: This M.2 interface does not support M.2 SATA SSDs.
root@armsom-cm5:/# mkdir temp
root@armsom-cm5:/# mount /dev/nvme0n1 temp
Audio
Check the sound cards in the system.
root@armsom-cm5:/# aplay -l
**** List of PLAYBACK Hardware Devices ****
card 0: rockchipes8388c [rockchip,es8388-codec], device 0: 2a610000.sai-ES8323 HiFi ES8323 HiFi-0 [2a610000.sai-ES8323 HiFi ES8323 HiFi-0]
  Subdevices: 1/1
  Subdevice #0: subdevice #0
card 1: rockchipdp0 [rockchip-dp0], device 0: rockchip-dp0 spdif-hifi-0 [rockchip-dp0 spdif-hifi-0]
  Subdevices: 1/1
  Subdevice #0: subdevice #0
card 2: rockchiphdmi [rockchip-hdmi], device 0: rockchip-hdmi i2s-hifi-0 [rockchip-hdmi i2s-hifi-0]
  Subdevices: 1/1
  Subdevice #0: subdevice #0
Before playing audio, you need to turn on the relevant audio controls first.
root@armsom-cm5:/# amixer -c 0 cset numid=72 on
root@armsom-cm5:/# amixer -c 0 cset numid=73 on
Play audio
root@armsom-cm5:/# aplay -D hw:0,0 /usr/share/sounds/alsa/Front_Right.wav
FAN
The CM5 Kit comes with a 5V fan using a 0.8mm connector.
The fan has five default states:
| Temperature | State | PWM Speed |
|---|---|---|
| Below 50°C | 0 | 0 |
| 50°C-55°C | 1 | 50 |
| 55°C-60°C | 2 | 100 |
| 60°C-65°C | 3 | 150 |
| 65°C-70°C | 4 | 200 |
| Above 70°C | 5 | 250 |
// Check the current speed
root@armsom-cm5:/# cat /sys/class/hwmon/hwmon9/pwm1
40 PIN
The CM5 Kit provides a 40-PIN GPIO header, compatible with most sensors on the market.
RGB LED
The CM5 Kit has a green LED.
- User Green LED: By default, it remains on to indicate that the system is operating normally.
RTC
- The CM5 Kit is equipped with an RTC IC LK8563S.
- First, insert the RTC battery into the 2-pin header to power the RTC IC.
- Note: The RTC battery should remain in the RTC connector, and confirm that the rtc LK8563S device has been created.
root@armsom-cm5:/# dmesg | grep rtc
[    3.476710] rtc-hym8563 2-0051: rtc information is valid
[    3.488534] rtc-hym8563 2-0051: registered as rtc0
[    3.490109] rtc-hym8563 2-0051: setting system clock to 2024-06-16T09:45:52 UTC (1718531152)
- Locate rtc0, then use the following commands to set the system time and synchronize it with rtc0.
root@armsom-cm5:/# hwclock -r
2023-11-03 10:32:40.461910+00:00
root@armsom-cm5:/# date
Fri Nov 03 2023 10:33:12 UTC
root@armsom-cm5:/# hwclock -w
root@armsom-cm5:/# hwclock -r
root@armsom-cm5:/# poweroff
- Remove the RTC battery, wait for 10 minutes or longer, reinsert the RTC battery, and power on Sige7. Check if the RTC is synchronized with the system clock.
root@armsom-cm5:/# hwclock -r
2023-11-03 10:35:40.461910+00:00
root@armsom-cm5:/# date
Fri Nov 03 2023 10:36:01 UTC
MIPI-CSI
Enable Camera Configuration
Before using a camera, enable the camera device-tree overlay by locating the following two lines:
root@armsom:~# nano /boot/uEnv/uEnvarmsom-cm5-io.txt
#dtoverlay=/dtb/overlay/rk3576-armsom-cm5-io-camera-imx219-cs0-overlay.dtbo
#dtoverlay=/dtb/overlay/rk3576-armsom-cm5-io-camera-ov13850-cs1-overlay.dtbo
Uncomment the line for the camera you want to use, save the file, exit, and reboot.
Basic Commands
- First, check the device node name assigned to each camera in different situations:
- When both cameras are enabled at the same time, the IMX219 camera is usually
video22and the OV13850 camera is usuallyvideo31. - When only one camera is enabled, its node is usually
video11.
- View the media topology. When both cameras are enabled, the IMX219 camera is usually
media0and the OV13850 camera is usuallymedia1.
root@armsom:/# media-ctl -d /dev/media1 -p
View the video formats supported by the video node.
root@armsom:~# v4l2-ctl -d /dev/video31 --get-fmt-video
Format Video Capture Multiplanar:
        Width/Height      : 2112/1568
        Pixel Format      : 'NV12' (Y/UV 4:2:0)
        Field             : None
        Number of planes  : 1
        Flags             :
        Colorspace        : sRGB
        Transfer Function : Rec. 709
        YCbCr/HSV Encoding: Rec. 709
        Quantization      : Full Range
        Plane 0           :
           Bytes per Line : 2112
           Size Image     : 4967424
Install gst-launch-1.0
- Check if the system has gst-launch-1.0 installed; if not, you'll need to install it first.
root@armsom:/# apt-get update
root@armsom:/# apt-get install gstreamer1.0*
Using the ArmSoM camera-module1
This camera uses the camera-module1 module. After connecting and powering on the camera module, check the boot log.
root@armsom:/# dmesg | grep ov13850
[    2.302905] ov13850 5-0010: driver version: 00.01.05
[    2.302944] ov13850 5-0010: Failed to get power-gpios, maybe no use
[    2.303067] ov13850 5-0010: supply avdd not found, using dummy regulator
[    2.303153] ov13850 5-0010: supply dovdd not found, using dummy regulator
[    2.303186] ov13850 5-0010: supply dvdd not found, using dummy regulator
[    2.303213] ov13850 5-0010: could not get default pinstate
[    2.303220] ov13850 5-0010: could not get sleep pinstate
[    2.308532] ov13850 5-0010: Detected OV00d850 sensor, REVISION 0xb2
[    2.332058] ov13850 5-0010: Consider updating driver ov13850 to match on endpoints
[    2.332084] rockchip-csi2-dphy csi2-dphy0: dphy0 matches m00_b_ov13850 5-0010:bus type 5
Replace /dev/video31 in the commands below with the video node actually registered on your system.
- Capture an image using
v4l2-ctl.
// video31 or video11
root@armsom:/# systemctl restart rkaiq_3A.service
root@armsom:/# v4l2-ctl -d /dev/video31 --set-selection=target=crop,top=0,left=0,width=2112,height=1568 --set-fmt-video=width=2112,height=1568,pixelformat=NV12 --stream-mmap=3 --stream-to=/nv12.bin --stream-count=1 --stream-poll
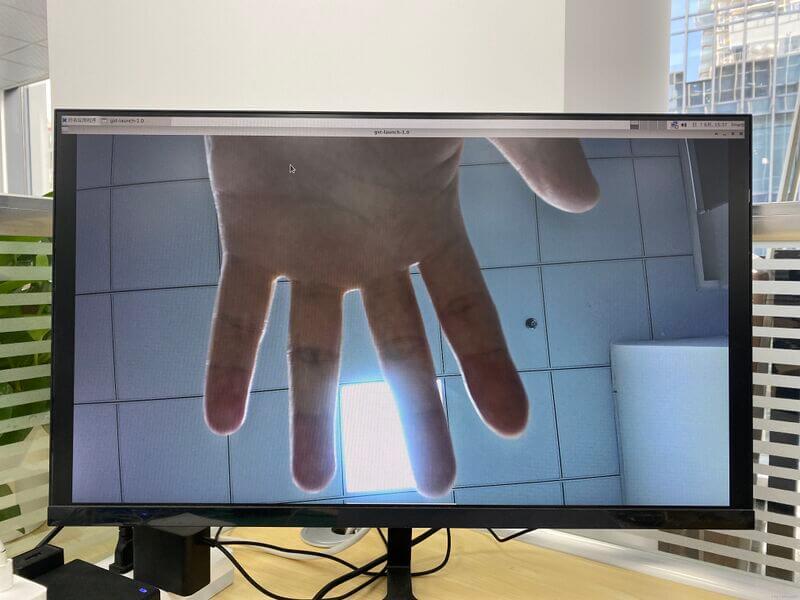
- Preview (requires a monitor for real-time preview)
// video31 or video11
root@armsom:/# gst-launch-1.0 v4l2src device=/dev/video31 ! video/x-raw,format=NV12,width=2112,height=1568, framerate=30/1 ! xvimagesink
Using Raspberry Pi Camera Module 2
This camera uses the Raspberry Pi Camera Module 2 module. After connecting and powering on the camera module, check the boot log.
root@armsom:/# dmesg | grep imx219
[    4.049680] imx219 4-0010: driver version: 00.01.02
[    4.074430] imx219 4-0010: Model ID 0x0219, Lot ID 0x258b89, Chip ID 0x056c
[    4.074460] imx219 4-0010: Consider updating driver imx219 to match on endpoints
[    4.074477] rockchip-csi2-dphy csi2-dphy4: dphy4 matches m01_b_imx219 4-0010:bus type 5
After confirming the driver is loaded, run the following command to take a photo or record a video
- take a photo
video22 or video11
root@armsom:~# GST_V4L2SRC_MAX_RESOLUTION=3280x2464 gst-launch-1.0 v4l2src device=/dev/video11 io-mode=4 ! videoconvert ! video/x-raw,format=NV12,width=3280,height=2464 ! jpegenc ! multifilesink location=photo.jpg
- record a video
video22 or video11
root@armsom:~# GST_V4L2SRC_MAX_RESOLUTION=3280x2464 gst-launch-1.0 v4l2src num-buffers=512 device=/dev/video11 io-mode=4 ! videoconvert ! video/x-raw, format=NV12, width=1920, height=1080, framerate=30/1 ! tee name=t ! queue ! mpph264enc ! queue ! h264parse ! mpegtsmux ! filesink location=/tmp/video.mp4
- Preview (requires a monitor for real-time preview)
video22 or video11
root@armsom:~# GST_V4L2SRC_MAX_RESOLUTION=3280x2464 gst-launch-1.0 v4l2src device=/dev/video11 ! video/x-raw,format=NV12,width=3280,height=2464, framerate=30/1 ! xvimagesink
Due to differences in mirror versions, some versions require manually installing gstreamer1.0. In these cases, if you get an error when using the command above to capture images, you can remove the GST_V4L2SRC_MAX_RESOLUTION=3280x2464 prefix and capture the images directly.
MIPI DSI
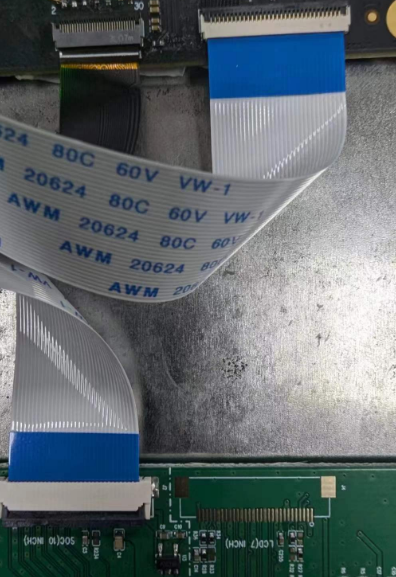
The CM5 Kit supports resolutions up to 2K@60Hz.
- Connect the ribbon cable as shown in the image below:
- Configuring a 10.1-inch MIPI LCD screen:
The Linux image does not enable the MIPI LCD screen configuration by default. To use the MIPI LCD screen, you need to enable it manually.
Use
nanoto open the/boot/armbianEnv.txtfile:
sudo nano /boot/armbianEnv.txt
- Find or add the "overlays=" keyword in the file.
// Choose one based on the product you have
overlays=armsom-cm5-io-display-10hd // cm5-kit
overlays=armsom-cm5-rpi-cm4-io-display // cm5-rpi-cm4-io
Shortcut keys: Ctrl + S to save Ctrl + X to exit
// Remount the file system
root@armsom-cm5-io:/home/armsom# sudo mount -o remount
// or
root@armsom-cm5-io:/home/armsom# sync
If you also need to use touch functionality, you will need to load the corresponding driver:
root@armsom-cm5-io:/home/armsom# insmod /usr/lib/modules/6.1.75-vendor-rk35xx/kernel/drivers/input/touchscreen/gt9xx/goodix_gt9xx.ko
Reboot the device to apply the Overlays settings and enable Display 10 HD support.
Supply Declaration
ArmSoM-CM5 will remain in production until at least August 2034.
Accessories
The official accessories designed for the ArmSoM-CM5-IO are intended to help you achieve optimal performance from your computer.
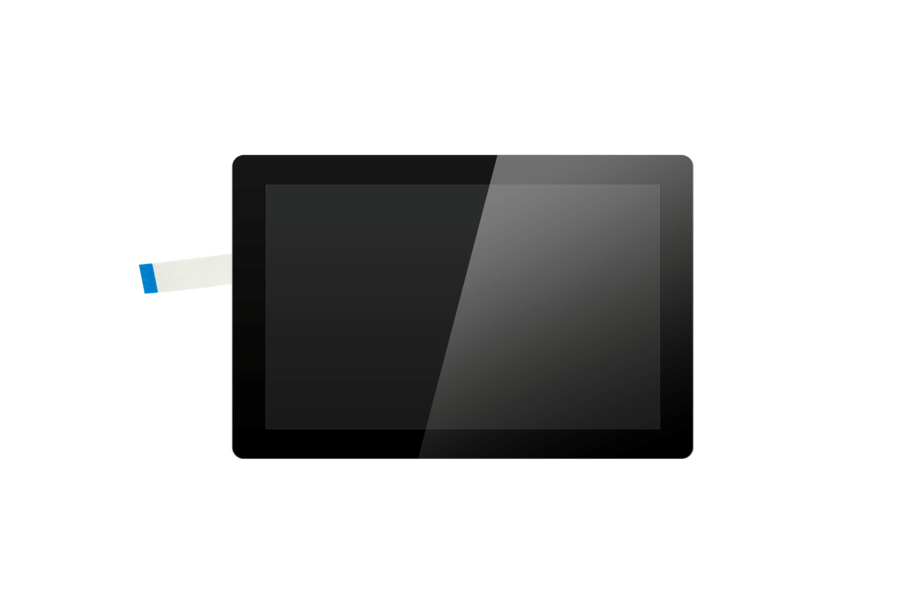
Display-10-HD
A 10.1-inch touchscreen display, ideal for interactive projects like entertainment systems and information dashboards.
Camera Module 1
The camera module 1, compatible with the OV13850 sensor, is a low-power camera module.
Purchase Samples
ArmSoM Official Website: https://www.armsom.org/product-page/cm5
ArmSoM Official AliExpress Store: https://aliexpress.com/item/3256807679122184.html
ArmSoM Official Taobao Store: https://item.taobao.com/item.htm?id=842137173767
For OEM & ODM, please contact: sales@armsom.org
CM5-IO · Purchase Samples
ArmSoM Official Website: https://www.armsom.org/product-page/cm5
ArmSoM Official AliExpress Store: https://aliexpress.com/item/3256807679122184.html
ArmSoM Official Taobao Store: https://item.taobao.com/item.htm?id=842137173767
For OEM & ODM, please contact: sales@armsom.org
What do others say about the CM5?
- itsfoss ArmSoM-CM5:ArmSoM CM5 Powerful Replacement for Raspberry Pi CM4
- Technically Unsure: ArmSoM CM5 | Can it Beat the Raspberry Pi CM5?
- Platima Tinkers: ArmSoM CM5 Review: RK3576 Compute Module with REAL CM4 Compatibility
- sbc compare: CM5 Benchmark Comparison on sbc.compare
CM5-IO · What do others say about the CM5?
- itsfoss ArmSoM-CM5:ArmSoM CM5 Powerful Replacement for Raspberry Pi CM4
- Technically Unsure: ArmSoM CM5 | Can it Beat the Raspberry Pi CM5?
Use case
- edge machine learning: edge machine learning
Notes
- Before handling the device, please ensure you wear an anti-static wrist strap or take electrostatic discharge measures to prevent damage to the development board.
- Assembly should be performed in an electrostatic-safe environment, avoiding operations in dry and low-humidity conditions.
- When not in use, store the device in an anti-static bag and keep it in a suitably temperature-controlled, low-humidity environment to prevent static electricity buildup.
- When handling the device, avoid friction or collisions to prevent the generation of static electricity that could cause damage.
- When holding the device, try to avoid direct contact with the chips on the mainboard to prevent static damage.
- Do not plug or unplug wires or other devices while the device is operating to avoid damage from electrical surges.
- When connecting or disconnecting the GPIO/MIPI expansion interfaces, make sure to turn off the power and disconnect the power cable to prevent damage from electrical current.
Without effective cooling measures, the surface temperature of the main chip may exceed 60 degrees. When handling the device, please avoid direct contact with the SoC and surrounding power inductors to prevent burns. Ensure that the environment is well-ventilated during operation to prevent localized heat buildup, which could lead to overheating. Additionally, do not place the device in direct sunlight. It is recommended to choose between the official cooling fan, heat sink, or third-party cooling kits based on specific usage conditions to ensure optimal cooling performance.
CM5-IO · Notes
- Before handling the device, please ensure you wear an anti-static wrist strap or take electrostatic discharge measures to prevent damage to the development board.
- Assembly should be performed in an electrostatic-safe environment, avoiding operations in dry and low-humidity conditions.
- When not in use, store the device in an anti-static bag and keep it in a suitably temperature-controlled, low-humidity environment to prevent static electricity buildup.
- When handling the device, avoid friction or collisions to prevent the generation of static electricity that could cause damage.
- When holding the device, try to avoid direct contact with the chips on the mainboard to prevent static damage.
- Do not plug or unplug wires or other devices while the device is operating to avoid damage from electrical surges.
- When connecting or disconnecting the GPIO/MIPI expansion interfaces, make sure to turn off the power and disconnect the power cable to prevent damage from electrical current.
Without effective cooling measures, the surface temperature of the main chip may exceed 60 degrees. When handling the device, please avoid direct contact with the SoC and surrounding power inductors to prevent burns. Ensure that the environment is well-ventilated during operation to prevent localized heat buildup, which could lead to overheating. Additionally, do not place the device in direct sunlight. It is recommended to choose between the official cooling fan, heat sink, or third-party cooling kits based on specific usage conditions to ensure optimal cooling performance.