13. Check the system information of the board
13.1 Check the overall system information
# Execute the following command in the armsom terminal
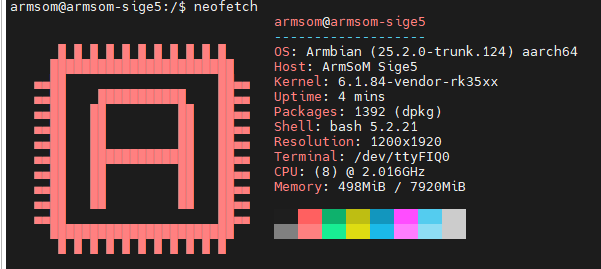
neofetch
The following information can be seen:

Its meaning is:
- OS: armbian 25.2.0 version
- Host: Board name armsom sige5
- Kernel: Kernel version 6.1.84 version
- Uptime: Board online time 4min
- Package: 1392 installation packages have been installed
- Shell: Indicates that the shell environment used by armsom is bash 5.2.21 version
- Resolution: Screen resolution is 1200*1920
- Terminal: Terminal uses /dev/ttyFIQ0
- CPU: 8 cores, due to the use of big and small core architecture, the actual CPU frequency cannot be displayed
- Memory: A total of 7920MiB (8G), currently using 498MiB
13.2 View the file system
#Use the command
df -h

# The actual machine runs as follows
armsom@armsom-sige5:/$ df -h
File system Capacity Used Available Used% Mount point
Filesystem Size Used Avail Use% Mounted on
tmpfs 793M 9.5M 783M 2% /run
/dev/mmcblk1p1 57G 5.1G 51G 9% /
tmpfs 3.9G 0 3.9G 0% /dev/shm
tmpfs 5.0M 0 5.0M 0% /run/lock
tmpfs 3.9G 8.0K 3.9G 1% /tmp
/dev/zram1 47M 2.9M 41M 7% /var/log
tmpfs 792M 68K 792M 1% /run/user/112
tmpfs 792M 56K 792M 1% /run/user/1000
13.3 Performance monitoring tool
13.3.1 top
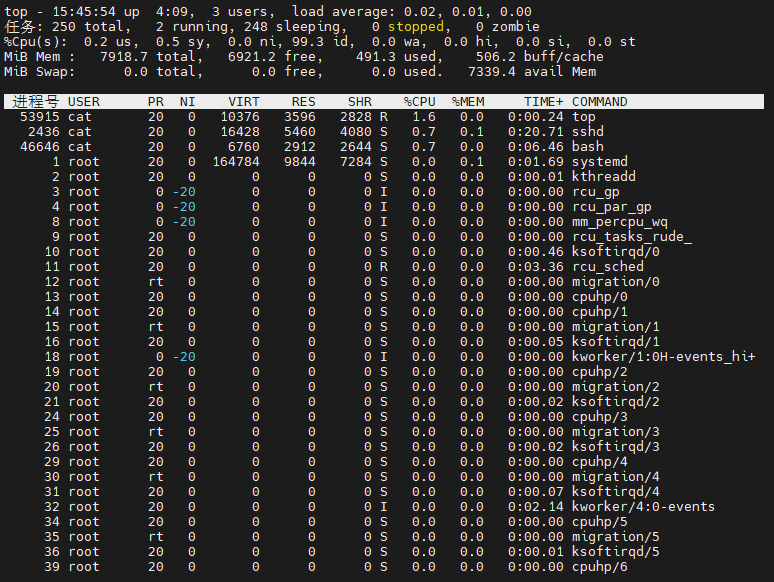
A monitoring tool that comes with the board, which can view some basic information of the process
#Use command
top

13.3.2 htop
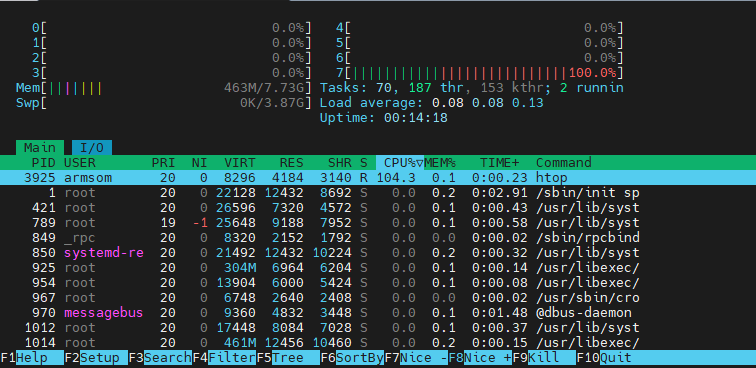
htop It is an interactive process viewer in Linux system, a text mode application (in console or X terminal), which requires ncurses. Compared with the traditional top in Linux, htop is more user-friendly. It allows users to operate interactively, supports color themes, can scroll through the process list horizontally or vertically, and supports mouse operation.
#Use command
htop

Some detailed usage of htop (click to jump link)
13.4 View cpu information
The /proc/cpuinfo file stores CPU information, which can be viewed through the following command:
armsom@armsom-sige5:~$ cat /proc/cpuinfo
processor       : 0
BogoMIPS        : 48.00
Features        : fp asimd evtstrm aes pmull sha1 sha2 crc32 cpuid
CPU implementer : 0x41
CPU architecture: 8
CPU variant     : 0x0
CPU part        : 0xd03
CPU revision    : 4

processor       : 1
BogoMIPS        : 48.00
Features        : fp asimd evtstrm aes pmull sha1 sha2 crc32 cpuid
CPU implementer : 0x41
CPU architecture: 8
CPU variant     : 0x0
CPU part        : 0xd03
CPU revision    : 4

processor       : 2
BogoMIPS        : 48.00
Features        : fp asimd evtstrm aes pmull sha1 sha2 crc32 cpuid
CPU implementer : 0x41
CPU architecture: 8
CPU variant     : 0x0
CPU part        : 0xd03
CPU revision    : 4

processor       : 3
BogoMIPS        : 48.00
Features        : fp asimd evtstrm aes pmull sha1 sha2 crc32 cpuid
CPU implementer : 0x41
CPU architecture: 8
CPU variant     : 0x0
CPU part        : 0xd03
CPU revision    : 4

processor       : 4
BogoMIPS        : 48.00
Features        : fp asimd evtstrm aes pmull sha1 sha2 crc32 cpuid
CPU implementer : 0x41
CPU architecture: 8
CPU variant     : 0x1
CPU part        : 0xd08
CPU revision    : 0

processor       : 5
BogoMIPS        : 48.00
Features        : fp asimd evtstrm aes pmull sha1 sha2 crc32 cpuid
CPU implementer : 0x41
CPU architecture: 8
CPU variant     : 0x1
CPU part        : 0xd08
CPU revision    : 0

processor       : 6
BogoMIPS        : 48.00
Features        : fp asimd evtstrm aes pmull sha1 sha2 crc32 cpuid
CPU implementer : 0x41
CPU architecture: 8
CPU variant     : 0x1
CPU part        : 0xd08
CPU revision    : 0

processor       : 7
BogoMIPS        : 48.00
Features        : fp asimd evtstrm aes pmull sha1 sha2 crc32 cpuid
CPU implementer : 0x41
CPU architecture: 8
CPU variant     : 0x1
CPU part        : 0xd08
CPU revision    : 0

Serial          : ef3fdfea9ac14db7
//ARM_CPU_PART的定义

#define ARM_CPU_PART_AEM_V8             0xD0F
#define ARM_CPU_PART_FOUNDATION         0xD00
#define ARM_CPU_PART_CORTEX_A57         0xD07
#define ARM_CPU_PART_CORTEX_A72         0xD08
#define ARM_CPU_PART_CORTEX_A53         0xD03
#define ARM_CPU_PART_CORTEX_A73         0xD09
#define ARM_CPU_PART_CORTEX_A75         0xD0A
#define ARM_CPU_PART_CORTEX_A35         0xD04
#define ARM_CPU_PART_CORTEX_A55         0xD05
#define ARM_CPU_PART_CORTEX_A76         0xD0B
#define ARM_CPU_PART_NEOVERSE_N1        0xD0C
#define ARM_CPU_PART_CORTEX_A77         0xD0D
#define ARM_CPU_PART_NEOVERSE_V1        0xD40
#define ARM_CPU_PART_CORTEX_A78         0xD41
#define ARM_CPU_PART_CORTEX_A78AE       0xD42
#define ARM_CPU_PART_CORTEX_X1          0xD44
#define ARM_CPU_PART_CORTEX_A510        0xD46
#define ARM_CPU_PART_CORTEX_A710        0xD47
#define ARM_CPU_PART_CORTEX_X2          0xD48
#define ARM_CPU_PART_NEOVERSE_N2        0xD49
#define ARM_CPU_PART_CORTEX_A78C        0xD4B
From the above information, we can see that the armsom sige5 CPU has 8 cores
- The cores 0-3 use 0xD05. According to the ARM_CPU_PART definition above, it is CORTEX_A53.
- The core of 4-7 uses 0xD0B. According to the definition of ARM_CPU_PART above, it is CORTEX_A72
- The RK3576 series chip is composed of 4xCORTEX_A72+4xCORTEX_A53
13.5 Check soc frequency
- Check soc frequency
The default is variable frequency mode, and the frequency will change with the current application
armsom@armsom-sige5:/sys/devices/system/cpu$ cat cpu*/cpufreq/scaling_cur_freq
408000
408000
408000
408000
408000
408000
408000
408000
- Check the gpu frequency
The default is variable frequency mode, and the frequency will change with the current application
armsom@armsom-sige5:/$ cat /sys/class/devfreq/27700000.npu/cur_freq
300000000
- Check the npu frequency
The default is variable frequency mode, and the frequency will change with the current application
armsom@armsom-sige5:/$ sudo cat /sys/kernel/debug/clk/clk_summary | grep npu*
scmi_clk_npu 0 0 0 200000000 0 0 50000 Y
tclk_npu_wdt 0 0 0 24000000 0 0 50000 N
clk_nputimer_root 0 0 0 24000000 0 0 50000 N clk_nputimer1 0 0 0 24000000 0 0 50000 N clk_nputimer0 0 0 0 24000000 0 0 50000 N clk_npu_cm0_rtc 0 0 0 32768 0 0 50000 N hclk_npu_cm0_root 0 0 0 396000000 0 0 50000 N fclk_npu_cm0_core 0 0 0 396000000 0 0 50000 N pclk_nputop_root 0 0 0 100000000 0 0 50000 N pclk_npu_wdt 0 0 0 100000000 0 0 50000 N
pclk_npu_timer 0 0 0 100000000 0 0 50000 N
- Check DDR frequency
The default is variable frequency mode, and the frequency will change with the current application
armsom@armsom-sige5:/$ cat /sys/class/devfreq/dmc/cur_freq
2112000000
13.6. Check soc temperature
Use Thermal to monitor the temperature of the chip
# List all thermal devices
ls /sys/class/thermal
armsom@armsom-sige5:~$ ls /sys/class/thermal
cooling_device0 cooling_device2 thermal_zone0 thermal_zone2 thermal_zone4
cooling_device1 cooling_device3 thermal_zone1 thermal_zone3 thermal_zone5
- You can see that there are four cooling_devices and six thermal_zones in the file
cooling_device is when the SOC reaches temperature control, the SOC reduces some of its own device power consumption to reduce the temperature
Cooling_device0 corresponds to the frequency reduction device of the four small cores of the SOC
Cooling_device1 corresponds to the frequency reduction device of two large cores of the SOC
Cooling_device2 corresponds to the frequency reduction device of the other two large cores of the SOC
Cooling_device3 corresponds to the frequency reduction device of the GPU of the SOC
thermal_zone is the temperature monitoring point inside the SOC
thermal_zone0 corresponds to the main temperature monitoring of the SOC, and the startup and shutdown of cooling_device are dependent on this device
thermal_zone1 corresponds to the temperature monitoring of two large cores of the SOC
thermal_zone2 corresponds to the temperature monitoring of the other two large cores of SOC
thermal_zone3 corresponds to the temperature monitoring of the four small cores of SOC
thermal_zone4 corresponds to the temperature monitoring of the chip center
thermal_zone5 corresponds to the temperature monitoring of the GPU of SOC
cat /sys/class/thermal/thermal_zone0/temp
# Other temperature control monitoring points can also be operated as above to check the temperature
13.7 View or modify the soc scheduling policy
The CPU scheduling policy (cluster) of rk3576 used by armsom does not control the frequency conversion of each core separately. rk divides the 8 cores into 2 clusters
armsom@armsom-sige5:~$ ls /sys/devices/system/cpu/cpufreq/
policy0 policy4
- 4 CORTEX_A53 cores – policy0
- 4 CORTEX_A72 cores – policy4
This makes control much easier, and the overall performance of the SOC can be controlled by controlling the cluster
The method of configuring these cluster fixed frequencies is very simple
# View the current SOC scheduling policy
cat /sys/devices/system/cpu/cpufreq/policy0/scaling_governor

# The actual machine runs as follows (the current SOC frequency modulation policy is ondemand)
armsom@armsom-sige5:~$ cat /sys/devices/system/cpu/cpufreq/policy0/scaling_governor
ondemand
armsom@armsom-sige5:~$

# View all SOC scheduling policies
cat /sys/devices/system/cpu/cpufreq/policy0/scaling_available_governors

# The actual machine runs as follows (there are 7 types)
armsom@armsom-sige5:~$ cat /sys/devices/system/cpu/cpufreq/policy0/scaling_available_governors
interactive conservative ondemand userspace powersave performance schedutil
armsom@armsom-sige5:~$
- conservative: Dynamic frequency adjustment based on CPU load, smoothly increasing or decreasing frequency according to a certain ratio.
- ondemand: Dynamic frequency adjustment based on CPU load, with a large frequency adjustment range, can be adjusted directly to the highest or lowest frequency.
- interactive: Dynamic frequency adjustment based on CPU load, faster response time, more configurable parameters, and more flexibility than ondemand.
- userspace: Provides corresponding interfaces for user-mode applications to adjust frequency.
- powersave: Power consumption is prioritized, and the frequency is always set to the lowest value.
- performance: Performance is prioritized, and the frequency is always set to the highest value.
- schedutil: EAS uses governor. EAS (Energy Aware Scheduling) is a new generation of task scheduling strategy. It combines the CPUFreq and CPUIdle strategies. When selecting a CPU to run a task, it takes both performance and power consumption into consideration, ensuring the lowest system energy consumption without affecting performance. Schedutil scheduling policy is a CPU frequency adjustment policy specifically used for EAS
Cluster scheduling policy settings (taking policy0 as an example):
# This configuration requires the root user to operate
su root
# Enter your password (default is "root")

# View supported scheduling policies
cat /sys/devices/system/cpu/cpufreq/policy0/scaling_available_governors

# Adjust to the scheduling policy you need (taking performance as an example)
echo performance > /sys/devices/system/cpu/cpufreq/policy0/scaling_governor
Cluster fixed frequency policy settings (taking policy0 as an example):
# This configuration requires the root user to operate
su root
# Enter your password (default is "root")

# Adjust the policy to ``userspace``
echo userspace > /sys/devices/system/cpu/cpufreq/policy0/scaling_governor

# View the available CPU frequency
cat /sys/devices/system/cpu/cpufreq/policy0/scaling_available_frequencies

# The actual machine runs as follows (there are 8 types)
armsom@armsom-sige5:~$ cat /sys/devices/system/cpu/cpufreq/policy0/scaling_available_frequencies
408000 600000 816000 1008000 1200000 1416000 1608000 1800000
armsom@armsom-sige5:~$

# Set the frequency (set to 600MHz)
echo 600000 > /sys/devices/system/cpu/cpufreq/policy0/scaling_setspeed
The above is only temporary and will not work after reboot. If you need to fix it permanently, you can add the above command at the end of /etc/init.d/boot_init.sh.