AIM Family User Manual
Here’s the translation:
AIM User Manual: This manual helps users understand the basic usage of the AIM development kit and the necessary preparations. Start using your AI Module 🚀
Getting Started
Before you start using the AIM development kit, please prepare the following items:
Tools Preparation
- Power supply
- System Installation (Choose one)
- Onboard eMMC boot
- USB Type-C data cable: Write the image to the AIM development kit from the Type-C port. You will need a Type-C data cable to connect the AIM development kit to a PC.
- MicroSD/TF card boot
- MicroSD/TF card: Class 10 or above, at least 8GB SDHC, and a card reader.
- The following are high-speed TF cards tested and verified by the ArmSoM team:
- SanDisk 32GB TF (MicroSD) (Recommended for developers)
- SanDisk 32GB TF (MicroSD) Dashcam & Security Surveillance Card (Recommended for long-term operation)
- SanDisk TF 8G Class10 microSD
- SanDisk TF 128G Class10 microSD XC TF 128G 48MB/S
- Onboard eMMC boot
You can set up the AIM development kit as an interactive desktop computer or a headless computer that can only be accessed via the network. To set up the AIM development kit as a headless computer, configure the hostname, user account, network connection, and SSH when installing the OS for the first time. If you want to use the AIM development kit directly, you will need the following additional accessories:
Optional Items
- Keyboard & Mouse
- HDMI monitor and HDMI cable
- DP monitor and DP cable
- Ethernet cable
- Camera module
- It is recommended to use the camera-module1.
- LCD display
- It is recommended to use the Display 10 HD.
Power Supply
The table below shows the power specifications required to power the AIM development kit. You can use any high-quality power supply that provides the correct power mode.
| Model | Recommended Power (Voltage/Current) | Power Mode |
|---|---|---|
| AIM7 + AIM-IO | 5V/3A, 9V/2A, 12V/2A, 15V/2A | DC adapter, 2.5mm |
| AIM5 + AIM-IO | 5V/3A, 9V/2A, 12V/2A, 15V/2A | DC adapter, 2.5mm |
System Image Burning
The AIM development kit supports multiple system images, and you can choose the appropriate image to download according to your needs.
A system image includes the Linux kernel, basic programs, etc., which are essential for running the AIM development kit, so you need to install the image before running the product.
1. Obtaining the System Image
Visit the Baidu Cloud resource page to obtain the system image: Baidu Cloud Link
- The default account/password for the official image is armsom/armsom, root/root.
- The Debian system is adapted and compiled using the SDK provided by RK, making it more suitable for users with ISP, GPU, codec, and NPU needs. It can be burned to eMMC using RKDevTool or to an SD card using SDDiskTool.
- Ubuntu, Armbian, and OpenWrt are additional options provided by ArmSoM for open-source enthusiasts.
2. Burning Ubuntu, Armbian, OpenWrt Systems
2.1. Burning to microSD using a Card Reader
Burning the OS image to microSD via Etcher
This method is suitable for burning the system to an SD card and is available on Windows, macOS, and Linux x64 operating systems.
1. A microSD card
2. An SD card reader
3. Download the Ubuntu/Armbian/OpenWrt system image for the respective product.
4. Insert the SD card into the SD card reader, then insert the SD card reader into the computer's USB port.
Burning the OS image to microSD via Etcher
Download balenaEtcher from the balena official website, and select the appropriate host system. The Linux version is in AppImage format.
Insert the MicroSD card into the MicroSD card reader.
Open the Etcher window, first select "Flash from file," find the location where you downloaded the image, and double-click to select it.

- Then click "Select target" and choose the MicroSD card you want to burn.
- Click "Flash" and wait for the burning process to complete. This will take some time.
- Once the burning is successful, it will show as pictured below:

1. On Windows, burning the image requires running "as administrator," and some Linux users may need to use the chmod command to make it executable.
2. If there is an error during the burning process, please try again.
Burning the OS image to microSD via Win32DiskImager
- Download the Win32DiskImager tool.
- Open Win32DiskImager.
- Click the folder icon button and then select the image you want to burn.
- After completing the above steps, click the "Write" button to start burning the image, then wait for the burning process to complete.
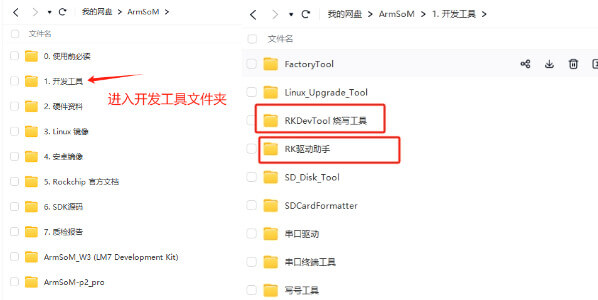
2.2. Burning to eMMC via USB Cable (Windows)
2.2.1. Tool Acquisition and Installation
Burning an image to eMMC requires using the RKDevTool and the RK Driver Assistant (DriverAssistant).
Click to enter the link: Baidu Cloud Link
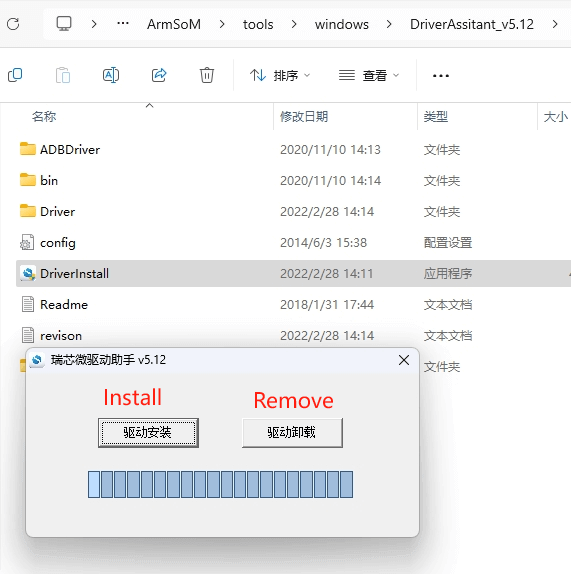
2.2.2. Installing DriverAssistant
Unzip the DriverAssistant software package and double-click DriverInstall.exe to enter the driver installation interface.
Click "Install Driver" to start installing the driver. If you are unsure whether a previous version of the driver was installed, first click "Uninstall Driver" to remove the old version, then click "Install Driver."
2.2.3. Installing RKDevTool
RKDevTool is a dedicated USB burning tool for Rockchip, available on the Windows platform, which can be used to download system images to the product via the USB interface.
After unzipping the package, you can use it without installation. Double-click RKDevTool.exe to enter the software interface.
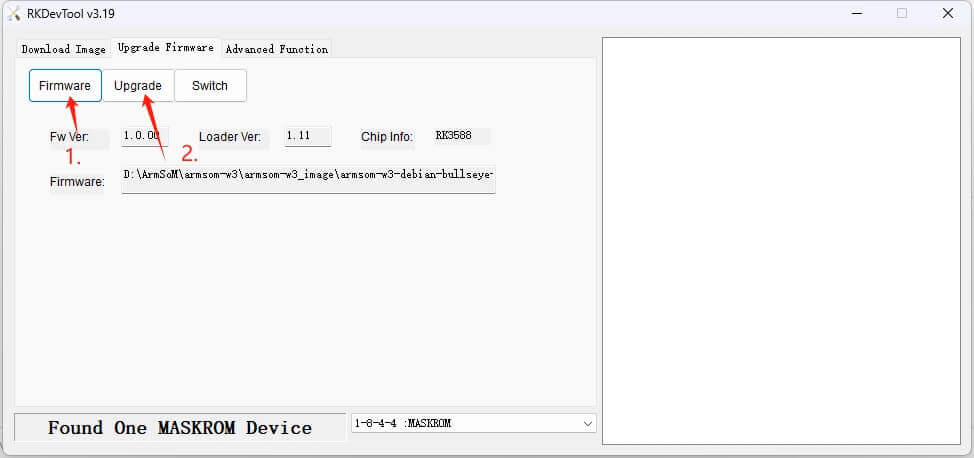
The software mainly has three sections: Download Image (burn image by address), Upgrade Firmware, and Advanced Functions.
2.1.4. Burning Image in MASKROM/Loader Mode
This mode is suitable for products that have not yet been burned with a system or where the burned system is damaged and cannot run (suitable for all situations).
Open the RKDevTool burning tool and set the product to burn mode.
Entering Loader Mode
1. Prepare a Type-C cable for burning the image.
2. Disconnect all cables that might power the product, such as the power cable, USB cable, etc.
3. Use a Type-C cable to connect the product's OTG interface to a USB port on the computer, then open the RKDevTool software.
4. Short pin 10 (FC REC) and pin 9 (GND) on the 12-pin connector, then power the product via DC.
5. Wait for the software to prompt "Loader device found" (as shown below), then release the buttons.
6. If unsuccessful, repeat steps 2-5.
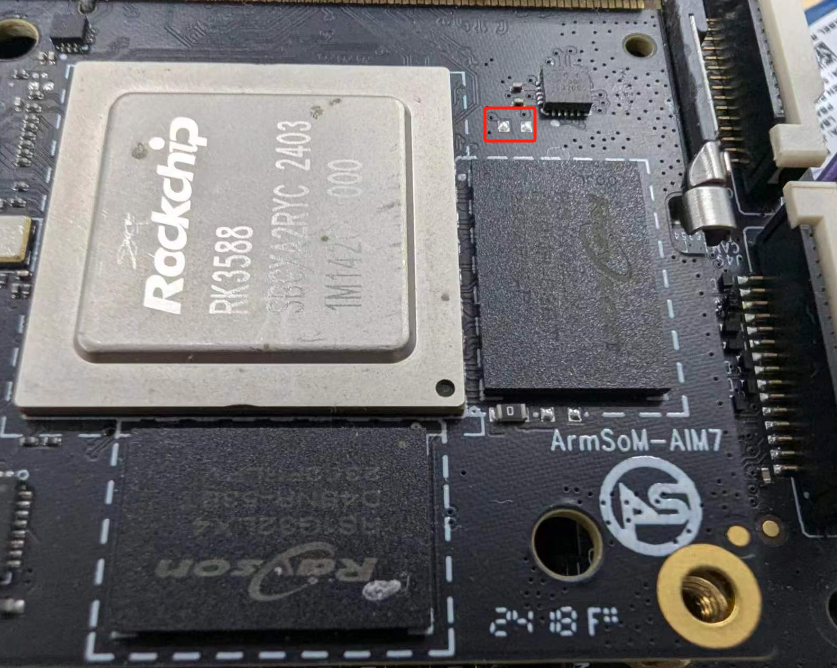
Entering MASKROM Mode
1. Prepare a Type-C cable for burning the image.
2. Disconnect all cables that might power the product, such as the power cable, USB cable, etc.
3. Use a Type-C cable to connect the product's OTG interface to a USB port on the computer, then open the RKDevTool software.
4. Short the solder points on the core board, then power the product via DC.
5. Wait for the software to prompt "Loader device found" (as shown below), then release the buttons.
6. If unsuccessful, repeat steps 2-5.
Start burning the system:
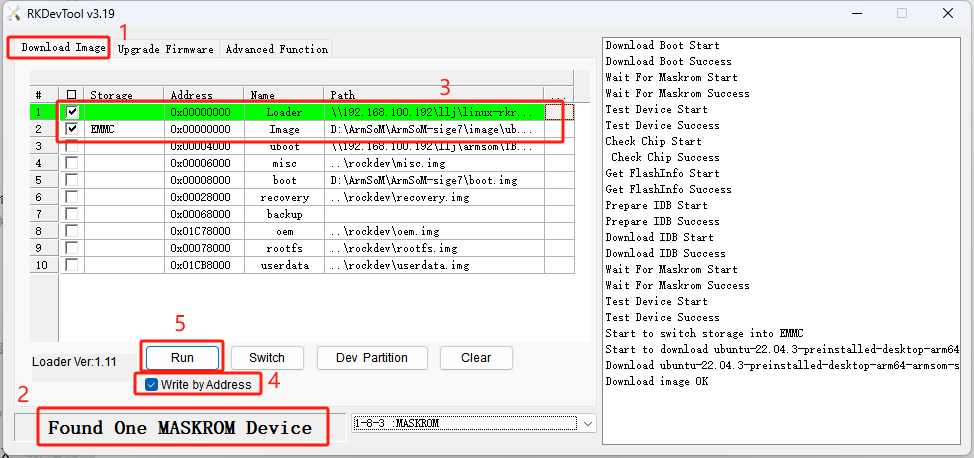
- Select the "Download Image" option.
- Confirm that the board has entered MASKROM/Loader mode.
- Click the blank cells to select the MiniLoaderAll and Image files to use. The corresponding MiniLoaderAll and Image files are stored on Baidu Cloud.
- In the "Storage" option, select the target medium "EMMC
3. Burning Debian System
3.1. Using a Card Reader to Burn to microSD
Installing SDDiskTool
To burn the image to eMMC, you need to use the SDDiskTool_版本号.exe tool.
Click the following link to access it: Baidu Cloud Link
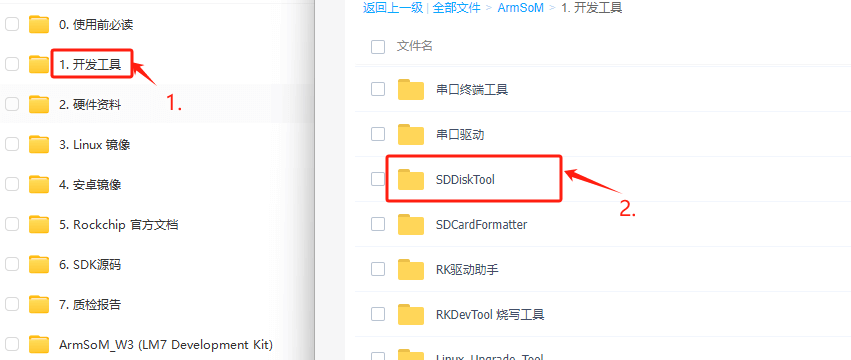
After extracting the compressed file, you can use the software without installation. Simply double-click the SD_Firmware_Tool.exe file to open the tool.
Burning the Image
Open the SDDiskTool executable file (SD_Firmware_Tool.exe) and insert the SD card.
First, select the correct SD card you want to burn. Then, set the function mode to SD Boot and choose the image you want to burn. Finally, click the "Create" button to start creating the bootable SD card.

Please be patient as the SD card is being burned. The larger the image, the longer the burning process will take.
- If you encounter an error saying it cannot burn the image after clicking "Create," try closing the error window and starting the creation process again. If that doesn’t work, try formatting the SD card.
- The firmware downloaded from Baidu Cloud must be extracted before it can be loaded. On a Windows PC, you need to run the tool with administrator privileges.
3.2. Using a USB Cable to Burn to eMMC
We will use the RKDevTool to burn the image and put the product into burning mode.
1. Prepare a Type-C cable for burning the image.
2. Disconnect all cables that might power the product, such as the power cord and USB cables.
3. Connect one end of the Type-C cable to the OTG port on the product and the other end to the USB port on the computer, then open the RKDevTool software.
4. Hold down the Recovery button and power the product using the DC supply.
5. Wait for the software to indicate that a LOADER device has been detected (as shown below), then release the button.
6. If unsuccessful, repeat steps 2-5.

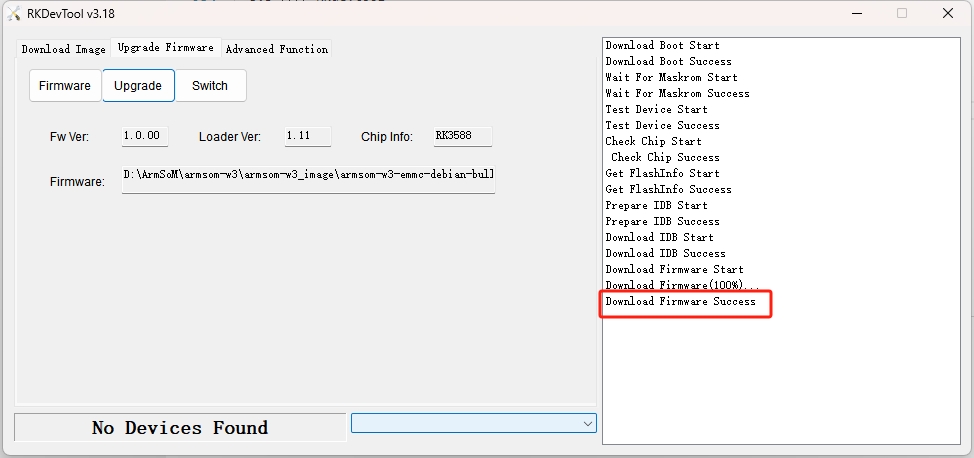
The burning progress will be shown on the right. Once completed, the tool will notify you:
If you encounter a "Download Boot Fail" error or other errors during the burning process (as shown below), it is usually due to a poor USB connection, low-quality cables, or insufficient power from the computer’s USB port. Try replacing the USB cable or using a different USB port on the computer to troubleshoot.
- Maskrom Mode: When the Flash is not yet burned with firmware, the chip will enter Maskrom mode for the initial firmware burning. During development, if the Loader mode fails to start properly, Maskrom mode can also be used to burn the firmware.
- Loader Mode: This mode is triggered during the uboot startup when a specific pin is pressed. In Loader mode, firmware burning and upgrading can be performed. You can also burn individual partition images for easier debugging.