ArmSoM-CM1 Product Specification
1.1 Product Introduction
ArmSoM-CM1 is a computer-on-module (COM) based on the Rockchip RK3506J (tri-core Cortex-A7 + single-core Cortex-M0). It features a rich set of peripheral interfaces such as SAI, USB2 OTG, RMII, and CAN. This module meets minimum system requirements and includes an onboard Type-C power & programming port, MIPI DSI display interface, and an SD card expansion slot.
The ArmSoM-CM1 Kit consists of the CM1 module paired with the CM1-IO carrier board, offering even richer peripheral resources: dual 10/100 Ethernet ports, dual USB2.0 Host ports, onboard WiFi, MIPI DSI display interface, headphone jack, microphone input, and 72 GPIOs routed from the core module.

The ArmSoM-CM1 Kit development suite provides full-stack Linux system development documentation and open-source software resources. Enterprise customers can directly purchase the core module for end-product development. ArmSoM delivers complete system source code (including kernel customization patches, peripheral drivers, and toolchains) as open-source hardware, significantly accelerating customer product development cycles.
To maximize enterprise development efficiency and shorten R&D cycles, we systematically integrate the following full lifecycle development resources for core module users:
1. Hardware Design Assets
- Core Module / Carrier Board Reference Schematics (including high-speed signal integrity design guidelines)
- Mechanical Structure 3D Models (STEP format)
- Key Component Footprint Libraries
- Industrial Connector Specifications and Interface Definition Manuals
2. Software Delivery Suite
- Pre-validated Factory System Images (Built with Buildroot)
- Cross-compilation Toolchain
- Board Support Package (BSP) & Device Tree Configuration Templates
- Modular Peripheral Driver Development Framework
1.2 Application Areas
The RK3506J finds wide application across various fields, including industrial control, smart appliance display control, HMI (Human-Machine Interface), and industrial information & data processing.
CM1 Getting started
CM1 User Manual
How to start using your CM1 Module
Hardware Information
CM1 Hardware Interfaces
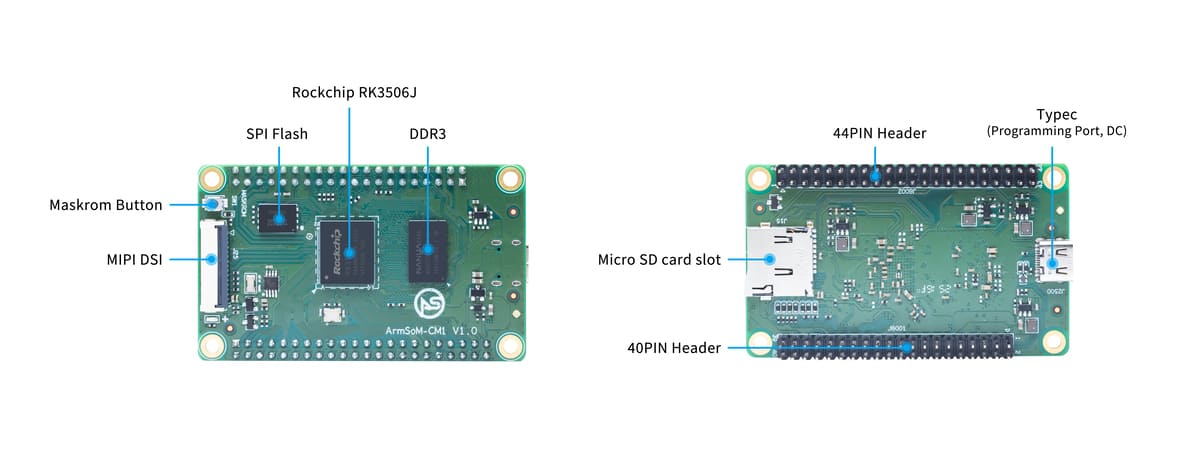
CM1 Hardware Specifications
| Category | Specification | Category | Specification |
|---|---|---|---|
| SOC | CPU | ||
| GPU | Memory | ||
| Storage | Video Output | ||
| 40-PIN & 44-PIN | Buttons | ||
| Power Supply | OS Support | ||
| Dimensions | Operating Temperature |
CM1-IO Hardware Interface
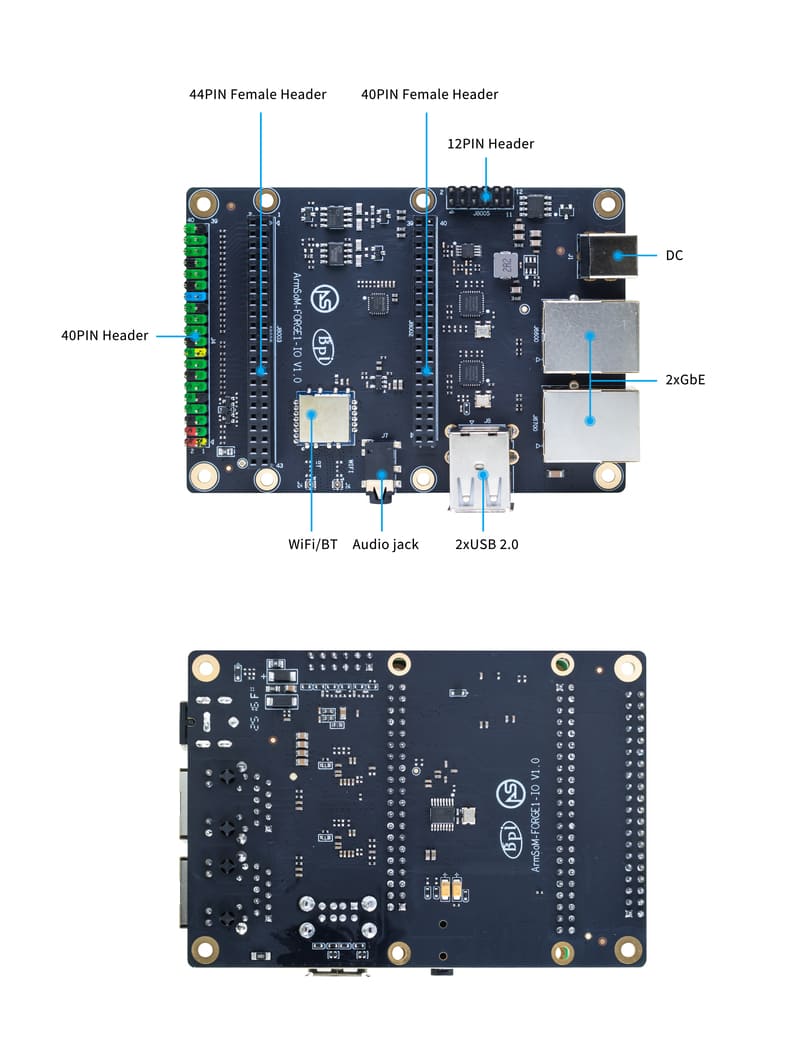
CM1-IO Hardware Specifications
| Category | Specification | Category | Specification |
|---|---|---|---|
| 40-PIN & 44-PIN Female Header | 40-PIN Header | ||
| USB Interfaces | Networking | ||
| Audio | 12-PIN Header | ||
| Power Supply | OS Support | ||
| Dimensions | Operating Temperature |
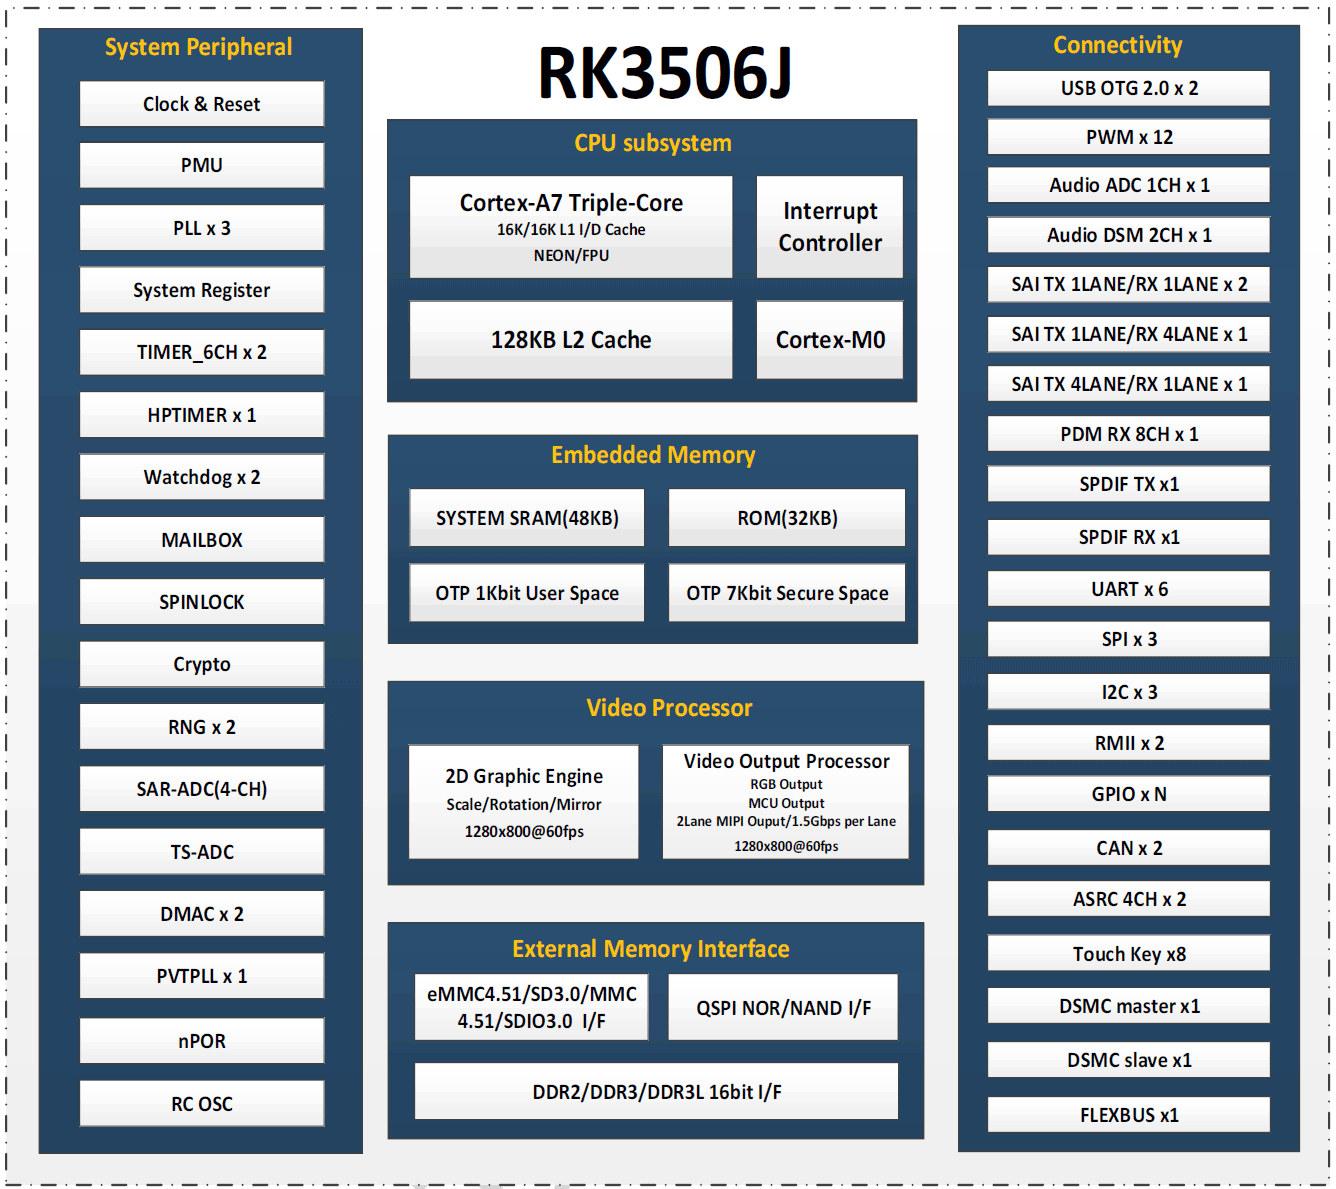
RK3506j Block Diagram
RK3506j Block Diagram
Pin Definitions
40-PIN Header
| GPIO Number | Function | Pin | Pin | Function | GPIO Number |
|---|---|---|---|---|---|
| +3.3V | 1 | 2 | +5.0V | ||
| 4 | RM_IO4/SAI0_SDI0/GPIO0_A4_d | 3 | 4 | +5.0V | |
| 5 | RM_IO5/SAI0_SDI1/GPIO0_A5_d | 5 | 6 | GND | |
| 59 | DSMC_SLV_RDYN/RM_IO31/UART5_RX_M1 FLEXBUS0_D0/DSMC_CSN3/VO_LCDC_D0 GPIO1_D3_d | 7 | 8 | UART0_TX RM_IO22/JTAG_TCK_M1/GPIO0_C6_u | 22 |
| GND | 9 | 10 | UART0_RX RM_IO23/JTAG_TMS_M1/GPIO0_C7_u | 23 | |
| 58 | DSMC_SLV_CSN0/RM_IO30/UART5_TX_M1 FLEXBUS0_D1/DSMC_CSN2/VO_LCDC_D1 GPIO1_D2_d | 11 | 12 | GPIO1_D1_d/DSMC_SLV_D7 RM_IO29UART5_RTSN_M1/DSM_AUD_LP_M0 FLEXBUS0_D2/DSMC_DQS1/VO_LCDC_D2 | 57 |
| 52 | DSMC_SLV_D2/FLEXBUS0_D7 DSMC_D11/VO_LCDC_D7 GPIO1_C4_d | 13 | 14 | GPIO1_C5_d DSMC_SLV_D3/FLEXBUS0_D6 DSMC_D12/VO_LCDC_D6 | 53 |
| 51 | DSMC_SLV_D1/RM_IO28/SAI2_SDO_M1 FLEXBUS1_CSN_M5/FLEXBUS0_D8 DSMC_D10/VO_LCDC_D8 GPIO1_C3_d | 15 | 16 | GPIO1_C2_d DSMC_SLV_D0/RM_IO27SAI2_SDI_M1 FLEXBUS0_CSN_M5/DSM_AUD_RP_M0 FLEXBUS0_D9/DSMC_D9/VO_LCDC_D9 | 50 |
| +3.3V | 17 | 18 | GPIO1_C1_d/DSMC_SLV_DQS0/SAI2_MCLK_M1 FLEXBUS1_CSN_M4/DSM_AUD_RN_M0 FLEXBUS0_CLK/DSMC_D8/VO_LCDC_D10 | 49 | |
| 48 | DSMC_SLV_CLK/FLEXBUS0_CSN_M4 DSMC_INT1/FLEXBUS1_CLK DSMC_RESETN/VO_LCDC_D11 GPIO1_C0_d | 19 | 20 | SARADC_IN2/GPIO4_B2_z | 138 |
| 46 | FLEXBUS0_CSN_M3/FLEXBUS0_D11 FLEXBUS1_D14/DSMC_CSN0 VO_LCDC_D13/GPIO1_B6_d | 21 | 22 | GPIO1_B7_d FLEXBUS1_CSN_M3/FLEXBUS0_D10 FLEXBUS1_D15/DSMC_RDYN/VO_LCDC_D1 | 47 |
| 44 | FLEXBUS0_CSN_M2/FLEXBUS0_D13 FLEXBUS1_D12/DSMC_D6 VO_LCDC_D15GPIO1_B4_d | 23 | 24 | GPIO1_B5_d FLEXBUS1_CSN_M2/FLEXBUS0_D12 FLEXBUS1_D13/DSMC_D7/VO_LCDC_D14 | 45 |
| GND | 25 | 26 | GPIO1_B3_d RM_IO26/SAI2_LRCK_M1FLEXBUS1_CSN_M1 FLEXBUS0_D14/FLEXBUS1_D11 DSMC_INT3/VO_LCDC_D16 | 43 | |
| 41 | RM_IO24/UART5_CTSN_M1 FLEXBUS1_CSN_M0/FLEXBUS1_D9 DSMC_CSN1/VO_LCDC_D184 GPIO1_B1_d | 27 | 28 | GPIO1_B2_d RM_IO25/SAI2_SCLK_M1FLEXBUS0_CSN_M1 FLEXBUS0_D15/FLEXBUS1_D10 DSMC_INT2/VO_LCDC_D17 | 42 |
| 40 | FLEXBUS0_CSN_M0/FLEXBUS1_D8 DSMC_D5/VO_LCDC_D19 GPIO1_B0_d | 29 | 30 | GND | |
| 38 | FLEXBUS1_D6/DSMC_D3 VO_LCDC_D21/GPIO1_A6_d | 31 | 32 | GPIO1_A7_d/FLEXBUS1_D7 DSMC_D4/VO_LCDC_D20 | 39 |
| 37 | FLEXBUS1_D5/DSMC_D2VO_LCDC_D22 GPIO1_A5_d | 33 | 34 | GND | |
| 35 | FLEXBUS1_D3/DSMC_D0/VO_LCDC_CLK GPIO1_A3_d | 35 | 36 | GPIO1_A4_d/FLEXBUS1_D4 DSMC_D1/VO_LCDC_D23 | 36 |
| 33 | DSMC_SLV_INT/DSMC_INT0 FLEXBUS1_D1/DSMC_CLKN VO_LCDC_VSYNC/GPIO1_A1_d | 37 | 38 | GPIO1_A2_d/FLEXBUS1_D2 DSMC_DQS0/VO_LCDC_HSYNC | 34 |
| GND | 39 | 40 | GPIO1_A0_d/FLEXBUS1_D0 DSMC_CLKP/VO_LCDC_DEN | 32 |
12-PIN Header
| Pin | Assignment | Description | Pin | Assignment | Description |
|---|---|---|---|---|---|
| 1 | RS485_A | RS485 Differential Signal (+) | 2 | RS485_B | RS485 Differential Signal (-) |
| 3 | CAN_L | CAN Bus Differential Signal (Low) | 4 | CAN_H | CAN Bus Differential Signal (High) |
| 5 | GND | System Ground | 6 | VBAT_RTC | RTC Real-time Clock Battery Input |
| 7 | MICIN_P | Microphone Input (+) (Differential) | 8 | MICIN_N | Microphone Input (-) (Differential) |
| 9 | MICIN_P | Microphone Input (+) (Alternate Channel) | 10 | MICIN_N | Microphone Input (-) (Alternate Channel) |
| 11 | SPK_P | Speaker Output (+) (Differential) | 12 | SPK_N | Speaker Output (-) (Differential) |
Development Resources
SDK Source Code
Official Images
The ArmSoM team uses Buildroot as the foundation for the official CM1 operating system. How to flash the system image?📤
The following systems have been tested and validated by ArmSoM:
Cloud Drive Address:
Google Drive link| logo | Description | Download |
|---|---|---|
| buildroot | buildroot for CM1: Linux Kernel 6.1, support RT-Thread 4.1, support bare metal programs, support multi-core heterogeneous AMP, Preempt-RT/Xenomai real-time patches, lightweight UI framework LVGL. | Google Drive link |
Hardware Resources
Get CM1 Schematics, DXF files, and other hardware resources.
Google Drive linkUser Manual
Product Certifications
CE / FCC / RoHS
Product Longevity Statement
ArmSoM-CM1 will be produced until at least July 2035.
Accessories
Our official accessories designed for the ArmSoM-CM1 Kit aim to help you achieve the best performance from your computer.
Purchase Samples
ArmSoM Independent Site: https://item.taobao.com/item.htm?ft=t&id=965592864051
ArmSoM AliExpress Official Store:
ArmSoM Taobao Official Store: https://item.taobao.com/item.htm?ft=t&id=965592864051
For OEM&ODM, please contact: sales@armsom.org
Expert Perspective
Important Notes
- Always wear an anti-static wrist strap or take ESD precautions before handling the device to prevent damage.
- Assembly should be performed in an ESD-controlled environment. Avoid operation under dry and low-humidity conditions.
- When not in use, store the device in an anti-static bag in a temperature-controlled, low-humidity environment.
- Avoid friction or collision when handling the device to prevent generating static electricity.
- Handle the device by its edges, avoiding direct contact with chips on the motherboard.
- Do not plug or unplug cables or other devices while the system is powered on to avoid damage from current surges.
- Before plugging/unplugging expansion GPIO/MIPI interfaces, power down the device and disconnect the power cable.
Without effective cooling measures, the surface temperature of the main SoC can exceed 60°C. Avoid direct contact with the SoC and surrounding power inductors to prevent burns. Ensure adequate ventilation around the device during operation. Do not place the SBC in direct sunlight. It is recommended to use the official Cooling Fan & Heatsink Kit or DIY Case, or suitable third-party cooling solutions to ensure optimal thermal performance.