ArmSoM Camera Applications
Use Cheese for quick photos and videos with separate resolutions for each. Use guvcview when you want to set the frame rate as well as the resolution. Its controls and preview have separate windows.
This guide uses CM7S with the Debian 12 XFCE desktop. On Ubuntu or another desktop image, search the applications menu for Cheese or guvcview, open it, and follow the same steps. Menu locations and button labels can vary with the desktop environment or display language.
Download core package (arm64)Download desktop package (arm64)
1. Connect a camera
- Power off the board and connect the camera ribbon cable. Enable the device-tree overlay for the sensor and connector, then reboot. For wiring and configuration, see the MIPI-CSI section in your product’s user manual.
- In XFCE, open Applications → Multimedia and select Cheese or guvcview. On GNOME, search for the application by name in Activities. Close one camera application before opening the other.
- On boards with several cameras, look for the IMX219 or OV13850 sensor name. The connector or module number distinguishes two sensors of the same model. On AIM7 with AIM-IO, the connector names match CAM0 through CAM3 on the carrier.
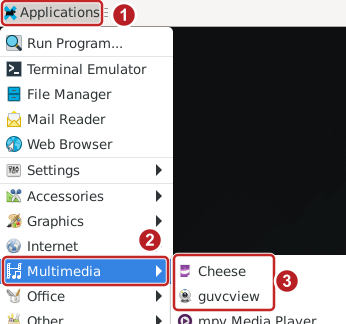
The screenshots show the English button labels. Images with ArmSoM camera support show sensor names and the native modes reported by the driver.
On CM7S, the two sensor drivers report these modes. The capture resolution is independent of the size of the preview window.
| Camera | Resolution (pixels) | Maximum frame rate |
|---|---|---|
| IMX219 | 3280 × 2464 | 15 fps |
| IMX219 | 1640 × 1232, 1920 × 1080, 640 × 480 | 30 fps |
| OV13850 | 4224 × 3136 | 7.5 fps |
| OV13850 | 2112 × 1568 | 30 fps |
2. Cheese
2.1 Select a camera and resolution
Open Cheese and wait for the preview. Click ① ☰ at the top right and choose ② Preferences. The same menu includes ③ Fullscreen.

In Preferences → Webcam, use the three fields shown here.

Open ① Device. This CM7S has two entries, IMX219 (m01, 4-0010) and OV13850 (m00, 1-0010). Choose one to switch the live preview to that camera.

Set ② Photo resolution and ③ Video resolution separately. For example, choose 3280 × 2464 for full-resolution IMX219 photos and 1640 × 1232 for video with the full field of view at up to 30 fps. Click Close to return to the preview.

Cheese negotiates the frame rate for the selected video resolution. To select a specific frame rate in the interface, use guvcview.
2.2 Take a photo or record video
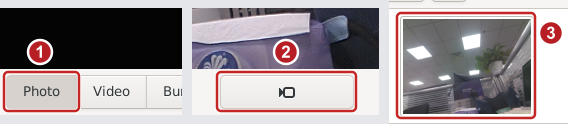
After selecting the camera and photo resolution, close Preferences to return to the preview. Click ① Photo at the bottom left, then click ② the shutter to take a picture. If the countdown is enabled, Cheese takes the photo when it ends. Double-click the saved photo in ③ the thumbnail strip to view it.
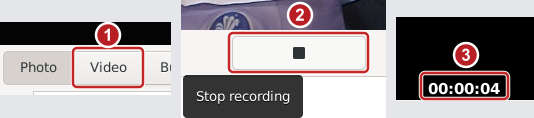
Click ① Video to switch modes, then click the record button in the middle to start recording. ③ The timer shows the elapsed time. Click ② Stop (■) to finish and save the video. When its thumbnail appears, double-click it to play the recording.
On the CM7S XFCE image shown here, Cheese saves both photos and videos in ~/.gnome2/cheese/media/. Open the file manager, press Ctrl+L, paste the path, and press Enter. ~ is the home directory of the signed-in desktop user.
If the desktop has configured Pictures and Videos folders, Cheese saves captures in the Webcam subfolder of each by default. On an English desktop these paths are usually ~/Pictures/Webcam/ and ~/Videos/Webcam/.
2.3 Fullscreen preview
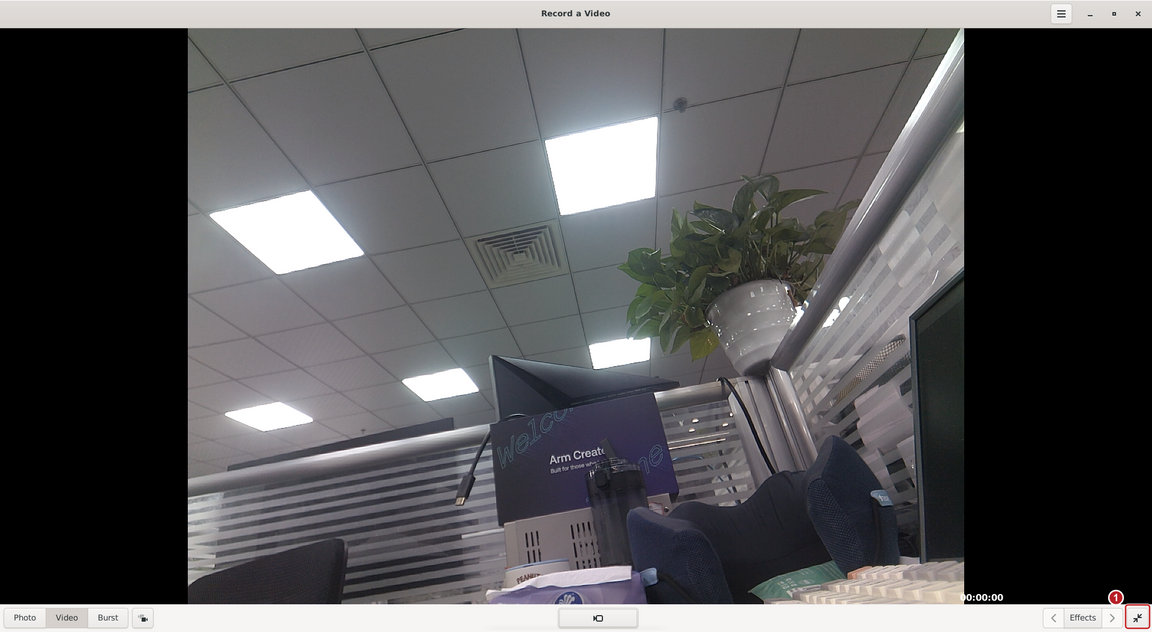
Open ☰ → Fullscreen at the top right, or press F11 in Cheese. Press F11 again to return to the normal window. The capture resolution stays the same when you resize the preview.
3. guvcview
3.1 Select a camera
guvcview opens two windows. One contains the Image Controls, Video Controls and Audio Controls tabs. The other shows the live preview. In the control window, click ① Video Controls, then open ② Device.
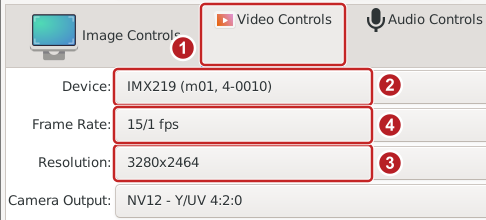
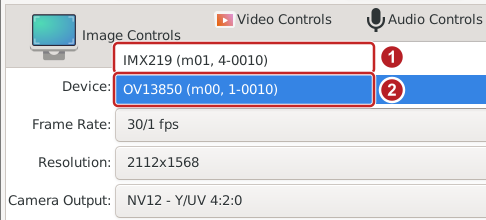
Choose the sensor you want to use. Switching cameras can open a start new dialog. Click restart to reopen the current guvcview session with the selected camera.

3.2 Set the resolution and frame rate
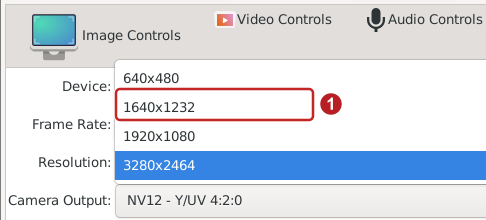
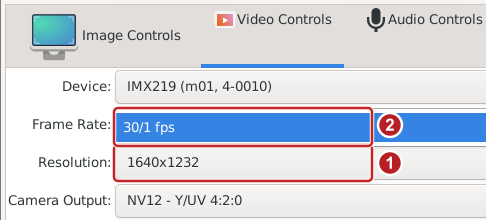
First, open Resolution. For this IMX219 example, select 1640x1232. Then open Frame Rate above it and select 30/1 fps (30 frames per second). If you select 3280x2464, its corresponding rate is 15/1 fps. You can leave Camera Output at NV12.
3.3 Take a photo or record video
After choosing the camera, resolution and frame rate, wait for a steady preview. Click ① Cap. Image (I) at the top of the control window to capture and save one photo. For video, click ② Cap. Video (V) to start recording, then click Stop Video (V) in the same place to finish and save the file. The example uses OV13850 at 2112 × 1568 and 30 fps.


In this example, guvcview saves captures in the desktop user’s home directory, /home/armsom/. Open Home in the file manager to find the photo my_photo-1.jpg and the video my_video-1.mkv. If you have changed the filename or destination, the status bar at the bottom of the control window shows the full path in use.
3.4 Make the preview fullscreen
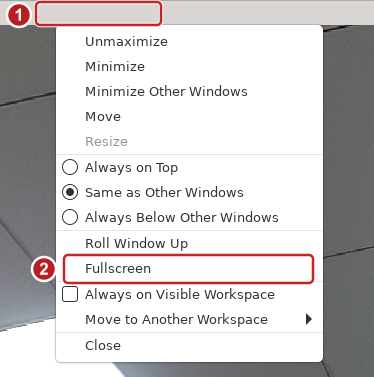
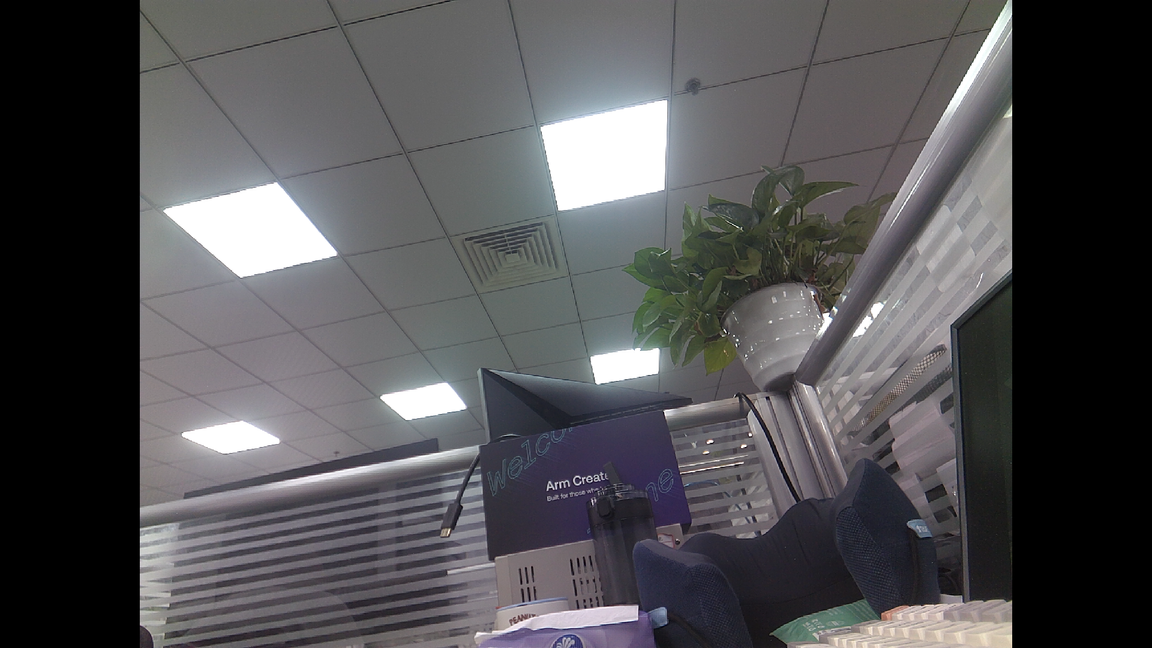
On XFCE, right-click the title bar of the window showing the camera feed and choose Fullscreen. The preview fills the display while keeping its aspect ratio. To return to windowed mode, click the preview to give it focus, then press Alt + F11.
4. Use the command line on Server images
Server images run without a graphical desktop. Enable the camera overlay, reboot, then log in to the board over SSH or serial. Use armsom-camera to select a camera, take photos and record video. Photos and recordings work with the monitor disconnected.
If armsom-camera is already installed, start with the list command below. When building an RK3588/RK3588S Debian 12 arm64 Server image, the default auto setting skips the camera packages. After selecting the platform with ./build.sh chip, run ./build.sh menuconfig, enter 1 under Debian → ArmSoM camera packages, save, then run ./build.sh. The resulting Server image includes the command-line tool.
For an existing compatible Server image, use Download core package at the top of this page. Copy the deb to the board and run this command in the directory containing the file.
sudo apt install --no-remove ./armsom-camera_0.2.0-1_arm64.deb
4.1 List cameras and modes
armsom-camera list
Choose a camera ID and one of the resolution and frame-rate combinations listed for it. The CM7S examples below use imx219-m01 and ov13850-m00. If an AIM7 lists two sensors of the same model as cam0 and cam1, pass the desired connector ID to --camera.
4.2 Take a JPEG photo
Use the full-resolution IMX219 mode to save one photo as imx219.jpg in your home directory.
armsom-camera photo --camera imx219-m01 --size 3280x2464 --fps 15 -o ~/imx219.jpg
To switch to OV13850, select its ID and a mode listed for that sensor.
armsom-camera photo --camera ov13850-m00 --size 2112x1568 --fps 30 -o ~/ov13850.jpg
4.3 Record an MP4 video
Record 10 seconds with OV13850 at 2112 × 1568 and 30 fps. When the command finishes, the recording is available at ~/ov13850.mp4. The duration is in seconds. Omit --duration to record until you press Ctrl+C to stop and save.
armsom-camera video --camera ov13850-m00 --size 2112x1568 --fps 30 --duration 10 -o ~/ov13850.mp4
4.4 Preview on a monitor connected to the board
Connect a monitor to an active display output on the board, then run the command below. The --display kms option uses the board’s DRM/KMS display output without starting a desktop. If you run the command over SSH or serial, the preview appears on the monitor attached to the board. Press Ctrl+C to close it.
armsom-camera preview --camera imx219-m01 --size 1640x1232 --fps 30 --display kms
5. Install desktop support
If your image includes the integration, open the applications directly. For an existing compatible Debian 12 arm64 desktop image, download both packages at the top of this guide, copy them to the same directory on the board. Run the following command in that directory.
sudo apt install --no-remove ./armsom-camera_0.2.0-1_arm64.deb ./armsom-camera-desktop_0.2.0-1_arm64.deb
Reopen the application from the desktop menu. Use the following command to check the detected cameras and the resolution and frame-rate combinations reported by their drivers.
armsom-camera list
The default SDK setting (RK_DEBIAN_CAMERA=auto) installs both packages in RK3588-series Debian 12 desktop images. After flashing the image and enabling the camera overlay, open the applications from the desktop menu.