CM1-IO Product Introduction
CM1-IO is the IO board of ArmSoM CM1, with dimensions of 100x70x19mm. The motherboard carries USB interfaces/WIFI/Bluetooth/audio/100Mbps network x2, making it the smallest system board designed specifically for makers, learners, and developers.
User Manual
Before starting to use CM1-IO, please prepare the following items.
The following text uses CM1 Kit to represent CM1+CM1-IO
Tool preparation
- 5/12v power supply
- system installation
- Onboard eMMC startup
- USB Type-C data cable, write the image from the Type-C port to the CM1 kit, you need a Type-C data cable to connect the CM1 kit and PC.
- MicroSD card/TF card startup
- Onboard eMMC startup
Optional Options
- USB to serial port conversion
- Ethernet
- LCD display screen
- audio cable
Selection of burning method
Interface usage
If you are using CM1 Kit for the first time, please familiarize yourself with each product first hardware interface
Debug port
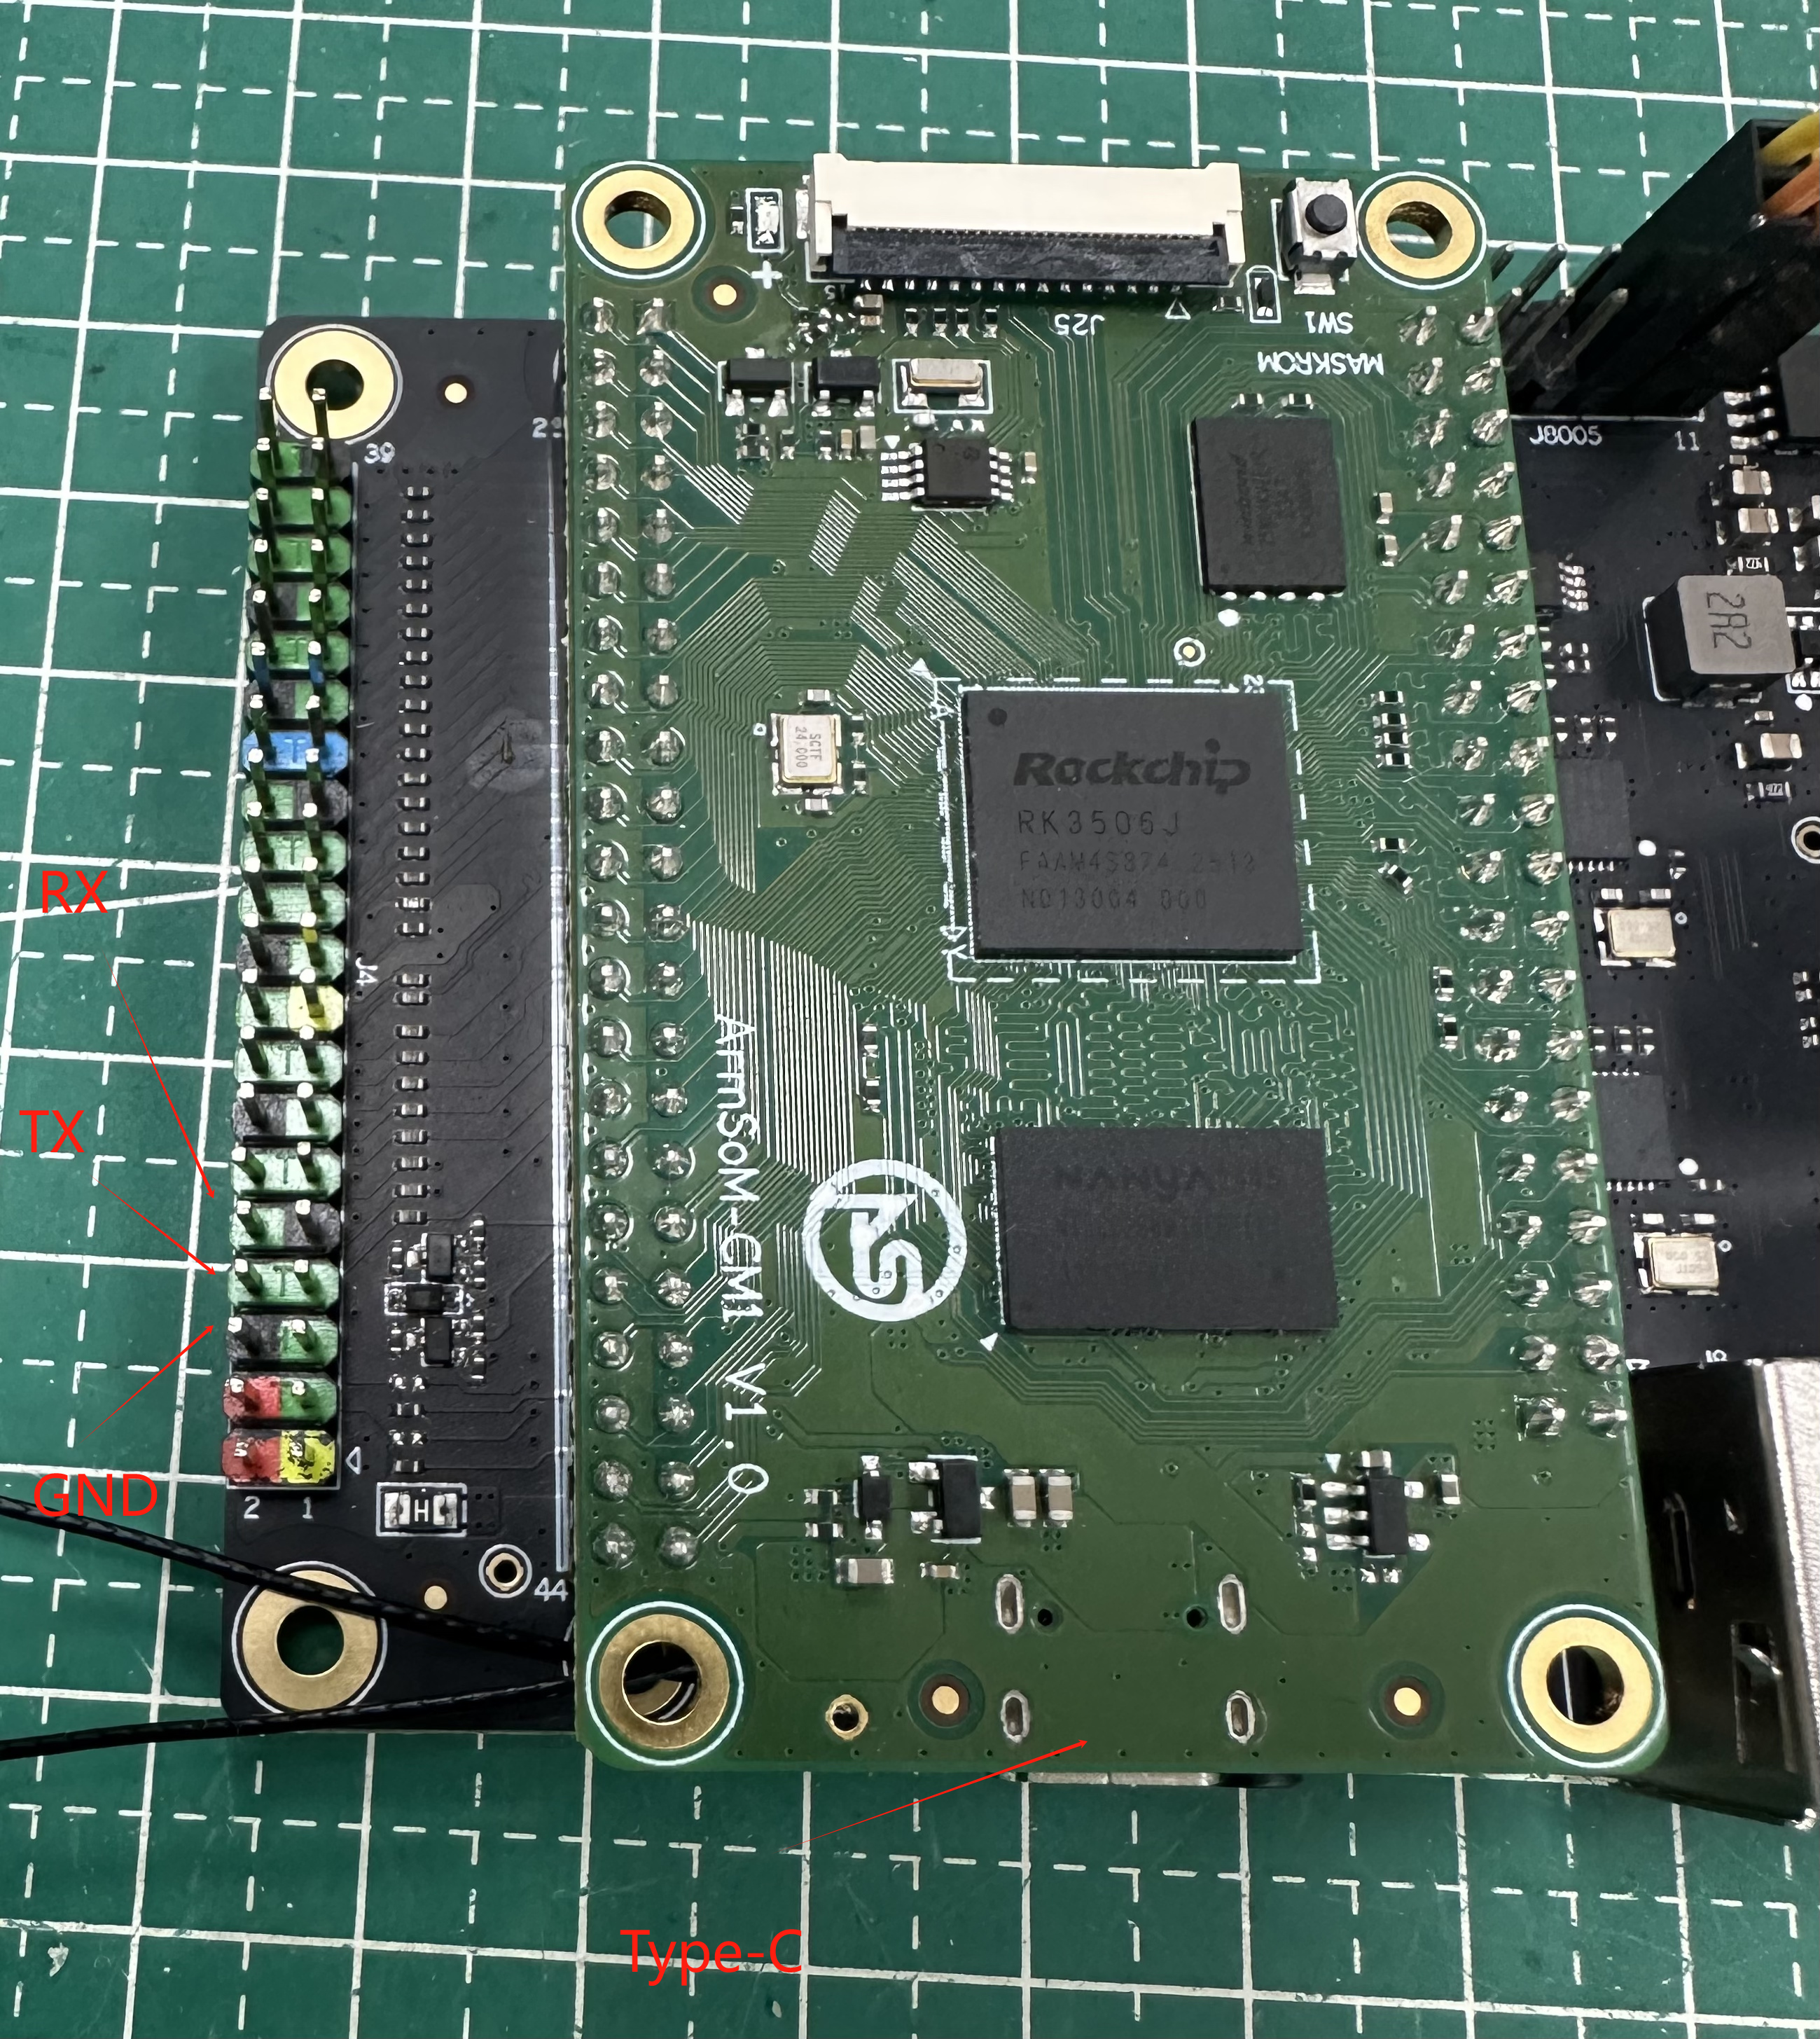
Connect the USB to TTL serial cable as shown below:
| CM1-IO | connect | port |
|---|---|---|
| GND (pin 6) | ---> | GND |
| TX (pin 8) | ---> | RX |
| RX (pin 10) | ---> | TX |
PC can also connect to Type-C interface for adb debugging
gmac
- Firstly, insert one end of the Ethernet cable into the Ethernet interface of the CM1 Kit, connect the other end of the cable to the router, and ensure that the network is unobstructed
- After the system is started, it will automatically assign an IP address to the Ethernet card through DHCP, without any other configuration required
- The command to view IP addresses in the Linux system of CM1 Kit is as follows
root@armsom:/# ip a
1: lo: <LOOPBACK,UP,LOWER_UP> mtu 65536 qdisc noqueue state UNKNOWN group default qlen 1000
    link/loopback 00:00:00:00:00:00 brd 00:00:00:00:00:00
    inet 127.0.0.1/8 scope host lo
       valid_lft forever preferred_lft forever
2: can0: <NOARP,ECHO> mtu 16 qdisc noop state DOWN group default qlen 10
    link/can
3: eth0: <NO-CARRIER,BROADCAST,MULTICAST,UP> mtu 1500 qdisc mq state DOWN group default qlen 1000
    link/ether 16:b1:42:f4:f6:69 brd ff:ff:ff:ff:ff:ff
4: eth1: <NO-CARRIER,BROADCAST,MULTICAST,UP> mtu 1500 qdisc mq state DOWN group default qlen 1000
    link/ether 32:81:2f:73:98:c8 brd ff:ff:ff:ff:ff:ff
5: wlan0: <NO-CARRIER,BROADCAST,MULTICAST,UP> mtu 1500 qdisc mq state DOWN group default qlen 1000
    link/ether cc:64:1a:61:e9:b5 brd ff:ff:ff:ff:ff:ff
- Use the ping tool to determine if the network is connected.
The command to test network connectivity is as follows. The ping command can be interrupted by pressing Ctrl+C shortcut key
root@armsom:~$ ping www.baidu.com
PING www.a.shifen.com (183.2.172.185): 56 data bytes
64 bytes from 183.2.172.185: icmp_seq=0 ttl=53 time=8.370 ms
64 bytes from 183.2.172.185: icmp_seq=1 ttl=53 time=8.917 ms
64 bytes from 183.2.172.185: icmp_seq=2 ttl=53 time=8.511 ms
64 bytes from 183.2.172.185: icmp_seq=3 ttl=53 time=8.673 ms
^C
--- www.a.shifen.com ping statistics ---
4 packets transmitted, 4 packets received, 0% packet loss
round-trip min/avg/max/stddev = 8.370/8.618/8.917/0.203 ms
WIFI
WIFI Station
Wi-Fi Station mode is an operating mode that enables a Wi-Fi device to connect to a Wi-Fi network and communicate with other devices.
root@armsom:/# ifconfig wlan0 up #Open wlan0
root@armsom:/# ifconfig -a
root@rk3506-buildroot:/# ifconfig -a
can0 Link encap:UNSPEC HWaddr 00-00-00-00-00-00-00-00-00-00-00-00-00-00-00-00
NOARP MTU:16 Metric:1
RX packets:0 errors:0 dropped:0 overruns:0 frame:0
TX packets:0 errors:0 dropped:0 overruns:0 carrier:0
collisions:0 txqueuelen:10
RX bytes:0 (0.0 B) TX bytes:0 (0.0 B)
Interrupt:45

eth0 Link encap:Ethernet HWaddr 9E:3C:0C:CC:4D:1D
UP BROADCAST MULTICAST MTU:1500 Metric:1
RX packets:0 errors:0 dropped:0 overruns:0 frame:0
TX packets:0 errors:0 dropped:0 overruns:0 carrier:0
collisions:0 txqueuelen:1000
RX bytes:0 (0.0 B) TX bytes:0 (0.0 B)
Interrupt:54 Base address:0x2000

eth1 Link encap:Ethernet HWaddr A2:3C:0C:CC:4D:1D
UP BROADCAST MULTICAST MTU:1500 Metric:1
RX packets:0 errors:0 dropped:0 overruns:0 frame:0
TX packets:0 errors:0 dropped:0 overruns:0 carrier:0
collisions:0 txqueuelen:1000 RX bytes:0 (0.0 B) TX bytes:0 (0.0 B)
Interrupt:56 Base address:0x2000

lo Link encap:Local Loopback
inet addr:127.0.0.1 Mask:255.0.0.0
UP LOOPBACK RUNNING MTU:65536 Metric:1
RX packets:578 errors:0 dropped:0 overruns:0 frame:0
TX packets:578 errors:0 dropped:0 overruns:0 carrier:0
collisions:0 txqueuelen:1000
RX bytes:28940 (28.2 KiB) TX bytes:28940 (28.2 KiB)

wlan0 Link encap:Ethernet HWaddr CC:64:1A:61:E8:19
BROADCAST MULTICAST MTU:1500 Metric: 1
RX packets: 0 errors: 0 dropped: 0 overruns: 0 frame: 0
TX packets: 0 errors: 0 dropped: 0 overruns: 0 carrier: 0
collisions: 0 txqueuelen: 1000
RX bytes: 0 (0.0 B) TX bytes: 0 (0.0 B)
root@armsom:/# connmanctl #Enter the Wi-Fi console
connmanctl> enable wifi #Enable Wi-Fi, enabled by default
connmanctl> agent on #Turn on the agent
connmanctl> scan wifi #Turn on Wi-Fi scanning, supports multiple scans
connmanctl> services #List scanned Wi-Fi networks
connmanctl> services
 TP-Link_210A         wifi_cc641a61e819_54502d4c696e6b5f32313041_managed_psk
    lulu                 wifi_cc641a61e819_6c756c75_managed_psk
    Triductor_5GAp       wifi_cc641a61e819_547269647563746f725f35474170_managed_none
    OrayBox-2.4G-FD5C    wifi_cc641a61e819_4f726179426f782d322e34472d46443543_managed_none
    R4R-2G               wifi_cc641a61e819_5234522d3247_managed_psk
                         wifi_cc641a61e819_hidden_managed_psk
    R3mini_Router2G      wifi_cc641a61e819_52336d696e695f526f757465723247_managed_psk
    R4R-5G               wifi_cc641a61e819_5234522d3547_managed_psk
    lulu_5G              wifi_cc641a61e819_6c756c755f3547_managed_psk
    OrayBox-5G-FD5C      wifi_cc641a61e819_4f726179426f782d35472d46443543_managed_none
    ydtx                 wifi_cc641a61e819_79647478_managed_psk
    Tri_Mesh_FH_         wifi_cc641a61e819_5472695f4d6573685f46485f_managed_psk
    Triductor_2GAp       wifi_cc641a61e819_547269647563746f725f32474170_managed_none
    R3mini_Router5G      wifi_cc641a61e819_52336d696e695f526f757465723547_managed_psk
    DIRECT-a4-HP M227f LaserJet wifi_cc641a61e819_4449524543542d61342d4850204d32323766204c617365724a6574_managed_psk
    CFG_2G               wifi_cc641a61e819_4346475f3247_managed_psk
                         wifi_cc641a61e819_hidden_managed_none
    Kingstar-Lo          wifi_cc641a61e819_4b696e67737461722d4c6f_managed_psk
    jachunfree_5         wifi_cc641a61e819_6a616368756e667265655f35_managed_psk
    ChinaNet-mbCu-5G     wifi_cc641a61e819_4368696e614e65742d6d6243752d3547_managed_psk
    HH-V-1               wifi_cc641a61e819_48482d562d31_managed_psk
    ChinaNet-2MNZ        wifi_cc641a61e819_4368696e614e65742d324d4e5a_managed_psk
    ChinaNet-AtTi        wifi_cc641a61e819_4368696e614e65742d41745469_managed_psk
    ChinaNet-mbCu        wifi_cc641a61e819_4368696e614e65742d6d624375_managed_psk
    recynova             wifi_cc641a61e819_726563796e6f7661_managed_psk
    DIRECT-sk-HUAWEI PixLab X1 wifi_cc641a61e819_4449524543542d736b2d485541574549205069784c6162205831_managed_psk
    ChinaNet-AtTi-5G     wifi_cc641a61e819_4368696e614e65742d417454692d3547_managed_psk
    recynova-5G          wifi_cc641a61e819_726563796e6f76612d3547_managed_psk
    Eureka-office        wifi_cc641a61e819_457572656b612d6f6666696365_managed_psk
    BTWIFI6-042426       wifi_cc641a61e819_425457494649362d303432343236_managed_psk
    Eureka-guest         wifi_cc641a61e819_457572656b612d6775657374_managed_psk
    ACCO-TEST            wifi_cc641a61e819_4143434f2d54455354_managed_psk
    Kingstar-Lo-5G       wifi_cc641a61e819_4b696e67737461722d4c6f2d3547_managed_psk
    jachun_link5g        wifi_cc641a61e819_6a616368756e5f6c696e6b3567_managed_psk
    ChinaNet-Ns24        wifi_cc641a61e819_4368696e614e65742d4e733234_managed_psk
    CMCC-YM6M            wifi_cc641a61e819_434d43432d594d364d_managed_none
From the scanned Wi-Fi list, use connect XXXX to connect.
connmanctl> connect wifi_cc641a61e819_79647478_managed_psk
connmanctl> exit #Exit the terminal.
After successfully connecting, use the ifconfig command to view the IP address obtained by wlan0.
root@armsom:/# ping www.baidu.com
BT
1. View Bluetooth
root@armsom:/# hciconfig -a
hci0:   Type: Primary  Bus: USB
        BD Address: CC:64:1A:61:E9:B6  ACL MTU: 1021:6  SCO MTU: 255:12
        UP RUNNING
        RX bytes:824 acl:0 sco:0 events:63 errors:0
        TX bytes:2289 acl:0 sco:0 commands:63 errors:0
        Features: 0xff 0xff 0xff 0xfa 0xdb 0xbf 0x7b 0x87
        Packet type: DM1 DM3 DM5 DH1 DH3 DH5 HV1 HV2 HV3
        Link policy: RSWITCH HOLD SNIFF PARK
        Link mode: PERIPHERAL ACCEPT
        Name: 'BlueZ 5.77'
        Class: 0x000414
        Service Classes: Unspecified
        Device Class: Audio/Video, Loudspeaker
        HCI Version: 5.2 (0xb)  Revision: 0xddc8
        LMP Version: 5.2 (0xb)  Subversion: 0x1141
        Manufacturer: Realtek Semiconductor Corporation (93)
bluetoothctl
root@armsom:/# bluetoothctl
Enter the following command to connect
root@armsom:/# power on
root@armsom:/# agent on
root@armsom:/# default-agent
root@armsom:/# scan on
root@armsom:/# pair yourDeviceMAC
USB
USB storage
- First, insert the USB flash drive or USB portable hard drive into the USB interface of the CM1 Kit
- If you can see the output of sdX by executing the following command, it indicates that the USB drive recognition is successful
root@armsom:/# cat /proc/partitions | grep "sd*"
major minor  #blocks  name
   8        0  122880000 sda
- The mount command can be used to mount a USB drive to/mnt, and then the files on the USB drive can be viewed
root@armsom:/# sudo mount /dev/sda1 /mnt
- After mounting, you can use the
df - hcommand to view the capacity usage and mounting points of the USB flash drive
root@armsom:/mnt# df -h | grep "sd"
/dev/sda        4.7G  4.7G     0  100% /mnt
audio
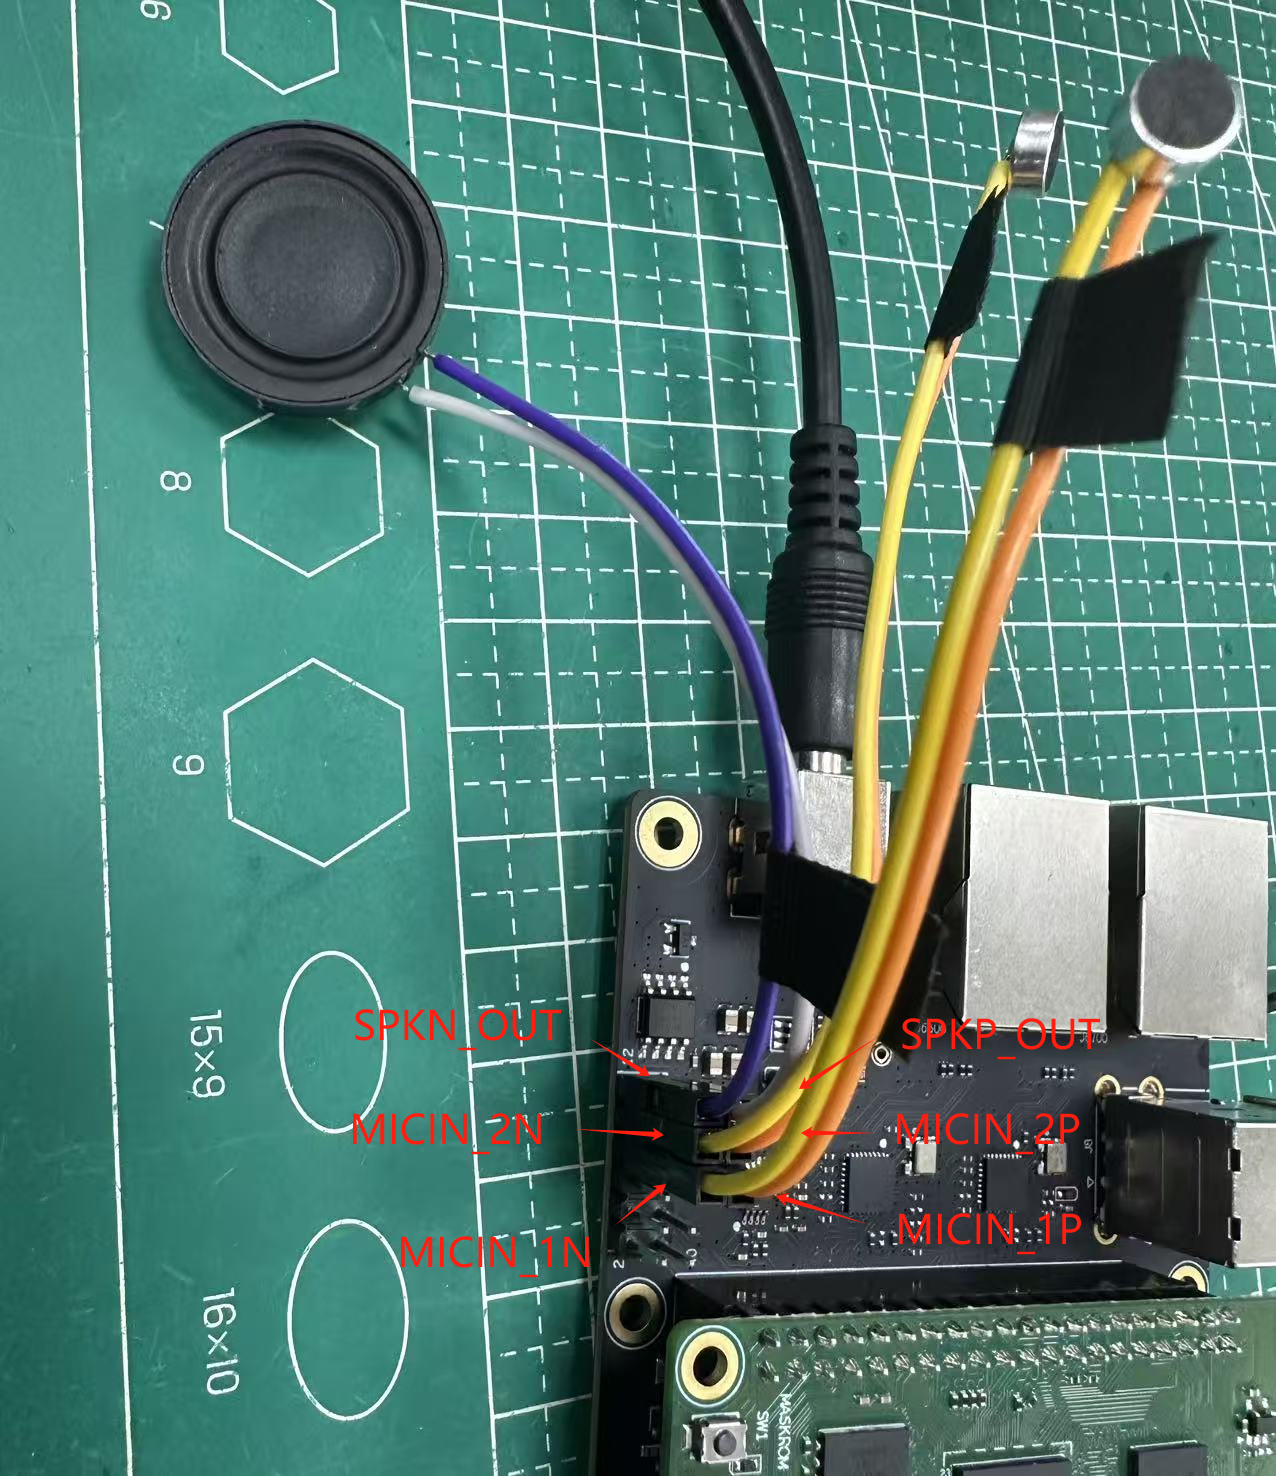 Check the sound card in the system.
root@armsom:/# aplay -l
**** List of PLAYBACK Hardware Devices ****
card 0: rockchiprk730 [rockchip-rk730], device 0: dailink-multicodecs HiFi-0 [dailink-multicodecs HiFi-0]
  Subdevices: 1/1
  Subdevice #0: subdevice #0
sound record
arecord -D hw:0,0 -f S16_LE -t wav -c2 -r 16000 -d 5 /userdata/t.wav
playback
aplay /userdata/t.wav
Purchase Samples
ArmSoM Official Website: https://www.armsom.org/product-page/cm5
ArmSoM Official AliExpress Store: https://aliexpress.com/item/3256807679122184.html
ArmSoM Official Taobao Store: https://item.taobao.com/item.htm?id=842137173767
For OEM & ODM, please contact: sales@armsom.org
Notes
- Before handling the device, please ensure you wear an anti-static wrist strap or take electrostatic discharge measures to prevent damage to the development board.
- Assembly should be performed in an electrostatic-safe environment, avoiding operations in dry and low-humidity conditions.
- When not in use, store the device in an anti-static bag and keep it in a suitably temperature-controlled, low-humidity environment to prevent static electricity buildup.
- When handling the device, avoid friction or collisions to prevent the generation of static electricity that could cause damage.
- When holding the device, try to avoid direct contact with the chips on the mainboard to prevent static damage.
- Do not plug or unplug wires or other devices while the device is operating to avoid damage from electrical surges.
- When connecting or disconnecting the GPIO/MIPI expansion interfaces, make sure to turn off the power and disconnect the power cable to prevent damage from electrical current.
Without effective cooling measures, the surface temperature of the main chip may exceed 60 degrees. When handling the device, please avoid direct contact with the SoC and surrounding power inductors to prevent burns. Ensure that the environment is well-ventilated during operation to prevent localized heat buildup, which could lead to overheating. Additionally, do not place the device in direct sunlight. It is recommended to choose between the official cooling fan, heat sink, or third-party cooling kits based on specific usage conditions to ensure optimal cooling performance.